Poulan BVM200LE User Manual - Page 7
Service, Storage, Need Assistance? - parts manual
 |
View all Poulan BVM200LE manuals
Add to My Manuals
Save this manual to your list of manuals |
Page 7 highlights
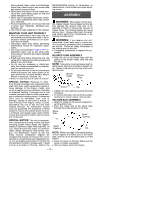
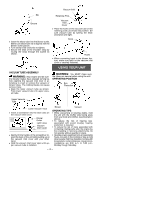
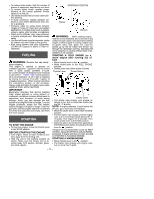
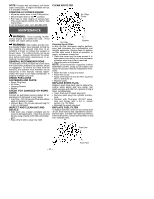
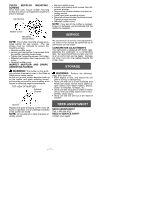
CHECK MUFFLER MOUNTING SCREWS Once each year, ensure muffler mounting screws are secure and tightened properly to prevent damage. Cap Screws Muffler Cover Mounting Screw Holes NOTE: The muffler mounting screws are located behind the cap screws. The cap screws must be removed to access the mounting screws. S Remove muffler cover. S Loosen and remove the 2 cap screws from the muffler mounting screw holes. S Tighten the 2 mounting screws (100 in/lbs). S Reinstall and tighten the 2 cap screws (100 in/lbs). S Reinstall muffler cover. INSPECT MUFFLER AND SPARK ARRESTING SCREEN WARNING: The muffler on this prod- uct contains chemicals known to the State of California to cause cancer. As the unit is used, carbon deposits build up on the muffler and spark arresting screen, and must be removed to avoid creating a fire hazard or affecting engine performance. TOP VIEW OF MUFFLER Exhaust Diverter S Remove muffler cover. S Loosen and remove both screws from the exhaust diverter. S Remove the exhaust diverter and spark ar- resting screen. S Install new spark arresting screen. S Reinstall exhaust diverter and both screws. Tighten screws securely. S Reinstall muffler cover. NOTE: If any part of the muffler is cracked, broken or damaged, we recommend that the muffler be replaced. SERVICE We recommend all service and adjustments not listed in this manual be performed by an authorized service dealer. CARBURETOR ADJUSTMENTS Your carburetor is equipped with limiter caps. Adjusting the carburetor is a complicated task. We recommend that you take your unit to an an authorized service dealer. Damage will occur if you turn the needles beyond the limiter stops. STORAGE WARNING: Perform the following steps after each use: S Allow engine to cool, and secure the unit before storing or transporting. S Store unit and fuel in a well ventilated area where fuel vapors cannot reach sparks or open flames from water heaters, electric motors or switches, furnaces, etc. S Store unit with all guards in place. Position unit so that any sharp object cannot accidentally cause injury. S Store unit and fuel well out of the reach of children. Screws Replace the spark arresting screen every 50 hours of operation or if any damage or breaks in the screen are noted. NOTE: Do not attempt to clean the spark arresting screen. NEED ASSISTANCE? NEED ASSISTANCE? Call: 1-800-554-6723. NEED A SERVICE PART? Contact your dealer. -- 7 --
-
 1
1 -
 2
2 -
 3
3 -
 4
4 -
 5
5 -
 6
6 -
 7
7 -
 8
8 -
 9
9
 |
 |
