Poulan P8527ESA User Manual - Page 7
Install Weight Bag See Fig. 10, Important, Check Tire Pressure, Install Chute Deflector Remote
 |
View all Poulan P8527ESA manuals
Add to My Manuals
Save this manual to your list of manuals |
Page 7 highlights
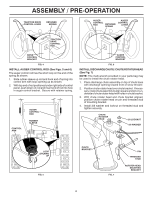
ASSEMBLY / PRE-OPERATION INSTALL CHUTE DEFLECTOR REMOTE CONTROL (See Figs. 8 and 9) 1. Install remote cable bracket to discharge chute with 5/16-18 carriage bolt, flat washer and 5/16-18 locknut as shown. Tighten securely. 2. Install remote cable eyelet to chute deflector with 1/4-20 shoulder bolt, nylon washer and 1/4-20 locknut as shown. Tighten securely. 3. Install spring hooks between hex nuts on chute rotater head and into hole in chute deflector as shown. CHUTE DEFLECTOR NYLON WASHER CABLE EYELET 1/4-20 LOCKNUT REMOTE CABLE BRACKET SPRING 1/4-20 SHOULDER BOLT HOOK BETWEEN HEX NUTS ON CHUTE ROTATER HEAD 5/16-18 CARRIAGE BOLT INSTALL WEIGHT BAG (See Fig. 10) Though seldom required, the weight bag will reduce the tendency of the auger housing to ride up on hard, icy drifts. Should conditions require it, install as follows: 1. Shut off engine and wait for all moving parts to stop. 2. Fill weight bag with desired amount of sand. 3. Place weight bag on top of auger housing with mount- ing clamp at front edge of auger housing as shown. 4. Insert weight bag between the auger housing and the bar of the mounting clamp as shown and secure with 5/16-18 x 1-1/2 capscrews. Tighten securely. IMPORTANT: Mount the weight bag in a location which does not cover the warning decals on top of the auger housing. MOUNTING BAR CLAMP WEIGHT BAG FLAT WASHER 5/16-18 LOCKNUT FIG. 8 CHUTE DEFLECTOR CONTROL LEVER FIG. 9 5/16-18 x 1-1/2 CAPSCREWS AUGER HOUSING FIG. 10 CHECK TIRE PRESSURE The tires on your snow thrower were overinflated at the factory for shipping purposes. Correct and equal tire pressure is important for best snow throwing performance. • Reduce tire pressure to 14-17 PSI. 7
-
 1
1 -
 2
2 -
 3
3 -
 4
4 -
 5
5 -
 6
6 -
 7
7 -
 8
8 -
 9
9 -
 10
10 -
 11
11 -
 12
12 -
13
-
14
-
15
-
16
-
17
-
18
-
19
-
20
-
21
-
22
-
23
-
24
-
25
-
26
-
27
-
28
-
29
-
30
-
31
-
32
 |
 |
