ProForm 7.0 Re Elliptical English Manual - Page 8
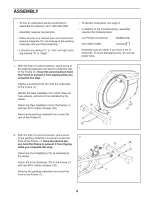
Tip: Avoid pinching the Pulse Wire 63. - power adapter
 |
View all ProForm 7.0 Re Elliptical manuals
Add to My Manuals
Save this manual to your list of manuals |
Page 8 highlights
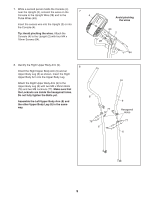
5. Identify the Left Pulse Bar (39), and orient it as shown. Slide a Pulse Bar Cover (20) onto the Left Pulse Bar (39). Make sure that the flat side of the Pulse Bar Cover is in the indicated position. Have a second person hold the Left Pulse Bar (39) near the Upright (2). Locate the wire tie in the left side of the Upright. Tie the wire tie to the Pulse Wire (63) in the Left Pulse Bar. Then, pull the upper end of the wire tie until the Pulse Wire is routed through the Upright. Tip: Avoid pinching the Pulse Wire (63). Attach the Left Pulse Bar (39) to the Upright (2) with two M8 x 35mm Bolts (76) and two M8 Locknuts (77). Make sure that the Locknuts are in the hexagonal holes. Slide the Pulse Bar Cover (20) against the Upright (2). Repeat this step for the Right Pulse Bar (21). 5 39 Flat Side 76 Wire 20 Tie 63 Hexagonal Holes 77 2 63 20 21 Avoid pinching the Pulse Wires (63) 6. The Console (4) can use four D batteries (not included); alkaline batteries are recommended. 6 Do not use old and new batteries together or alkaline, standard, and rechargeable batter- ies together. IMPORTANT: If the Console has been exposed to cold temperatures, allow it to warm to room temperature before inserting batteries. Otherwise, you may damage the console displays or other electronic com- ponents. Remove the battery covers from the back of the Console, and insert batteries into the battery compartments. Make sure to orient the batteries as shown by the diagrams inside the battery compartments. Then, reattach the battery covers. To purchase an optional power adapter, call the telephone number on the cover of this manual. To avoid damaging the console, use only a manufacturer-supplied power adapter. Plug one end of the power adapter into the receptacle inside the battery compartment on the console; plug the other end into an outlet installed in accordance with all local codes and ordinances. Battery Cover 4 Battery Cover Receptacle 8
-
 1
1 -
2
-
 3
3 -
 4
4 -
 5
5 -
 6
6 -
 7
7 -
 8
8 -
 9
9 -
 10
10 -
 11
11 -
 12
12 -
 13
13 -
14
-
15
-
16
-
17
-
18
-
19
-
20
-
21
-
22
-
23
-
24
-
25
-
26
-
27
-
28
 |
 |
