ProForm 745 Ekg Instruction Manual - Page 7
How To Use Programs Directly
 |
View all ProForm 745 Ekg manuals
Add to My Manuals
Save this manual to your list of manuals |
Page 7 highlights
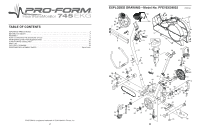
HOW TO USE PROGRAMS DIRECTLY FROM OUR WEB SITE Our Web site at www.iFIT.com allows you to play iFIT.com programs directly from the internet. To use programs from our Web site, the exercise cycle must be connected to your home computer. See HOW TO CONNECT YOUR COMPUTER on page 15. In addition, you must have an internet connection and an internet service provider. A list of specific system requirements will be found on our Web site. Follow the steps below to use a program from our Web site. 1 Turn on the console. See step 1 on page 11. 2 Select the iFIT.com mode. Each time the console is turned on, the manual mode will be selected. To select the iFIT.com mode, press the iFIT.com button. The indicator near the button will light and the letters IF will appear in the small display. 3 Go to your computer and start an internet connection. 4 Start your Web browser, if necessary, and go to our Web site at www.iFIT.com. 5 Follow the desired links on our Web site to select a program. 6 Follow the on-line instructions to start the program. When you start the program, an on-screen countdown will begin. 7 Return to the exercise cycle and begin pedaling. When the on-screen countdown ends, the program will begin. The program will function in almost the same way as a Smart program (see step 3 on page 13). However, an electronic "chirping" sound will alert you when the resistance level and/or the target pace is about to change. 8 Follow your progress with the large display. See step 4 on page 11. 9 Measure your heart rate if desired. See step 5 on page 12. 10 When you are finished exercising, the console will automatically turn off. See step 7 on page 12. 18 5. Slide the two slots in the Handlebar Clamp (49) onto the 5 two indicated tabs on the Upright (13). Lift the bottom of the Handlebar Clamp away from the Upright, and insert the Handlebar (15) between the Handlebar Clamp and the Upright. Centre the Handlebar and rotate it to the desired position. Slide an M8 Washer (67) onto the Adjustment Handle (53). Insert the Adjustment Handle into the Handlebar Clamp (49) and tighten the Adjustment Handle into the Upright (13). Note: The Adjustment Handle works like a spanner. Turn the Handle clockwise, pull it away from the Upright, turn it counterclockwise, push it toward the upright, and then turn it clockwise again. 6. Hold the Console (16) near the Upright (13). Connect the console wire to the Upper Wire Harness (36). Insert the excess wire into the Upright. Attach the Console (16) to the Upright (13) with four M4 x 16mm Screws (66). Be careful to avoid pinching the wires. 6 66 66 15 13 Tabs 49 67 53 16 Console 36 Wire 13 7. Turn the indicated Adjustment Knob (28) counterclockwise two or three turns to loosen it. Next, pull the Knob, 7 insert the Seat Post (5) into the Frame (1), and then release the Knob. Move the Seat Post up and down slightly until the pin on the Knob snaps into one of the holes in the Seat Post. Then, turn the Knob clock- wise until it is tight. 5 1 28 8. Attach the Seat (12) to the Seat Bracket (6) with four 8 M8 Nylon Locknuts (10) and four M8 Split Washers (64). Note: The Nylon Locknuts and the Split Washers may be pre-attached to the underside of the Seat. Turn the Adjustment Knob (28 counterclockwise two or three turns to loosen it. Next, pull the Knob, slide the Seat Bracket (6) into the top of the Seat Post (5), and then release the Knob. Move the Seat Bracket forward and backward slightly until the pin on the Knob snaps into one of the holes in the Seat Bracket. Then, turn the Knob clockwise until it is tight. Note: If desired, you can attach your own seat to the exercise cycle using the Adapter Bracket (not shown) in place of the Seat (12) and the Seat Bracket. 7 12 64 6 28 10 64 10 5
-
 1
1 -
 2
2 -
 3
3 -
 4
4 -
 5
5 -
 6
6 -
 7
7 -
 8
8 -
 9
9 -
 10
10 -
 11
11 -
 12
12
 |
 |
