ProForm 900w/3 Accessories English Manual - Page 12
How To Use The Manual Mode
 |
View all ProForm 900w/3 Accessories manuals
Add to My Manuals
Save this manual to your list of manuals |
Page 12 highlights
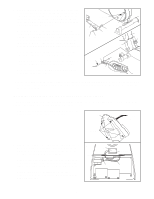
HOW TO USE THE MANUAL MODE 1 Turn on the console. Note: The console requires four "D" batteries (not included). If you have not installed batteries, refer to step 5 on page 6 and install batteries. To turn on the console, press the On/Reset button or begin pedaling. 2 Select the manual mode. Each time the console is turned on, the This corner should be blank manual mode will be select- ed. If a Smart program, a Heart Rate pro- gram, or the iFIT.com mode has been selected, select the manual mode by pressing the Program button repeatedly until the upper right corner of the display is blank. 3 Begin exercising and adjust the resistance of the elliptical crosstrainer. As you exercise, adjust the resistance of the elliptical crosstrainer as desired by pressing the + and - buttons. There are ten resistance levels; level 10 is the most challenging. Note: After the buttons are pressed, it will take a few seconds for the selected setting to be reached. 4 Follow your progress with the feedback modes and the left bar graph. When the console is turned on, the scan mode will be selected. As you exercise, the display will show your current speed, the elapsed time, the distance that you have pedaled, the current resistance level, the approximate number of calories you have burned, and your power output in watts. In addition, your heart rate will be shown when you use the handgrip pulse sensor (refer to step 5 on this page) or the optional chest pulse sensor (refer to page 19). Note: Each time the resistance level changes, the console will show the resistance level for six seconds. In addition, when a Smart program or a Heart Rate program is selected, the display will show the time remaining in the program instead of the elapsed time. In addition, the left bar graph will appear in the display to show your exercise pace. As you increase or decrease your pace, additional bars will appear or disappear on the bar graph. If desired, you can select a single feedback mode for continuous display. Press the Display Mode button repeatedly until only the MPH (or Km/H), Time, Miles (or Kms), Resist., Cals., or Watts indicator appears in the display. Make sure that the Scan indicator does not appear. 5 Measure your heart rate if desired. Note: If you wear the optional chest pulse sensor (see page 19) and hold the handgrip pulse sensor at the same time, the console may not display your heart rate accurately. If there are thin sheets of plastic on the metal Metal Contacts contacts on the handgrip pulse sensor, peel off the plastic. To use the handgrip pulse sensor, place your hands on the metal contacts. Your palms must be on the upper contacts and your fingers must be touching the lower contacts. Avoid moving your hands. When your pulse is detected, the heart-shaped indicator in the dis- play will flash each time your heart beats. After a moment, two dashes (- -) will appear and then your heart rate will be shown. For the most accurate heart rate reading, continue to hold the handgrips for about 15 seconds. Note: When you first hold the handgrips, the display will show your heart rate continuously for 15 seconds. The display will then show your heart rate along with the other feedback modes. 6 When you are finished exercising, the console will automatically turn off. If the pedals are not moved and the console buttons are not pressed for a few minutes, the console will automatically turn off to conserve the batteries. 12
-
 1
1 -
2
-
3
-
4
-
5
-
6
-
 7
7 -
 8
8 -
 9
9 -
 10
10 -
 11
11 -
 12
12 -
 13
13 -
 14
14 -
 15
15 -
 16
16 -
 17
17 -
18
-
19
-
20
-
21
-
22
-
23
-
24
 |
 |
