ProForm Club Sx2 English Manual - Page 4
Assembly
 |
View all ProForm Club Sx2 manuals
Add to My Manuals
Save this manual to your list of manuals |
Page 4 highlights
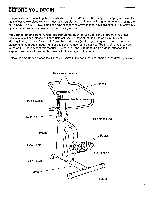
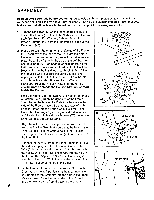
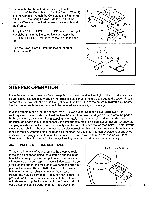
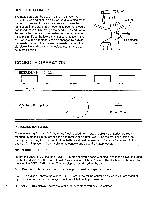
ASSEMBLY Read all steps carefully before beginning. Assembly can be completed using two adjustable wrenches and a phillips screwdriver (not included). The help of a second person is recommended. Make sure that all parts are included before disposing of the packing materials. 1. Turn the Stabilizer (46) so the indented bolt holes are toward the Frame (6). Attach the Stabilizer with the two 1 Stabilizer Bolts (47), Washers (45) and Nuts (44). Press a Bumper (48) onto the underside of each Lower Pedal Arm (40). .1 40 48 2. Place a Friction Plate (56) on the left side of the Frame (6). Insert two of the tabs of the Plate into the slots in the side of the Frame. Apply grease to a Nylon Washer (42). Place the Washer in the side of the Left Handlebar Housing (53). (See page 3 for help identifying the Left Handlebar, if necessary.) Hold the Left Handlebar Housing inside the left Handlebar Bracket (76). Slide the Housing Cap (52) onto the Long Bolt (51) and apply grease to the Bolt. Insert the Bolt from the left through the Handlebar Bracket, Nylon Washer, Handlebar Housing, Friction Plate and Frame. Be careful not to damage the Sensor Wire (not shown) inside the Frame. Hold the Frame Cap (55) against the Frame (6). Place a Friction Plate (56) on the right side of the Frame. Insert two of the tabs of the Plate into the slots in the side of the Frame. Insert the other two tabs of both Friction Plates into the Frame Cap. Hold the Right Handlebar Housing (75) and a greased Nylon Washer (42) inside the right Handlebar Bracket (76). Insert the Long Bolt (51) through all parts. 45 46 2 55 53 11 52 1 76 6 47 676 25 42 75 56 3 12 Yellow Wire Align the notch in the Housing Cap (52) with the left Housing Bracket (76). Make sure that the head of the Long Bolt (51) is in the square hole in the Housing Cap. Tighten the Resistance Dial (25) onto the end of the Long Bolt. 3. Connect the Wire (7) from the Right Handlebar (11) to the indicated plug with the blue wire. Connect the Wire (7) from the Left Handlebar (12) to the plug with the yellow wire. Insert all excess wire into the hole in the Frame (6). Apply the "ARC" decal to the Right Handlebar Housing (75) in the indicated location. The "+" arrow must be at the top of the decal. 11 Decal 75 7 Blue Wire 6 4 Split Portion 7 4. Fit the Grommet (54) around the Wires (7). Turn the Grommet so the split portion is at the top. Insert the split portion of the Grommet into the hole in the Frame (6) as shown. Press the remainder of the Grommet 6 54 into the hole, working from the top to the bottom. 4
-
 1
1 -
 2
2 -
 3
3 -
 4
4 -
 5
5 -
 6
6 -
 7
7 -
 8
8 -
 9
9 -
 10
10 -
11
-
12
 |
 |
