ProForm Ers 10.0 Pt English Manual - Page 4
treadmill.
 |
View all ProForm Ers 10.0 Pt manuals
Add to My Manuals
Save this manual to your list of manuals |
Page 4 highlights
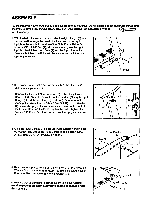
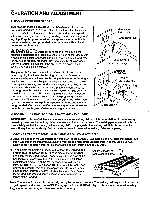
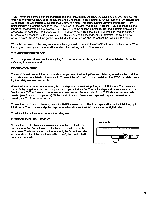
ASSEMBLY Set the treadmill in a cleared area and remove all packing materials. Do not dispose of the packing materials until assembly is completed. TOOLS REQUIRED FOR ASSEMBLY: An adjustable wrench (not Included). 1. With the help of a second person, raise the right Upright (3) to a vertical position. Align the hole in the lower end of the right Upright with the hole in the side of the Right Frame Rail (47). Insert a 3/4' x 41/2" Bolt (2), with a Washer (1), into the right Upright. Hand tighten both Bolts (2) into the Right Frame Rail. Do not fully tighten the Bolts yet. Repeat the step with the Left Upright (not shown). 3 1 Tighten 47 2. It is recommended that a second person hold the Handrail (5) while you complete step 2. Connect the Handrail Wire Harness (13) to the Upright Wire Harness (30). Slide the brackets on the Handrail (5) into the right Upright (3) and the left Upright (not shown). Be careful not to damage the wires. Insert a 3/8" x 1 1/4' Bolt (7), with a Washer (1), into each Upright. It may be necessary to raise the front of the Handrail to insert the Bolts. Tighten the Bolts. Tighten the 3/4" x 4 1/2" Bolts (2) in the lower ends of the Uprights (see step 1). 2 30 1 7 5 13 3 3 30 3. Slide the metal Clothes Clip onto the Pulse Earclip in the indicated location. The use of the Pulse Earclip is explained in OPERATING THE MONITOR MODES on page 9. 3 Pulse Earclip Clothes Clip 4. Remove the paper backing from the Wrench Clip (84). Press the Wrench Clip onto the Right Endcap (78) in the indicated location. 4 Press the Allen Wrench (83) into the Wrench Clip. Make sure that all parts are tightened before using the treadmill. Note: To protect the floor, a covering should be placed under the treadmill. m 0 78
-
 1
1 -
 2
2 -
 3
3 -
 4
4 -
 5
5 -
 6
6 -
 7
7 -
 8
8 -
 9
9 -
 10
10 -
11
-
12
-
13
-
14
-
15
-
16
 |
 |