ProForm Gl50 Bike English Manual - Page 7
How To Operate The Recumbent Cycle
 |
View all ProForm Gl50 Bike manuals
Add to My Manuals
Save this manual to your list of manuals |
Page 7 highlights
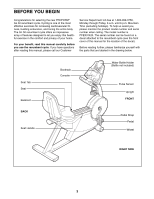
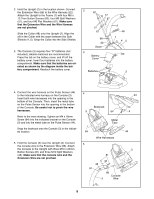
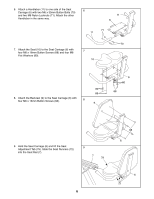
10. Slide the Seat Carriage (6) to the position shown. Slide the Seat Rail Cover (84) into the slot in the 10 Seat Rail (7). The beveled end of the Seat Rail Cover should be flush with the end of the Seat Rail. Attach a Seat Stop (77) and the Seat Rail Cover to the Seat Rail with an M4 x 16mm Screw (64). Press the Seat Rail Endcap (13) into the end of the Seat Rail (7). 11. Identify the Left Pedal (69) (there is an "L" on the Left Pedal for identification). Using an adjustable wrench, firmly tighten the Left Pedal counterclockwise into the Left Crank Arm (51). Tighten the Right Pedal (not shown) clockwise into the Right Crank Arm (not shown). Tighten both Pedals as firmly as possible. Important: After using the recumbent cycle for one week, retighten the Pedals. For best performance, the Pedals must be kept properly tightened. Adjust the Left Pedal Strap (21) to the desired position, and press the end of the Pedal Strap onto the tab on the side of the Left Pedal (69). Adjust the Right Pedal Strap (not shown) in the same way. 11 21 Tab 69 6 64 77 7 13 84 Slot 51 12. Make sure that all parts are tightened before you use the recumbent cycle. Place a mat beneath the recumbent cycle to protect the floor. HOW TO OPERATE THE RECUMBENT CYCLE HOW TO ADJUST THE POSITION OF THE SEAT For effective exercise, the seat should be in the proper position. As you pedal, there should be a slight bend in your knees when the pedals are at the point farthest from you. To adjust the seat, lift the seat tab in front of the seat, slide the seat to the desired position, and then release the seat tab. Important: After you adjust the seat, make sure that your knees will not hit the handgrip pulse sensor when you pedal. Seat Seat Tab 7
-
 1
1 -
 2
2 -
 3
3 -
 4
4 -
 5
5 -
 6
6 -
 7
7 -
 8
8 -
 9
9 -
 10
10 -
 11
11 -
 12
12 -
13
-
14
-
15
-
16
-
17
-
18
-
19
-
20
 |
 |
