ProForm R 350 Instruction Manual - Page 7
Your machine is now ready for use.
 |
View all ProForm R 350 manuals
Add to My Manuals
Save this manual to your list of manuals |
Page 7 highlights
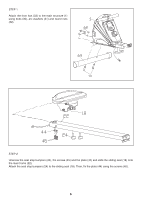
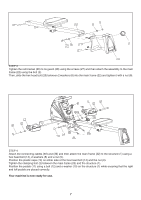
STEP 3 Tighten the rail bracket (29) to its guard (28) using the screws (27) and then attach the assembly to the main frame (22) using the bolt (2). Then, slide the hex head bolt (25) between 2 washers (8) into the main frame (22) and tighten it with a nut (9). STEP 4 Attach the connecting cables (46) and (36) and then attach the main frame (22) to the structure (1) using a hex head bolt (14), 2 washers (8) and a nut (9). Position the plastic caps (70) on either side of the hex head bolt (14) and the nut (9). Tighten the clamping bolt (2) between the main frame (22) and the structure (1). Position the pedals (11) using a bolt (12) and a washer (10) on the structure (1) while ensuring that the right and left pedals are placed correctly. Your machine is now ready for use. 7
-
 1
1 -
 2
2 -
 3
3 -
 4
4 -
 5
5 -
 6
6 -
 7
7 -
 8
8 -
 9
9 -
 10
10 -
 11
11 -
 12
12 -
13
-
14
-
15
-
16
 |
 |
