Pyle AZPLCM4340 User Manual - Page 4
Reverse Signal Sense, yellow, white, Mirror Assembly Mounting, Mirror Assembly Button Controls
 |
View all Pyle AZPLCM4340 manuals
Add to My Manuals
Save this manual to your list of manuals |
Page 4 highlights
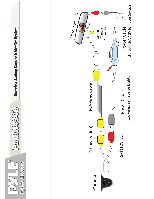
The white video input connector from the rearview mirror assembly serves as the Reverse Signal Sense and takes priority over the yellow video input connector. If you connect the camera to the yellow video input of the mirror assembly, there will be a constant picture displayed on the LCD display. If you connect the camera to the white video input of the mirror assembly, there will be a picture displayed on the LCD display only when the vehicle is placed in reverse gear. Mirror Assembly Mounting The rearview mirror assembly mounts over your existing rearview mirror housing. The spring‐type clamp mechanism easily fits over your rearview mirror and sits on top of it, without causing any damage. Use two hands to firmly hold the new mirror assembly over your existing mirror, with one hand holding the mirror, and the other expanding the spring‐type clamp mechanism. Mirror Assembly Button Controls Located in the back of the rearview mirror assembly are button controls. The top and bottom buttons serve as settings adjustment controls (UP/DOWN), while the center button can be pressed to access settings like: brightness, contrast, saturation, tint, mode (16:9, 4:3), language and settings RESET. ‐ Determine the best location for the camera (Keep in mind that you must run the cable from the camera to the transmitter). You may need to drill a small hole in the panel near your license plate (The camera is preferably mounted just above the license plate). ‐ Be sure when running the connection cables to leave a small amount of slack so you can still move the camera around the license plate, if you decide to slightly adjust the camera's positioning at a later time. ‐ Test the camera, activate your vehicle and see if the system functions. Your connected monitor will automatically power on if properly connected to a power source. Placing your vehicle in reverse should provide a picture (if connected through the white video input of the mirror assembly.
-
 1
1 -
 2
2 -
 3
3 -
 4
4 -
 5
5
 |
 |
