Pyle EUPDIC56 User Guide - Page 1

Pyle EUPDIC56 Manual

Page 1 highlights

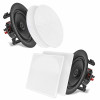
IN-CEILING SPEAKER INSTALLATION MANUAL www.pyleaudio.com TECHNICAL PARAMETERS p p p p pḤḤ p p p p pḤḤ p p p p pḤḤ p p p p pḤḤ -2- INSTALLATION The in-wall/in-ceiling speakers were designed to be easily installed.However,if you are unsure of your ability to properly install these loudspeakers please contact your dealer or a quali fied installer. TOOLS NEEDED Pencil Phillips #2 screwdriver Measuring tape Utility knife Carpenter's level Awl TROUBLESHOOTING IF THERE IS NO SOUND FROM ANY OF THE SPEAKERS: Check that receiver/amplifier is on and a source is playing. Check all wires and connections between receiver/amplifier and speakers.Make sure all wires are connected.Make sure none of the speaker wires are frayed,cut,punctured or tounching each other. Review proper proper operation of your receiver/amplifier. IF THERE IS NO SOUND COMING FROM ONE SPEAKERS: Check the"Balance"control on your receiver/amplifier. Check allwires and connections between receiver/amplifier and speakers.Make sure all wires are connected.Make sure none of the speaker wires are frayed,cut,punctured or tpunching each other. IF THERE IS LOW(OR NO)BASS OUTPUT: Make sure the connections to the left and right"speaker Inputs"have the correct polarity(+ and -). Consider adding a powered subwoofer to your system. In Dolby Digital or DTS modes,make sure your receiver/processor is corectly configured.When using a subwoofer, make sure thesubwoofer output of the receiver/processor has been enabled.If no subwoofer is being used, make sure the left and right front and rear speakers have been configured as"LARGE"See your receiver/processor's owner's manual for futher information on correct speaker configuration in Dolby Digital,DTS and other surround sound modes. IF THE SYSTEM PLAYS AT LOW VOLUMES BUT SHUTS OFF AS VOLUME IS INCREASED: Check all wires and connections between receiver/amplifier and speakers.Make sure all wires are connected.Make sure none of the speaker wires are frayed,cut,punctured or touching each other. If more than one pair of main speakers is being used,check the minimum-impedance requirements of your receiver/amplifier. -3- Thank you for purchasing this PYLE in-wall/in-ceiling speaker system.It is a state-of-the-art product carefully designed and manufactured for your installation needs,and has been thoroughly tested to ensure consistent and reliable performance. If you have any question about the installation or operation of your PYLE in-wall/in-ceiling speaker system which are not answered by this manual,contact your dealer immediately. INCLUDED IN-CEILING SPEAKERS One pair of speakers with grilles. One pc of speakers with grills for PDIC56/PDIC66/PDIC86/PDIC106 srtips of adhesive SPEAKER PLACEMNT FRONT SPEAKERS WALL 40 0 60 0 M4x60mm 4pcs Screws Template -4- REAR SPEAKERS WALL WALL WALL 5-6FT WALL IN-CEILING Proper placement of the speakers is an imporant step in obtaining the most realistic soundstage possible.These recommendations are for the optimum placement of the londspeakers.Use these placement recommendations as a guide. Slight variations will not diminish your listening pleasure.The front speakers should be placed the same di-stance from each other as they are from the listening position.They should be placed at about the same height from the floor as the liste- ner's ears will be,with the tweeters aimed toward the listener at ear-level height.In a home theater configuration,the two surround,speakers should be placed slightly behind the listening position and ideally should face each other and be at a level higher than the listener's ears.If that is not possible,they may be placed in a wall(or in the ceiling)behind the listening position,facing forword.The surround speakers should not call attention to themselves.They should provide a diffuse,ambient sound accompanying the main program material heard in the front speakers. In Dolby*Digital and DTS systems,aim the tweeters toward the listening position at ear-level height. SPEAKER CONNECTIONS CONNECTION TIPS LEFT RIGHT LEFT RIGHT Front or Rear Speaker Outputs The wires for both speakers should be the same length.If one speaker is placed closer to the amplifer than the other, hide the excess wire behid the wall.Speakers and electronics terminals have corresponding(+)and(-)terminals. We use red to denote the(+)terminal and black for the(-)terminal.It is important to connect both speakers identically:(+)on the speaker to(+)on the amplifier and(-)on the speaker to(-) on the amplifier.Wireing"out of phase" results in thin sound, weak bass and a poor stereo image.With the advent of multichannel surround sound systems,connecting all of the speakers in your system with the correct polarity remains equally important in order to preserve the proper ambience and directionality of the program material. -5- EXISTING CONSTRUCTION IN-CEILING SPEAKERS Cut the drywall. Note:Always allow at least one-half inch between a wall stud and the speaker cutout or the locking tabs will not be able to swivel into place. Connect the speaker wires to the speaker. Screw down each of the four Phillips head screws.The locking tabs will swivel into place and secure the unit to the rear surface of the drywall. Put in the strips of adhesive to secure the grille. Replace the metal grille. Complete. -6- 1600-63rd Street Brooklyn,NY 11204 USA

  • 1

IN-CEILING SPEAKER
INSTALLATION MANUAL
www.pyleaudio.com
INSTALLATION
TECHNICAL PARAMETERS
TROUBLESHOOTING
IF THERE IS NO SOUND FROM ANY OF THE SPEAKERS:
IF THERE IS NO SOUND COMING FROM ONE SPEAKERS:
IF THERE IS LOW(OR NO)BASS OUTPUT:
IF THE SYSTEM PLAYS AT LOW VOLUMES BUT SHUTS OFF AS VOLUME IS INCREASED:
TOOLS NEEDED
The in-wall/in-ceiling speakers
were designed to be easily
installed.However,if you are
unsure of your ability to prop-
erly install these loudspeakers
please contact your dealer or a
quali fied installer.
Pencil
Phillips #2 screwdriver
Measuring tape
Utility knife
Carpenter’s level
Awl
Check that receiver/amplifier is on and a source is playing.
Check all wires and connections between receiver/amplifier and speakers.Make sure all wires are connected.Make
sure none of the speaker wires are frayed,cut,punctured or tounching each other.
Review proper proper operation of your receiver/amplifier.
Check the“Balance”control on your receiver/amplifier.
Check allwires and connections between receiver/amplifier and speakers.Make sure all wires are connected.Make
sure none of the speaker wires are frayed,cut,punctured or tpunching each other.
Make sure the connections to the left and right“speaker Inputs”have the correct polarity(+ and -).
Consider adding a powered subwoofer to your system.
In Dolby Digital or DTS modes,make sure your receiver/processor is corectly configured.When using a subwoofer,
make sure thesubwoofer output of the receiver/processor has been enabled.If no subwoofer is being used,
make sure the left and right front and rear speakers have been configured as“LARGE”See your receiver/processor’s
owner’s manual for futher information on correct speaker configuration in Dolby Digital,DTS and other surround sound
modes.
Check all wires and connections between receiver/amplifier and speakers.Make sure all wires are connected.Make
sure none of the speaker wires are frayed,cut,punctured or touching each other.
If more than one pair of main speakers is being used,check the minimum-impedance requirements of your
receiver/amplifier.
Thank you for purchasing this PYLE in-wall/in-ceiling speaker system.It is a
state-of-the-art product carefully designed and manufactured for your installation
needs,and has been thoroughly tested to ensure consistent and reliable perfor-
mance.
If you have any question about the installation or operation of your PYLE
in-wall/in-ceiling speaker system which are not answered by this manual,contact
your dealer immediately.
INCLUDED
SPEAKER CONNECTIONS
REAR SPEAKERS
IN-CEILING
CONNECTION TIPS
SPEAKER PLACEMNT
IN-CEILING SPEAKERS
EXISTING CONSTRUCTION
IN-CEILING SPEAKERS
FRONT SPEAKERS
srtips of
adhesive
Screws
Template
One pair of speakers with grilles.
One pc of speakers with grills
for PDIC56/PDIC66/PDIC86/PDIC106
M4x60mm
4pcs
40
60
WALL
5-6FT
WALL
WALL
WALL
LEFT
RIGHT
LEFT
RIGHT
Front or Rear Speaker Outputs
Proper placement of the speakers is an imporant step in obtaining
the most realistic soundstage possible.These recommendations are
for the optimum placement of the londspeakers.Use these placement
recommendations as a guide. Slight variations will not diminish your
listening pleasure.The front speakers should be placed the same di--
stance from each other as they are from the listening position.They
should be placed at about the same height from the floor as the liste-
ner’s ears will be,with the tweeters aimed toward the listener at ear-level height.In a home theater configu-
ration,the two surround,speakers should be placed slightly behind the listening position and ideally should
face each other and be at a level higher than the listener’s ears.If that is not possible,they may be placed in
a wall(or in the ceiling)behind the listening position,facing forword.The surround speakers should not call
attention to themselves.They should provide a diffuse,ambient sound accompanying the main program mat-
erial heard in the front speakers. In Dolby*Digital and DTS systems,aim the tweeters toward the listening
position at ear-level height.
The wires for both speakers
should be the same length.If
one speaker is placed closer to
the amplifer than the other,
hide the excess wire behid
the wall.Speakers and elec-
tronics terminals have corre-
sponding(+)and(-)terminals.
We use red to denote the(+)termi-
nal and black for the(-)termi-
nal.It is important to connect
both speakers identically:(+)on
the speaker to(+)on the ampli-
fier and(-)on the speaker to(-)
on the amplifier.Wireing
out
of phase” results in thin sound,
weak bass and a poor stereo
image.With the advent of multi-
channel surround sound
systems,connecting all of the
speakers in your system with
the correct polarity remains
equally important in order to
preserve the proper ambience
and directionality of the
program material.
5.25" 2-W
ay Ceiling SpeakerSystem
PD IC 56
PD IC 66
PD IC 86
PD IC 106
4
5
/
3
10
/
3
10
/
3
10
/
6.5" 2- W
ay Ceiling SpeakerSystem
*Black PP Cone W
ith RubberEdge
*1/2" Titanium
Dom
e Tw
eeterIn Sw
ivelM ount
*Pow
er:200 W
atts Rated Peak
*Frequency Response:60H
Z-20KHZ
*Im
pedance:8 O
hm s
*Sensitivity:89 dB
*w
ith Electronic C rossoverN
etw ork
*Supplied W
ith Round G
rilles A nd Square G
rilles
*Size:Round / Square G
rilles:9
”/9
”*9
*CutoutSize:8”
*M
ounting Depth:3”
1
2
/
1
2
/
1
2
/
8" 2- W
ay Ceiling SpeakerSystem
*Black PP Cone W
ith RubberEdge
*1/2" Titanium
Dom
e Tw
eeterIn Sw
ivelM ount
*Pow
er:250 W
atts Rated Peak
*Frequency Response:40H
Z-20KHZ
*Im
pedance:8 O
hm s
*Sensitivity:89 dB
*w
ith Electronic C rossoverN
etw ork
*Supplied W
ith Round G
rilles A nd Square G
rilles
*Size:Round / Square G
rilles:11
”/11
”*11
*CutoutSize:9
*M
ounting Depth:3
2
5
/
1
5
/
1
2
/
1
5
/
1
5
/
10" 2- W
ay Ceiling SpeakerSystem
*Black PP Cone W
ith RubberEdge
*1/2" Titanium
Dom
e Tw
eeterIn Sw
ivelM ount
*Pow
er:300 W
atts Rated Peak
*Frequency Response:35H
Z-20KHZ
*Im
pedance:8 O
hm s
*Sensitivity:89 dB
*w
ith Electronic C rossoverN
etw ork
*Supplied W
ith Round G
rilles A nd Square G
rilles
*Size:Round / Square G
rilles:12
”/12
”*12
*C utoutSize:10
*M
ounting Depth:3
4
5
/
4
5
/
1
2
/
4
5
/
4
5
/
This productgets the patentofinnovation ofthe structure,easy for
installation.
U
se new
environm
entalprotection A BS m
aterial,w
ith longerservice life,noteasy to change color.
Cut the drywall.
Note:Always allow at least
one-half inch between a wall
stud and the speaker cutout or
the locking tabs will not be able
to swivel into place.
Connect the speaker wires to
the speaker.
Replace the metal grille.
Complete.
Screw down each of the four
Phillips head screws.The
locking tabs will swivel into
place and secure the unit to
the rear surface of the drywall.
Put in the strips of adhesive to
secure the grille.
-2-
-3-
-4-
-5-
-6-
1600-63rd Street
Brooklyn,NY 11204 USA