Pyle HURFS38R Instruction Manual - Page 8
Scooter Assembly
 |
View all Pyle HURFS38R manuals
Add to My Manuals
Save this manual to your list of manuals |
Page 8 highlights
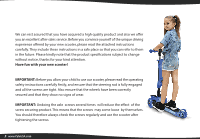
SCOOTER ASSEMBLY WARNING: Keep the kids in a safe distance while assembling the scooter to avoid accidental injuries. A Push Red Button (M), Handlebar B M T S (T), Fixing Sleeve (S), as shown in Figure A. H Scooter Hole (H), as shown in Figure B. C Press Red Push Button (M). Insert D the Handlebar (T) with the at side backwards in Scooter Hole (H), as shown in Figure C. Until you hear "click" sound to ensure HandIebar (T) securely locked in Scooter Body. E Height Adjustable T-Bar handlebar F with 3 heights to accompany child's development, as shown in Figure E. Pull the Fixing Sleeve downward to strengthen stability of the Handlebar (T) and Scooter Body, as shown in Figure D. Finish the Scooter Assembly and adjust Height as shown in Figure F. www.PyleUSA.com 8
-
 1
1 -
2
-
 3
3 -
 4
4 -
 5
5 -
 6
6 -
 7
7 -
 8
8 -
 9
9 -
 10
10 -
 11
11 -
 12
12 -
 13
13 -
14
-
15
-
16
-
17
-
18
 |
 |
