Pyle PCMX260MB PCMX260MB Manual 1 - Page 3
Diagram, Parts, Description
 |
View all Pyle PCMX260MB manuals
Add to My Manuals
Save this manual to your list of manuals |
Page 3 highlights
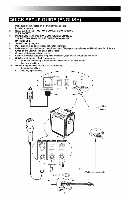
DIAGRAM AND PARTS DESCRIPTION 1. Microphone 1 Balanced cN SEEMCNa Input with Gain Control a USB (114" and XLR): This jack can either take a 'A" balanced or a XLR balanced cable. An XLR Cable is included with the MIC 1IN 1.110. I P.Ti INEJMIC 2 IN LJNIL041 LEVEL 4, Ft CD/TAPE IN LEVEL So TREDLE 0 ISAnD DrearrAc P4 Alveft a OOOOOOOOO mioroit ve W ni 'Arse POMO SASS MASTER Vol 0 0 microphone. 2. Instrument/Microphone 2 o to •01 0 Input with Gain Control (114"): This mono input accepts a 'A" input such as a microphone, guitar, or other musical instrument. 3. CD/TAPE /Auxuliary input with Gain Control (Stereo RCA): This knob controls the level of the RCA input. This stereo RCA input can eFIARGIE I I ot4 144.120V F, 1 Orr no- 40V aMKt MgoUaNtsI.' laSid MIER O a aj, 0 3 0 2 0 LI K Ol) rFII 'L. I a„ LOW SO O SYSTEM BAT EBY LEVEL be used to connect a CD, MP3, or other audio source. To connect to a portable device with a 1/8" headphone jack, you need a standard (1/8" to RCA) adapter which is NOT included. 4. Treble Control: This knob controls the treble • 5. Middle Control: This knob controls the middle. 6- Bass Control: This knob controls the bass 7. Master Volume Control: This knob controls the master volume • 8. MP3 Player 9. Power Adapter (IEC): Insert the included power cable here to charge the unit. Note that it can run off the power adapter while it simultaneously charges the battery. The charge indicator illuminates when the battery is charging. 10. Power ON/OFF Switch 11. Voltage Selector: Set this to the correct voltage for your location standard. 12. Link Output: This 1/4" jack is a stereo line level output that can be connected to the stereo input of an amplifier or amplified loudspeaker such as another 13_ Battery Level Indicator: While the unit is powered ON, these four lights indicate the power left in the battery. Battery life varies based on volume and usage. IMPORTANT NOTES Use this troubleshooting guide if: The sound is distorted at high volumes. • Input is clipping: Try lowering the input gain or the volume control on your sound source or music instrument. • Output is clipping: Lower the main volume level. • There is too much bass: Try adjusting the tone or DO control on your sound source to lower the bass level. This will allow you to play the music louder before clipping (distortion) occurs. • The link cable: is being plugged into the instrument or MIC input instead of the RCA line input. Important: With all large speakers, an initial "break-in" period is needed to perform at optimal levels. To properly :break-in" , play an audio source at medium volume for a few hours. SPECIFICATIONS Input Voltage: AC 100-120V/ 60Hz 220-240V/ 50Hz Output Wattage: (Peak) 200 W Output Wattage: (RMS) 100 W, 1,OTHD Frequency Response: 70Hz- 50kHz +1- 3dB Bottom pole mount specifications: Standard Pole Mount found at professional audio retailer: Depth 80mm (3.1T) Diameter 35.5mm (1.40") Time required to fully charge : under 4 hours Battery life: Over 12 hours* at full volume when fully charged. *Note: Battery life may vary based on temperature, age, and volume usage of product.
-
 1
1 -
 2
2 -
 3
3
 |
 |
