Pyle PCMX265B PCMX265B Manual 1 - Page 2
Quick Setup Guide - audio
 |
View all Pyle PCMX265B manuals
Add to My Manuals
Save this manual to your list of manuals |
Page 2 highlights
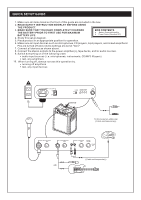
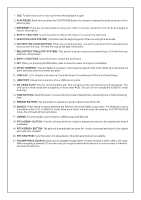
QUICK SETUP GUIDE 1. Make sure all items listed on the front of this guide are included in the box. 2. READ SAFETY INSTRUCTION BOOKLET BEFORE USING THE PRODUCT. 3. MAKE SURE THAT YOU HAVE COMPLETELY CHARGED BOX CONTENTS THE BATTERY PRIOR TO FIRST USE FOR MAXIMUM BATTERY LIFE. Battery Powered Amplifier Power Cable (Standard IEC) 4. Study this setup diagram. 5. Place product in an appropriate position for operation. 6. Make sure all input devices such as microphones,CD players, mp3 players, and linked amplifiers/ PAs are turned off and volume settings are set at "zero" 7. Connect all devices as shown above. 8. Connect the stereo outputs to the power amplifier(s), tape decks, and/or audio sources. 9. Switch everything on in the following order. audio input sources ( i.e. microphones, instruments, CD/MP3 Players) last, any amplifiers 10. When turning off, always reverse this operation by. turming off amplifiers last, any input devices AC F US E IN PU T RA NG E CHARGE ON OFF 110 -T 75 0m AL 250 V 10 0- 12 0V- 60 Hz 2 0W 23 0- T3 15 mA L 250V 22 0- 24 0V- 50 Hz 2 0W USB/SD ON SOUND SYSTEM BATTERY LEVEL OFF LOW 1 2 3 LINK OUTPUT USB/SD L R To RCA input on additional (Cable sold separately) MIC 1 BALANCED GAIN INSTRUMENT/MIC 2 GAIN LEFT RIGHT USB/SD/AUX GAIN MASTER VOLUME POWER L R (Cable sold separately) OR
-
 1
1 -
 2
2 -
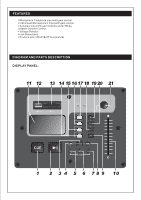 3
3 -
 4
4 -
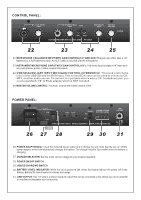 5
5 -
 6
6
 |
 |
