Pyle PDA6BU User Manual - Page 5
Track / Folder Searching Knob, Press - antenna
 |
View all Pyle PDA6BU manuals
Add to My Manuals
Save this manual to your list of manuals |
Page 5 highlights
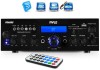
PDA6BU 3. Track / Folder Searching Knob: * Turn this knob clockwise to search through all of the tracks inside the USB flash drive / SD Card. Each track will appear by the name of the track. It will show the tracks or folders chronologically (from when the files were loaded onto the USB flash drive / SD Card. Press the knob to begin playing the desired track. First the tracks on the root file will be displayed and then the tracks that are in folders. * Press this knob to activate the folder searching function. Once pressed the word " FOLDER" will begin flashing on the display screen. Then, turn this knob clockwise to search the folders inside the USB flash drive / SD Card. Press the knob to begin playing the tracks from that folder. 1. SD Card Reader/USB Port: for using external media on this device, just plug your SD/USB into these ports. 2. LCD Screen: all information regarding external media or this device will be displayed from this screen 3. Folder and track selection 4. Power Button: Press this button to power the unit on and off. 5. Microphone Volume Control Knob: Turn this knob to adjust the volume of microphone 6. Microphone Echo Volume Control Knob: Turn this knob to adjust the microphone echo volume level. 7. Bass Control: Turn this knob to adjust the low frequencies of Channel 1 & Channel 2. 8. Master Volume Fader- Move the fader up and down to adjust the master volume. 9. Treble Control: Turn this knob to adjust the high frequencies of Channel 1 & Channel 2. 10. Balance: Control the volume balance from left to right. 11. Input Selector: Turn this button to choose the favorable input 12. MICROPHONE INPUTS: KARAOKE or EXTERNAL MIC connects to these jacks. 13. IPOD/MP3 JACK-IPOD/MP3 connects to this jack. 14. REMOTE RECEIVER: To receive the remote control signal 15. POWER LED INDICATOR: When you turn on the unit, the LED will be on. 16. AUDIO INPUT: Connect the audio output jacks of DVD/CD, to these jacks. 17. LINE OUTPUT: Connect the RECORD input jacks to these jacks. 18. FM ANTENNA CONNECTOR: Connect for AM and FM antennas. 19. SPEAKER OUTPUT: Connect your speaker system to these terminals. 20. BLUETOOTH ANTENNA: Pease pull the antenna out when using Bluetooth input 21. POWER SUPPLY: Connect to AC 11 OV/60Hz & 220V/50Hz outlet. 22. POWER VOLTAGE SELECTOR: 110V/220V 4
-
 1
1 -
 2
2 -
 3
3 -
 4
4 -
 5
5 -
 6
6
 |
 |