Pyle PDA7BU Instruction Manual - Page 3
Pda7bu Front & Back Panel
 |
View all Pyle PDA7BU manuals
Add to My Manuals
Save this manual to your list of manuals |
Page 3 highlights
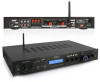
PDA7BU FRONT & BACK PANEL 1. POWER SWITCH: Switch to power the unit on and o . 2. MICROPHONE ECHO KNOB: Adjust the depth of echo e ect by increasing or decreasing the level by turning this knob. 3. MICROPHONE VOLUME KNOB: Turn this knob to adjust the volume of the microphone 4. USB PORT/SD CARD SLOT: Insert USB mass storage device or SD Card to play Mp3 les. NOTE: The USB input is ONLY meant to connect a USB ash drive (thumb drive). Connecting an MP3 player or computer directly to the USB ash drive input will result the unit of failing to play the audio from those devices. 5. REMOTE RECEIVER WINDOW: To receive the remote control signal. 6. MICROPHONE INPUT 1 JACK: MIC 1 Input Jack for connecting an unbalanced low impedance microphone with 1/4" TRS plug. 7. MICROPHONE INPUT 2 JACK: MIC 2 Input Jack for connecting an unbalanced low impedance microphone with 1/4" plug. 8. LCD DISPLAY SCREEN 2 www.PyleUSA.com
-
 1
1 -
 2
2 -
 3
3 -
 4
4 -
 5
5 -
 6
6
 |
 |
