Pyle PLCMTR71 PLCMTR71 Manual 1 - Page 1
Pyle PLCMTR71 Manual
 |
View all Pyle PLCMTR71 manuals
Add to My Manuals
Save this manual to your list of manuals |
Page 1 highlights
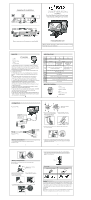
PLCMTR71 Rear View Weather Proof Parking System Video Monitor & IR Night Vision Camera www.pyleaudio.com 1. Please disconnect your automobile's battery, and then take the wiring harness that plugs into your monitor. There should be a red, black & green wires coming from the small black box at the end of the wiring harness. 2. Attach the black wire to your vehicles metal body or any available ground wire. 3. Attach the red wire to any available ignition controlled positive 12V power source, most likely located at the fuse box. 4. Connect the green wire to the positive wire going to your reverse tail lights so that the monitor will receive a 12V signal from this wire when the car is put in reverse. 5. Attach monitor to the dash mount. Then plug the monitor's threaded locking cable connection into the female receiving connection at the other end of the monitor wiring harness with the small black box that you just wired to your automobile. 6. Attach your camera's mounting bracket to your vehicle where it will have an unobstructed view. 7. Now we will wire your camera. Plug the camera's threaded locking cable connection into the female receiving connection of the 15m long cable. 8. Now take the long cable and attach the threaded locking cable connection into the (C1) female receiving connection on the monitor's wiring harness. Warning: To ensure your safety, the driver should not watch videos or operate features on the monitor while driving. There are no serviceable parts in this unit, do not disassemble or try to repair this unit. If unit malfunctions please return to your vendor or send to a Pyle repair facility. Please observe and obey the local laws and regulations when installing unit. Attention: When weather is very cold. The LCD screen may remain dark when unit is powered on. Please wait until temperature increases and the screen will return to normal.
-
 1
1
 |
 |
