Pyle PLPTS25 PLPTS25 Manual 1 - Page 2
L-bars are parallel and facing in towards each
 |
View all Pyle PLPTS25 manuals
Add to My Manuals
Save this manual to your list of manuals |
Page 2 highlights
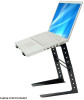
1. Start by removing the end screws from the two support bars. 3. Now, flip this structure over and screw on the two support bars. 2. Next, you will be connecting two of the Lbars. Use one with rubber stoppers and one without. Make sure that the two L-bars are for the same side. The base and the rubberized part of each respective L-bar should be facing the same direction. Align the L-bars so that at least two of their holes are overlapping, and then insert two of the end screws. 4. Align the other two L-bars with the support bars. Make sure that the two rubber stopper L-bars are parallel and facing in towards each other. The other L-bar should also be parallel with its counterpart and facing inwards. Use the remaining two end screws to secure this mechanism into place. 5. Your stand is now complete!
-
 1
1 -
 2
2
 |
 |
