Pyle PLPTS26 PLPTS26 Manual 1 - Page 2
should be facing the same direction. Layer
 |
View all Pyle PLPTS26 manuals
Add to My Manuals
Save this manual to your list of manuals |
Page 2 highlights
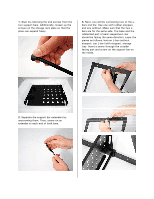
1. Start by removing the end screws from the two support bars. Additionally, loosen up the screws on the storage rack plate so that the plate can expand freely. 3. Next, you will be connecting two of the Lbars and the Use one with rubber stoppers and one without. Make sure that the two Lbars are for the same side. The base and the rubberized part of each respective L-bar should be facing the same direction. Layer the pieces as follows: bottom L-bar (without stopper), top L-bar (with stopper), storage tray. Insert a screw through the outsidefacing part and screw on the support bar on the inside. 2. Separate the support bar extenders by unscrewing them. Then, screw on an extender to each end of both bars.
-
 1
1 -
 2
2 -
 3
3
 |
 |

1.
Start by removing the end screws from the
two support bars. Additionally, loosen up the
screws on the storage rack plate so that the
plate can expand freely.
2.
Separate the support bar extenders by
unscrewing them. Then, screw on an
extender to each end of both bars.
3.
Next, you will be connecting two of the L-
bars and the
Use one with rubber stoppers
and one without. Make sure that the two L-
bars are for the same side. The base and the
rubberized part of each respective L-bar
should be facing the same direction. Layer the
pieces as follows: bottom L-bar (without
stopper), top L-bar (with stopper), storage
tray. Insert a screw through the outside-
facing part and screw on the support bar on
the inside.