Pyle PRJAND820 User Guide - Page 7
Projector Installation / Placement, Screen Diagonal Size, Projection distance, Charging
 |
View all Pyle PRJAND820 manuals
Add to My Manuals
Save this manual to your list of manuals |
Page 7 highlights
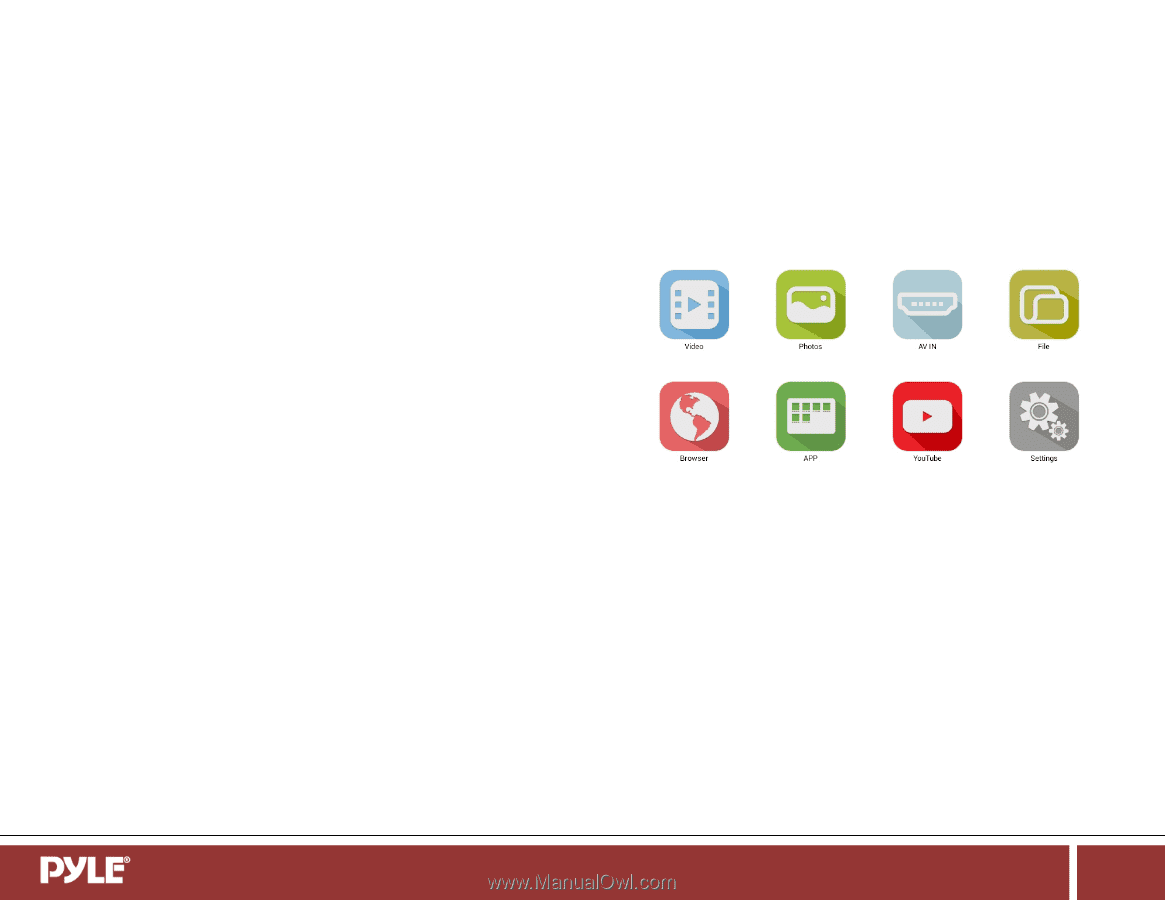
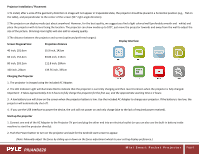
Projector Installation / Placement 1.To install, after a vote of the geometry distortion in image will not appear in trapezoidal state, the projector should be placed in a horizontal position (e.g., flat on the table), and perpendicular to the center of the screen (90 ° right-angle direction). 2.The projector can display media just about anywhere! However, for the best quality, we suggest you find a light colored wall (preferably smooth and white) and place the projector with its lens facing the location. The projector can show media up to 100", just move the projector towards and away from the wall to adjust the size of the picture. Dimming room lights will also add to viewing quality. 3.The distance between the projector and screen (optimum/preferred ranges): Screen Diagonal Size: Projection distance Display Interface: 40 inch, 101.6cm 55.9 inch, 142cm 60 inch, 152.4cm 83.86 inch, 213cm 80 inch, 203.2cm 111.8 inch, 284cm 100 inch, 254cm 139.76 inch, 355cm Charging the Projector 1. The projector is charged using the included AC Adapter. 2. The LED Indicator Light will illuminate Red to indicate that the projector is currently charging and then revert to Green when the projector is fully charged. Important: It takes approximately 3 to 5 hours to fully charge the projector for the first use, and the approximate working time is 2 hours. 3. A low battery icon will show on the screen when the projector battery is low. Use the included AC Adapter to charge your projector. If the battery is too low, the projector will automatically shut off. 4. If you use the USB Interface to power the device, the unit will not power on and only charge (due to the lack of required power received). Start up the projector 1. Connect one end of the AC Adapter to the Projector 5V port and plug the other end into an electrical outlet (or you can also use the built-in battery inside machine to start the projector directly). 2. Push the Power button to turn on the projector and wait for the Android start screen to appear. (Note: Manually adjust the focus by sliding up or down on the focus adjustment wheel to your setting display preference.) PRJAND820 M i n i S m a r t P o c k e t P r o j e c t o r Page 6
-
 1
1 -
 2
2 -
 3
3 -
 4
4 -
 5
5 -
 6
6 -
 7
7 -
 8
8 -
 9
9 -
 10
10 -
 11
11 -
 12
12
 |
 |