RCA ANT3901 User Guide - Page 5
Installing Your New, ANT3901 Antenna
 |
View all RCA ANT3901 manuals
Add to My Manuals
Save this manual to your list of manuals |
Page 5 highlights
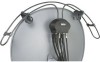
ANT3901new 4/29/03 8:37 Page 5 Installing Your New ANT3901 Antenna The ANT3901 installation consists of three basic steps: Step A: Installing the ANT3901 on your satellite dish. Step B: Installing the inside diplexers. Step C: Setting up your TV to use the ANT3901. Please be sure to complete all of these steps before attempting to watch local channels with your ANT3901. Fig 1 Step A: Installing the ANT3901 on your satellite dish Note: Some satellite dishes have integrated multi-switches. The "TO RECEIVER" terminals are connected to the cables coming from the bottom of the dish. Treat these cables as the "TO RECEIVER" terminals of the multi-switch. Note: For Dish Network owners; some Dish Network installations use smaller SW21 multi-switches. Treat these as one multi-switch with two "OUTPUT" or "TO RECEIVER" terminals. 1. Make sure all satellite receivers are turned off and unplugged from the electrical outlet. 2. Unsnap the antenna from the back notch of the mounting clamp (see Fig 2 on page 6). 3. Hold the antenna to the back of the dish so that the circular housing is centered with the RCA logo facing out (see Fig 4 on page 6). 4. Maneuver clamps over or around the edge of the dish one at a time (see Fig 3 on page 6). 5. Snap the antenna back into the back notch of the mounting clamp. 6. Tighten the clamps by turning the thumb-wheel screw clockwise. Note: We recommend the use of the enclosed security clips for any dish. Snap the security clips onto the ANT3901 and slide down towards the mounting clips (see Fig 4 on page 6). 5
-
 1
1 -
 2
2 -
 3
3 -
 4
4 -
 5
5 -
 6
6 -
 7
7 -
 8
8 -
 9
9 -
 10
10 -
 11
11 -
12
 |
 |
