RCA DRC99390 DRC99390 Product Manual - Page 2
Need More Help? - specifications
 |
UPC - 062118993902
View all RCA DRC99390 manuals
Add to My Manuals
Save this manual to your list of manuals |
Page 2 highlights
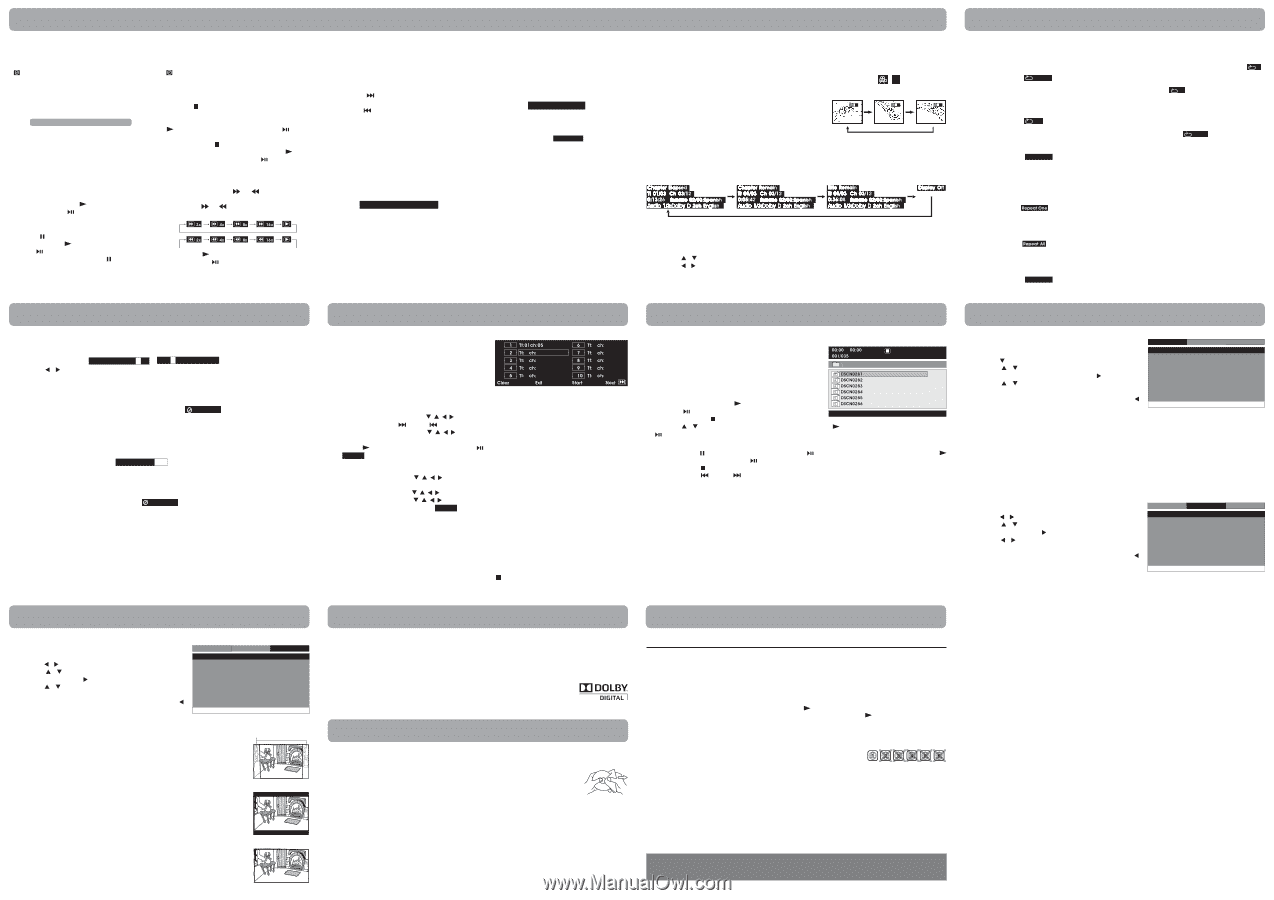
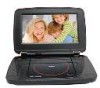
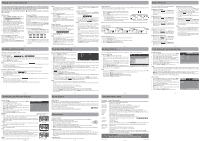
Playing a Disc (Basic Playback) This owner's manual explains the basic instructions for operating this unit. Some DVDs are produced in a manner that allows specific or limited operation during playback. Therefore, this unit may not respond to all operating commands. THIS IS NOT A DEFECT. Please refer to the instructions accompanying the specific DVD in question for more information about the options available on that DVD. " " may appear on the screen during operation. A " " means the desired operation is not permitted by the unit or disc. Playing a Disc 1. Slide the CHARGE / STANDBY / ON switch on the left side of the unit to the ON position. See Customizing the function settings before proceeding to step 2. 2. Press the OPEN knob to open the disc door. 3. Hold the disc by its sides and carefully place it onto the spindle with the label side facing up, pushing gently until you hear a "click". 4. Close the disc door. It takes a short while for your unit to load the disc. After loading, the unit will automatically bring you to the main menu of the DVD or start playing the DVD. 5. If the unit does not automatically start playing the DVD, press the PLAY button on the remote control or button on the unit. Pausing Playback (Still Mode) Press the PAUSE button. To resume normal playback, press the PLAY button on the remote control or button on the unit. For a DVD, each time you press the PAUSE button on the remote control, the picture advances one frame. Stopping Playback Press the STOP button at the location where you want to interrupt playback. To resume playback at the position where the disc was stopped, press the PLAY button on the remote control or button on the unit. If you press the STOP button twice, the unit's memory will be cleared and pressing the PLAY button on the remote control or button on the unit will reset the DVD to the beginning. Fast Forward / Fast Reverse 1. Press the SEARCH or SEARCH button when a disc is playing. Each time you press the SEARCH or SEARCH button, the playback speed changes in the following sequence: 2. Press the PLAY button on the remote control or press the button twice on the unit when you reach the desired point to resume normal playback. E - 12 Locating a Desired Section Locating a Specific Chapter / Title If you know the chapter/title number for the chapter/title that you want to play, you can locate it by directly selecting that number. 1. Press the GOTO button. Title 01/03 Chapter 03/12 / Title 01/03 Chapter 00/00 2. Press the / button to highlight chapter/title number, then press the corresponding number buttons (2 digits) for the chapter/title you want (for example: 02, 08, 10 or 15). If you press only 1 numeric button, press the ENTER button to confirm. 3. Playback starts from the selected chapter/title. Notes: • If the chapter/title number entered is not permitted by the DVD, " Input invalid " will display. Repeat steps 1 and 2 to re-enter the correct number. • Some discs may not respond to this process. • This method of locating a chapter/title is available only on a DVD that contains chapter/title numbers. Locating a Specific Time You can move to a specific location by entering its corresponding time (hours, minutes, seconds). 1. Press the GOTO button two times. Title 01/03 Time : : 2. Press the corresponding number buttons (5 digits: X:XX:XX, for example: 0 30 05, 1 08 23, 1 22 56) for the setting point you want. 3. Playback starts from the selected section. Notes: • If the time entered is not permitted by the DVD, " Input invalid " will display. You should re-enter the correct time. • Some discs may not respond to this process. • Some scenes may not be located as precisely as you specified. • This method for accessing specific locations is available only within the current title of the DVD. E - 16 Customizing the Function Settings System Setup 1. Press the SETUP button on the remote control or MENU Language Video System button on the unit in stop mode. - - System Menu - - 2. Press the / button to select System Menu. TV Display Wide 3. Press the / button to select the option (TV Display or Default No Default), then press the button. 4. Press the / button to adjust the settings, then press the ENTER button to confirm. 5. Repeat steps 3 and 4 to adjust other options. Press the button to return to the previous menu. Go To System Menu 6. Press the SETUP or RETURN button to exit the menu. TV Display Cut off when a wide-screen Pan Scan video image is played. • When wide-screen video is played, this mode clips the right and left sides of the image so that it can be viewed on a conventional screen. • Some wide-screen DVDs that do not permit Pan Scan mode playback are automatically played in letterbox mode (black bands that appear at the top and bottom of the screen). Letter Box • When wide-screen video is played in this mode on a conventional screen, black Pan Scan bands appear at the top and bottom of the screen. Wide Screen • This is the correct mode for playing wide-screen videos on the unit screen or other external wide-screens. Notes: • The displayable picture size is preset on the DVD. Therefore the playback picture of some DVDs may not conform to the picture size selected. • When you play DVDs recorded in the 4:3 aspect ratio, the playback picture will Letter Box always appear in the 4:3 aspect ratio regardless of the TV display setting. • Select Wide Screen to conform the LCD screen on the unit. Always be sure that your TV display conforms to the actual TV in use if you connect the unit to a TV. Default It takes 3-5 seconds to reset the DVD settings to the factory default. E - 20 Wide Screen Notes: • The DVD player mutes sound and subtitles during reverse and forward scan of DVDs. • The fast playback speed may differ depending on the disc. Skip (Forward / Reverse) • Press the NEXT button to advance titles, chapters/tracks. • Press the PREV button to go back to current or previous titles, chapters/tracks. • For an Audio CD, use the number buttons on the remote control to go directly to the desired track number. Audio Selection On some DVDs, the sound is recorded in two or more formats. Follow the directions below to select the preferred language and sound system. 1. While a disc is playing, press the AUDIO button to show the current audio format number. Audio 1/3:Dolby D 2ch English 2. Press the AUDIO button repeatedly to select the desired audio format. Notes: • If only one audio format is recorded on the DVD, the number does not change. • Some DVDs allow you to change audio selections using the disc menu only. If this is the case, press the MENU button and choose the appropriate language on the disc menu. • You can select different audio channels (Stereo, Mono Left, Mono Right or Mix-Mono) on an Audio CD by pressing the AUDIO button repeatedly. Subtitle Selection 1. While a DVD is playing, press the SUBTITLE button to display the current language setting, as shown in the example. Subtitle 02/03:Spanish 2. Press the SUBTITLE button repeatedly to select the desired subtitle language. You can turn subtitles off by pressing the SUBTITLE button repeatedly until the " Subtitle Off " is displayed. Notes: • Some DVDs are set to display subtitles automatically, and you cannot turn them off even if you set the subtitle function to off. • During some scenes, the subtitles may not appear immediately after you select your desired scene. • The number of subtitle languages recorded differs depending on the disc. If only one language is recorded, the language does not change. • This function can only be used for discs on which subtitles have been recorded in multiple languages. • Some DVDs allow you to change subtitles using the disc menu only. If this is the case, press the MENU button and choose the appropriate subtitle on the disc menu. E - 13 Programmable Memory You can combine your favorite titles/chapters/tracks and play them in the order you determine. 1. Press the MEMORY button while a disc is playing. The following display appears. Clear: Delete all input programs. Exit: Exit memory menu and return to normal playback. Start: Start memory playback. Next / Prev: Move to the next / previous setup page. 2. Input the title (2 digits) and chapter (2 digits) by pressing the number buttons (for example: 01 02, 02 05, 02 11). It will move to the next item automatically. • You can use the Cursor buttons ( , , , ) to move the highlighted bar to any item, and re-enter the title and chapter. Press the NEXT / PREV to move to the next / previous setup page. • You can use the Cursor buttons ( , , , ) to move the highlighted bar to "Clear", "Exit", "Start" or "Next / Prev", and press the ENTER button to confirm. 3. Press the PLAY button on the remote control or button on the unit to start memory playback. (" Program " appears on the screen). 4. To resume normal playback from memory playback 1). Press the MEMORY button to display the memory menu. 2). Use the Cursor buttons ( , , , ) to move the highlighted bar to "Stop". Press the ENTER button to confirm "Stop". 3). Use the Cursor buttons ( , , , ) to highlight "Clear", and then press the ENTER button to confirm. 4). Use the Cursor buttons ( , , , ) to highlight "Exit", and then press the ENTER button to confirm. It will return to normal playback (" Program " disappears from the screen). Notes: • For a CD, you can only arrange order for tracks. The display will be a little different. • If the title or chapter number entered is not permitted by the DVD, it will disappear. You should re-enter correct number. • You should input items one by one following the 1, 2, 3 ... sequence. • If the DVD contains only one title, you can only arrange order for chapters. • Some discs may not permit memory playback operation. • If you select repeat during memory playback, the DVD player repeats the current memory playback. • If you press the MEMORY button while the display appears on the TV screen, the display disappears. • The programmed selections will be cleared when you press the STOP button two times, open the disc tray or turn off the DVD player. E - 17 Sound System Dolby Digital Dolby Digital is a technology developed by Dolby Laboratories. Soundtracks encoded in Dolby Digital can reproduce from one to 5.1 discrete channels of excellent quality audio. The unit automatically recognizes the Dolby Digital bitstream and provides a downmix suitable for twochannel listening. An additional Dolby Digital decoder is required for reproduction of the discrete multi-channel soundtracks available on many DVDs. Manufactured under license from Dolby Laboratories. Dolby and the double-D symbol are trademarks of Dolby Laboratories. Maintenance Cleaning the Disc A defective or soiled disc inserted into the unit can cause sound to drop out during playback. Handle the disc by holding its inner and outer edges. • Do NOT touch the surface of the unlabeled side of the disc. • Do NOT stick paper or tape on the surface. • Do NOT expose the disc to direct sunlight or excessive heat. • Clean the disc before playback. Wipe the disc from the center outward with a cleaning cloth. • NEVER use solvents such as benzine or alcohol to clean the disc. • Do NOT use irregular shaped discs (example: heart shaped, octagonal, etc.). They may cause malfunctions. Cleaning the Unit • Be sure to turn the unit off and disconnect the AC power adapter before cleaning the unit. • Wipe the unit with a dry soft cloth. If the surfaces are extremely dirty, wipe clean with a cloth that has been dipped in a weak soap-and-water solution and wrung out thoroughly, then wipe with a dry cloth. • Never use alcohol, benzine, thinner, cleaning fluid or other chemicals. Do NOT use compressed air to remove dust. Important Note • Before transporting the unit, remove the disc from the disc compartment. E - 21 Angle Selection Some DVDs contain scenes that have been shot from a number of different angles. For these discs, the same scene can be viewed from each of these different angles. 1. While you are playing a DVD with different angles recorded, press the ANGLE button to view the number of current angles available. 2. Press the ANGLE button repeatedly to change the scene to the next recorded angle. • After approx. two seconds, playback will continue from the new angle selected. • If no button is pressed within 10 seconds, playback continues without changing the current angle. 1/3 Sequence of angle shots (Example) 1/3 2/3 3/3 Note: This function can only be used for discs on which scenes shot from multiple angles have been recorded. Display Function While the disc is playing, press the DISPLAY button repeatedly to display information on operation status. Adjust the LCD Screen You can adjust Brightness, Panel Display and Contrast of the LCD screen. 1. Press the VIDEO MODE button. 2. Press the / button to select Brightness, Panel Display or Contrast. 3. Press the / button to change the setting. 4. Press the VIDEO MODE button to exit the menu. E - 14 Viewing JPEG Files This unit can play JPEG files recorded on a CD-R or CD-ROM disc (CD-RW is not recommended). Viewing JPEG Files 1. Press the OPEN knob to open the disc door. 2. Hold a JPEG file disc by its edges and gently push it onto the spindle with the label side facing up until you hear a "click". 3. Close the disc door. The JPEG files on the disc will be displayed one by one automatically. If the disc does not play automatically, press the PLAY button on the remote control or button on the unit. 4. Press the MENU or STOP button to display a folder list. Press the / button to highlight a JPEG file to play. Press the button on the unit to start playback. PLAY button on the remote control or Notes: • You can press the PAUSE button on the remote control or button on the unit to freeze the picture. Press the PLAY button on the remote control or button on the unit to resume picture slide show. • You can press the STOP button to quit playback. • You can press the PREV or NEXT button to change the picture. • You can press the ANGLE button to rotate direction of the picture by 90°. • Some discs may not permit this operation. E - 18 Troubleshooting Guide Symptom Cause (and remedy) No power. • Ensure the AC power adapter is connected. • The unit is not turned on. The remote control does not function. • Make sure the infrared remote sensor is not blocked. • Make sure the plastic sheet has been removed from the remote control. • Point the remote directly at the infrared remote sensor on the unit. • Replace the battery in the remote control with a new one. No sound or only a very low-level sound is heard. • The volume control is located on the side of the unit - please try adjusting this. • The system is in pause mode. Press the PLAY button to return to normal play mode. • The unit is in fast-forward or fast-reverse mode. Press the PLAY button to return to normal play mode. • Make sure the AUDIO/VIDEO output connections are correct. • The DTS DVD cannot be decoded to have speaker output. • The unit is too hot; shut off the unit for 30 minutes to cool it down. No picture. • The region number of the disc doesn't match the region number of this unit. The picture is • Clean the disc. not clear. • The disc is scratched. • Adjust the LCD's brightness and contrast using the VIDEO MODE button on the remote control. Severe hum or • The plugs and jacks are dirty. Wipe them with a cloth slightly moistened with alcohol. noise is heard. • Clean the disc. The disc does not play. • There is no disc inside ("No Disc" appears on the screen). • Insert the disc correctly with the playback side facing down. • Clean the disc. • A non-NTSC disc has been inserted. The unit and disc region number are incompatible. • Condensation may have formed inside the unit due to a sudden change in temperature. Wait about an hour for it to clear and try again. Need More Help? Please visit online help at http://www.RCAav.com Printed in China E - 22 811-939091W010 Repeat Playback You can play a specific DVD title or chapter repeatedly (title repeat, chapter repeat, A-B repeat). Repeating a Chapter 1. While the DVD is playing, press the REPEAT DISC button until the " Chapter " indicator displays on the screen. The current chapter is played repeatedly. Repeating a Title 2. While the DVD is playing, press the REPEAT DISC button until the " Title " indicator displays on the screen. The current title is played repeatedly. To Resume Normal Playback 3. While the DVD is playing, press the REPEAT DISC button until the " Repeat Off " indicator displays on the screen. You can play a single CD track or the whole disc repeatedly. Repeating a Single Track 1. While the CD is playing, press the REPEAT DISC button until the " " indicator displays on the screen. The current track is played repeatedly. Repeating the Whole Disc 2. While the CD is playing, press the REPEAT DISC button until the " " indicator displays on the screen. The whole disc is played repeatedly. Repeating a Specific Section You can play a specific section repeatedly. 1. While the disc is playing, press the REPEAT A-B button at the beginning of the section (" A " is displayed) you want to play repeatedly. 2. Press the REPEAT A-B button again at the end of the section (" AB " is displayed). 3. The unit will immediately begin replaying your selection. To Resume Normal Playback 4. While the disc is playing, press the REPEAT A-B button until the " AB OFF " indicator displays on the screen (the repeat indicator disappears from the screen for a CD). The system will return to normal playback. Notes: • Some discs may not permit A-B repeat operation. • You cannot set the A-B repeat function for a segment that includes multiple camera angles. • You can specify a segment only within the current title or track. • There may be a slight difference between point A and the location where playback actually resumes depending on the disc. To Resume Normal Playback 3. While the CD is playing, press the REPEAT DISC button until the " Repeat Off " indicator displays on the screen. E - 15 Customizing the Function Settings Language Setup 1. Press the SETUP button on the remote control or MENU button on the unit in stop mode (when disc is not playing). 2. Press the button to select Language Menu. 3. Press the / button to select the option (Player Menu, Audio, Subtitle or Disc Menu), then press the button. 4. Press the / button to select your preferred language, then press the ENTER button to confirm. 5. Repeat steps 3 and 4 to adjust other options. Press the button to return to the previous menu. 6. Press the SETUP or RETURN button to exit the menu. Language Video - - Language Menu - - Player Menu Eng Audio Eng Subtitle Off Disc Menu Eng Go To Language Menu System Notes: • Some DVDs may not play in the audio language you selected. A prior language may be programmed on the disc. • Some DVDs may be set to display subtitles in a language other than the one you selected. A prior subtitle language may be programmed on the disc. • Some DVDs allow you to change subtitle selections using the disc menu only. If this is the case, press the MENU button and choose the appropriate subtitle language from the selection on the disc menu. • Some DVDs may not include your pre-selected language. In this case, the DVD player automatically displays disc menus consistent with the disc's initial language setting. Video Setup 1. Press the SETUP button on the remote control or MENU button on the unit in stop mode (when disc is not playing). 2. Press the / button to select Video Menu. 3. Press the / button to select the option (Brightness or Contrast), then press the button. 4. Press the / button to adjust the setting, then press the ENTER button to confirm. 5. Repeat steps 3 and 4 to adjust other options. Press the button to return to the previous menu. 6. Press the SETUP or RETURN button to exit the menu. Language Video - - Video Menu - - Brightness 00 Contrast 00 Go To Video Menu System E - 19
-
 1
1 -
 2
2
 |
 |