RCA RCU810 User Guide - Page 4
Button Description For Video Operation - lcd
 |
UPC - 079000312369
View all RCA RCU810 manuals
Add to My Manuals
Save this manual to your list of manuals |
Page 4 highlights
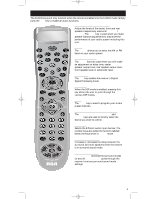
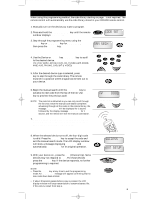
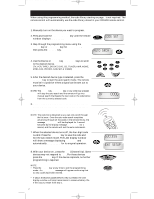
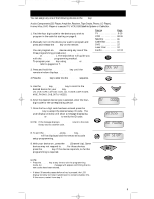
RCU810_MANUAL.QXD 1/7/02 11:49 AM Page 4 Button Description For Video Operation INDICATOR ICON The Indicator Icon appears on the LCD display showing that the remote is working. ON•OFF The ON•OFF key operates the same as your original remote. NOTE: Some RCA, GE and ProScan models require you to press the device key to turn the device on and the POWER key to turn the device off. TV, VCR1, VCR2, DVD, AUX, AUD, CBL & SAT The TV, VCR1, VCR2, DVD, AUX, AUD, CBL and SAT keys are used to select the device you want to control. L1, L2 & L3 (LEARNING) The L1, L2 and L3 keys are used to supplement the preprogrammed code library. NOTE: The standard code library provides most of the functions needed, but you can add a small number of additional functions of your choice. M1, M2 & M3 (MACRO) The M1, M2 and M3 keys are used to execute a series of key operations. NOTE: Each macro key may be programmed so that pressing it alone will carry out several key functions sequentially. VOL & CH The VOL (Volume) and CH (Channel) keys increase or decrease the volume level and channel numbers. MUTE Mutes the volume on your device with volume control. GO BACK The GO BACK key allows you to go to the previous channel you selected. Operates the same as Last Channel, Previous Channel, Go Back, or Recall key on your original remote. LIGHTBULB KEY Activates key backlighting. CODE SEARCH Used to enter the remote into the programming sequence. PIP & SWAP PIP (Picture-In-Picture) and SWAP operates your television's Picture-in-Picture features. INPUT The INPUT key selects the video inputs of your device if equipped with this feature. SLEEP The SLEEP key allows you to set time for you to turn your device off automatically. GUIDE Brings up the on-screen programming guide if your device has that feature. INFO Shows the date and time (Your device may not have this feature). MENU Brings up the Main Menu. If you are already in the menu system, press SELECT or MENU key to select a highlighted choice. Use the NAVIGATION keys to move through the menu selections. CLEAR Removes the on-screen display to return to normal operation of the remote. NAVIGATION KEYS & SELECT KEY Use the NAVIGATION keys to move through on-screen menu and guides. The NAVIGATION keys may also be used to move the highlighted choice up, down, right or left. The SELECT key will choose the highlight choice. NOTE: With some DBS models the MENU or ENTER key should be used to select the highlighted item. 0-9 The number keys operate the same as on your original remote, and are used for entering device codes. TV•VCR The TV•VCR key operates the TV/VCR function of your VCR. PLAY, FWD, PAUSE, STOP, REW & REC These keys operate the same as on your original VCR or remote. NOTE: You must press the REC key twice to begin recording. ENTER The ENTER key is used to complete channel selection for some brands of TV. It is also used to complete the highlighted sections in menu mode. 3
-
 1
1 -
 2
2 -
 3
3 -
 4
4 -
 5
5 -
 6
6 -
 7
7 -
 8
8 -
 9
9 -
 10
10 -
11
-
12
-
13
-
14
-
15
-
16
-
17
-
18
-
19
-
20
-
21
-
22
-
23
-
24
-
25
-
26
-
27
 |
 |
