RCA RS2127iH RS2127iH Product Manual - Page 2

LISTENING TO YOUR iPod/iPhone - cd music system

Page 2 highlights

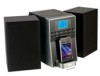
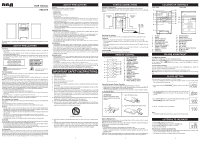
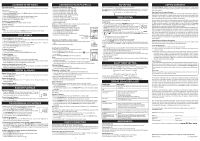
listening to the radio Presetting Stations The unit can store a total of 20 stations in memory. Presetting allows you to tune in to a station directly. 1. Tune in to a desired station. 2. Press the PROG/MEM/ button. The "MEM" indicator will blink and a preset number will be shown on the display. 3. Press the MEM.UP/ button to select the desired preset number. 4. Press the PROG/MEM/ button again to store it in memory. 5. Repeat steps 1-4 to store other stations. Tuning in to a Preset Station Press the MEM.UP/ button to select a preset number. For Better reception Fully unwind the antenna wire. Extend the antenna wire and place it in the position that sounds best. Notes: • When the reception is good, the "STEREO" indicator will appear on the display. • Do not connect the FM antenna to an outside antenna. CD PLAYBACK 1. Press the button to turn on the unit. 2. Hold the OPEN knob up to open the CD door. Place a disc in the center with the label side up and then close the CD door gently. 3. Press the FUNCTION button to select CD mode. " " appears and "- -" blinks on the display. Then the total track no. is shown on the display. 4. Press the PLAY/PAUSE button to start playing. • Adjust the volume levels. To Pause Playback • Press the PLAY/PAUSE button. • To resume playback, press the PLAY/PAUSE button again. To Stop Playback • Press the STOP button. Skipping to Another Track • Press either the or button according to the desired direction. Press the button to skip to the start of the current track or skip to previous tracks. Press the button to skip to the beginning of the next track. Locating a Particular Point on a Track • Keep either the or button pressed during playback, according to the desired direction, and release at the desired point. REPEAT PLAYBACK Repeat Current Track • Press the MEM.UP/ button until " be played repeatedly. " appears on the display. The current track will Repeat the Entire CD • Press the MEM.UP/ button until " played repeatedly. " appears on the display. All tracks will be Cancel Playback Mode • Press the MEM.UP/ button until repeat indicator disappears. RANDOM PLAYBACK Random Playback • Press the RANDOM button on the remote control and " " will be shown on the display. All tracks will be played randomly. After all tracks have played, the unit will stop automatically. Cancel Random Playback • Press the RANDOM button on the remote control again during RANDOM playback to return to normal playback. PROGRAMMABLE CD PLAYBACK A program of up to 20 tracks can be set to play in a preset order. 1. In CD stop mode, press the PROG/MEM/ button, the "0 0 " will blink and the "MEM" indicator will appear on the display. 2. Press the or button to select the desired track then press the PROG/MEM/ button to store the track in memory. 3. To add additional tracks, repeat step 2 (up to 20 tracks). 4. To start playback, press the PLAY/PAUSE button. To Check the Program • Press the STOP button and the or button. Each time the pressed, the track number appears on the display. button is To Change the Programmed Tracks during Program Playback • Press the STOP button and press the PROG/MEM/ button repeatedly to search the program number, then press either the or button to select the desired track. Press the PROG/MEM/ button again to register the newly selected track into program. To Erase the Whole Program, Do One of the Following • Press the STOP button twice. • Press the FUNCTION button to change to Radio/iPod/AUX mode. • Press the button to turn off the unit. • Hold the OPEN knob up to open the CD door. - 5 - LISTENING TO YOUR iPod/iPhone Compatible iPod/iPhone Types • iPod nano (1st generation) 1GB, 2GB, 4GB • iPod nano (2nd generation) 2GB, 4GB, 8GB • iPod nano 3rd generation (video) 4GB, 8GB • iPod nano 4th generation (video) 8GB, 16GB • iPod 5th generation (video) 30GB, 60GB, 80GB • iPod classic 80GB, 120GB, 160GB • iPod touch (1st generation) 8GB, 16GB, 32GB • iPod touch (2nd generation) 8GB, 16GB, 32GB • iPhone 4GB, 8GB, 16GB • iPhone 3G 8GB, 16GB Note: If your iPhone is called while it is docked, playback will be paused. Installing an iPod/iPhone Dock Adapter 1. Choose the iPod/iPhone Dock Adapter that fits your iPod/iPhone, we recommend using the adapter that was supplied with your iPod/iPhone (dock adapter is not included with this Audio System). 2. Insert your iPod/iPhone Dock Adapter into the dock until it sits firmly in place. iPod/iPhone Dock Adapter (not included) Removing an iPod/iPhone Dock Adapter 1. Remove the iPod/iPhone Dock Adapter as illustrated in the figure to the right. 2. Replace it with another one you need. Inserting Your iPod/iPhone 1. Insert your iPod/iPhone into the connector in the dock. 2. Press the button to turn on the unit. 3. Press the FUNCTION button repeatedly until the indicator " " appears on the display. 4. Press the PLAY/PAUSE button to start playback. Notes: • The iPod/iPhone will charge automatically (until fully charged) once it is docked in the cradle. • Note that not all functions of some iPod/iPhone models can be controlled via the remote control of this unit. If necessary, operate on your iPod/iPhone directly. Pausing Playback • Press the PLAY/PAUSE button. • To resume playback, press the PLAY/PAUSE button again. Skipping to a Another Track • Press either the or button according to the desired direction. • Press the button to skip to the beginning of the current track or previous track. Press the button to skip to the beginning of the next track. Locating a Particular Point on a Track • Keep either the or button pressed during playback, according to the desired direction, and release at the desired point. Repeat Playback Repeat lets you play songs repeatedly (a single repeat or all songs repeat). • Press the MEM.UP/ button on the remote control. The repeat indicator appears on the iPod/iPhone screen. • To cancel repeat playback, press the MEM.UP/ button until the repeat indicator disappears. Note: Please refer to the owner's manual that was included with your iPod/iPhone for more details. Random Playback Random plays songs/albums from your iPod/iPhone in a random order. 1. Press the RANDOM button on the remote control once and the random indicator appears on the iPod/iPhone screen. All songs will be played without sequence. 2. Press the RANDOM button on the remote control twice and the random indicator appears on the iPod/iPhone screen. All songs of this albums will be played without sequence. • To cancel shuffle playback, press the RANDOM button until the shuffle indicator disappears. Note: Please refer to the owner's manual that was included with your iPod/iPhone for more details. This product can navigate and play Music stored on your iPod/iPhone using your iPod/ iPhone screen. To do so, simply follow the steps: 1. Press the MENU button to go back to the previous menu, then use the / and SELECT buttons to navigate your iPod/iPhone menu lists. 2. Press the / buttons to highlight your desired music, and press the SELECT button to start playing. 3. You can repeat steps 1-2 to select other music you wish to play. LINE IN CONNECTION Connecting to LINE IN for Other Sound Sources You can connect audio devices such as your iPod, CD players or MP3 players to the unit via the LINE IN jack. To do this, connect an audio cable from the line out or headphone out jack of the other audio device to the LINE IN jack on the unit's front panel. Listening to the Connected Device 1. Press the FUNCTION button to select LINE IN mode - "AUX" is shown on the display. 2. Turn on the audio device you've attached to the LINE IN jack. - 6 - EQ SETTING This system supports a variety of equalizers and sound effects. During playback, press the EQ/TIMER button to select a desired music mode. Each time the EQ/TIMER button is pressed, the music mode will be changed to the next one as follows: (CLASSIC) -> (ROCK) -> -> TIMER SETTING The timer function will turn the unit on at a preset time. To Set Timer 1. In standby mode, press and hold the EQ/TIMER button on the remote control until the hour digits and time TIMER indicator blink. 2. Tap the or button to adjust the desired hours then tap the EQ/ TIMER button once to confirm. The minute digits will begin to blink. 3. Tap the or button to adjust the desired minutes then tap the EQ/TIMER button once to confirm. 4. Press the FUNCTION button to select the timer mode (RADIO, CD or iPod). The " ", " " or " " icon will be shown on the display. Tap the EQ/TIMER button once to confirm. • For RADIO timer, tune in to a desired station. • For CD timer, insert a CD into the unit. • For iPod timer, insert your iPod/iPhone into the connector. 5. Press the - VOLUME + buttons to adjust the volume levels. 6. Press the EQ/TIMER button to confirm. The timer indicator will stop blinking and remain on. 7. The unit will wake up to "RADIO", " iPod" or "CD" when the timer reaches the preset time. Notes: • After the unit wakes up, you can adjust the volume control to obtain the desired volume. Press the button once to shut off the timer (timer setting will stay active, it will turn on again, 24 hours later the time that the timer is set to). • If timer is set for FM tuner, it will wake up to the last station you tuned in. • For CD/iPod timer, if no CD/iPod is inserted, it will wake up to radio mode and jump to the last station you tuned in. To Cancel Timer • Press and hold the EQ/TIMER button on the remote control until the TIMER indicator goes out. SLEEP TIMER SETTING The sleep timer automatically turns the unit off after a certain time. 1. While the unit is on, press the SLEEP button, " " and " " will appear on the display. 2. Press the SLEEP button repeatedly to select the desired sleep time as below: 3. After setting a desired sleep time, the " " icon remains on. 4. The unit will automatically turn off once it counts down the sleep time. • To clear the preset sleep time, press the SLEEP button until " " appears. TROUBLESHOOTING GUIDE Problems Solutions System does not turn on • Make sure AC adapter is secure in the outlet, and outlet has power. CD Disc in place but unit won't play • Make sure you've selected CD mode. • Make sure disc label is facing up. • Make sure disc is clean. • Pause mode is activated. • Disc may be damaged or dirty; check disc. Disc skips • Make sure the unit is on a secure spot. Vibration or jarring can cause the disc to skip. RADIO Poor FM reception • Make sure FM antenna wire is fully extended. • Electrical interference in your home can cause poor reception. Move the unit away from them (especially those with motors and transformers). iPod/iPhone iPod/iPhone does not dock • Remove your iPod/iPhone from the dock and check for properly or does not install obstruction on the connectors in the dock and on your iPod/ properly. iPhone. iPod/iPhone does not respond to the speaker system. • Make sure that your iPod/iPhone is working properly before docking into the unit. Please refer to your iPod/ iPhone manual for details. MAINTENANCE Cleaning the Unit Do not use volatile chemicals on this unit. Clean by lightly wiping with a soft cloth. Cleaning the CD If the CD skips or will not play, the disc may need to be cleaned. Before playing, wipe the disc from the center outwards with a cleaning cloth. After playing, store the disc in its case. Handling the disc Only touch the CD on the edge to avoid finger prints on its surface. Do not stick paper or tape nor write anything on the surface. - 7 - LIMITED WARRANTY AVC MULTIMEDIA ("AVC") makes the following limited warranty. These limited warranties extend to the original consumer purchaser and is limited to non-commercial user of the product. One Year Parts & Labor Warranty AVC products purchased in the United States are warranted to be free from defects in materials or workmanship for a period of one year from the date of their original retail purchase. If the unit fails to conform to this warranty, we will service the product using new or refurbished parts and products, at AVC's sole discretion. During a period of one year from the effective warranty date, AVC will provide, when needed, service labor to repair a manufacturing defect at its designated Service Center. To obtain warranty service in the United States, you must first call our Customer Support Center at 1-877-252-6873, during the hours listed in the box below. The deternination of service will be made by AVC customer support. PLEASE DO NOT RETURN YOUR UNIT TO AVC WITHOUT PRIOR AUTHORIZATION. New or remanufactured replacements for defective parts or products will be used for repairs by AVC at its designated Service Center for one year from the defective warranty date. Such replacement parts or products are warranted for an additional one year from the date of repair or replacement. The Customer will be required to ship the unit to the Service Center indicated at the time Customer Support is contacted to make the necessary repairs. The customer is responsible for all transportation charges to the service facility. Packaging and Shipping Instruction When you send the product to the AVC service facility you must use the original carton box and packing material or an equivalent as designated by AVC. Your Responsibility (1) You must retain your bill of sale to provide proof of purchase. (2) These warranties are effective only if the product is purchased and operated in the U.S.A. or Canada. (3) Warranties extend only to defects in material or workmanship, and do not extend to any product or parts which have been lost or discarded, or damage to product or parts caused by misuse, accident, improper operation or maintenance, or use in violation of instructions provided with the product, or to product which has been altered or modified without authorization of AVC, or to products or parts thereof which have had the serial number removed or changed. Out of Warranty In the event your product requires repair after the limited warranty period has expired, please contact our Customer Support Center at 1-877-252-6873 or www.RCAav.com Hours: Monday-Thursday: 9am-7pm, Friday: 9am-5pm, Saturday: 9am-NOON Eastern time. Important: You are responsible for any transportation, shipping or insurance relative to the return of the product to our Product Returns Center. All warranties implied by state law, including the implied warranties of merchantability and fitness for a particular purpose, are expressly limited to the duration of the limited warranties set forth above. With the exception of any warranties implied by state law as hereby limited, the foregoing warranty is exclusive and in lieu of all other warranties, guarantees, agreements and similar obligations of manufacturer or seller with respect to the repair or replacement of any parts. In no event shall AVC be liable for consequential or incidental damages. No person, agent, distributor, dealer or company is authorized to change, modify or extend the terms of these warranties in any manner whatsoever. The time within action must be commenced to enforce any obligation of AVC arising under the warranty or under any statute, or law of the United States or any state thereof, is hereby limited to one year from the date of purchase. This limitation does not apply to implied warranties arising under state law. This warranty gives you specific legal rights and you may also have other rights, which may vary from state to state. Some states do not allow limitation on how long an implied warranty lasts, when an action may be brought, or the exclusion or limitation of incidental or consequential damages, so the above provisions may not apply to you. For more information on other products and services, please contact our web site at www.RCAav.com Important: Also keep your "Bill of Sale" as proof of purchase. Model no Product name Type of set ...Serial no Invoice no Date purchased Dealer name www.RCAav.com FOR SUPPORT, SERVICE AND REPAIR, PLEASE VISIT . Specifications and external appearance are subject to change without notice. Printed in China 811-622791W011

  • 1
  • 2

Removing an iPod/iPhone Dock Adapter
1. Remove the iPod/iPhone Dock Adapter as illustrated in the figure
to the
right.
2. Replace it with another one you need.
Inserting Your iPod/iPhone
1. Insert your iPod/iPhone into the connector in the dock.
2. Press the
button to turn on the unit.
3. Press the
FUNCTION
button repeatedly until the indicator “
” appears
on the display.
4. Press the
PLAY/PAUSE
button to start playback.
Notes:
The iPod/iPhone Will charge automatically (until fully charged) once it
is docked in the cradle.
Note that not all functions of some iPod/iPhone models can be controlled
via the remote control of this unit. If necessary, operate on your iPod/iPhone directly.
Pausing Playback
Press the
PLAY/PAUSE
button.
To resume playback, press the
PLAY/PAUSE
button again.
Skipping to a Another Track
Press either the
or
button according to the desired direction.
Press the
button to skip to the beginning of the current track or previous track. Press
the
button to skip to the beginning of the next track.
Locating a Particular Point on a Track
Keep either the
or
button pressed during playback, according to the desired
direction, and release at the desired point.
Repeat Playback
Repeat lets you play songs repeatedly (a single repeat or all songs repeat).
Press the
MEM.UP/
button on the remote control. The repeat indicator appears on
the iPod/iPhone screen.
To cancel repeat playback, press the
MEM.UP/
button until the repeat indicator
disappears.
Note:
Please refer to the owner’s manual that was included with your iPod/iPhone for
more details.
Random Playback
Random plays songs/albums from your iPod/iPhone in a random order.
1. Press the
RANDOM
button on the remote control once and the random indicator appears
on the iPod/iPhone screen. All songs will be played without sequence.
2. Press the
RANDOM
button on the remote control twice and the random indicator appears
on the iPod/iPhone screen. All songs of this albums will be played without sequence.
To cancel shuffle playback, press the
RANDOM
button until the shuffle indicator
disappears.
Note:
Please refer to the owner’s manual that was included with your iPod/iPhone for
more details.
This product can navigate and play Music stored on your iPod/iPhone using your iPod/
iPhone screen. To do so, simply follow the steps:
1. Press the
MENU
button to go back to the previous menu, then use the
/
and
SELECT
buttons to navigate your iPod/iPhone menu lists.
2. Press the
/
buttons to highlight your desired music, and press the
SELECT
button
to start playing.
3. You can r
epeat steps 1-2 to select other music you wish to play.
Compatible iPod/iPhone Types
iPod nano (1st generation) 1GB, 2GB, 4GB
iPod nano (2nd generation) 2GB, 4GB, 8GB
iPod nano 3rd generation (video) 4GB, 8GB
iPod nano 4th generation (video) 8GB, 16GB
iPod 5th generation (video) 30GB, 60GB, 80GB
iPod classic 80GB, 120GB, 160GB
iPod touch (1st generation) 8GB, 16GB, 32GB
iPod touch (2nd generation) 8GB, 16GB, 32GB
iPhone 4GB, 8GB, 16GB
iPhone 3G 8GB, 16GB
Note:
If your iPhone is called while it is docked, playback will be paused.
Installing an iPod/iPhone Dock Adapter
1. Choose the iPod/iPhone Dock Adapter that fits your
iPod/iPhone, we recommend using the adapter that
was supplied with your iPod/iPhone (dock adapter
is not included With this Audio System).
2. Insert your iPod/iPhone Dock Adapter into the
dock until it sits firmly in place.
LISTENING TO THE RADIO
LISTENING TO YOUR iPod/iPhone
TIMER SETTING
LIMITED WARRANTY
TROUBLESHOOTING GUIDE
CD PLAYBACK
REPEAT PLAYBACK
RANDOM PLAYBACK
PROGRAMMABLE CD PLAYBACK
Presetting Stations
The unit can store a total of 20 stations in memory. Presetting allows you to tune in to a
station directly.
1. Tune in to a desired station.
2. Press the
PROG/MEM/
button. The “
MEM
” indicator Will blink and a preset number
will be shown on the display.
3. Press the
MEM.UP/
button to select the desired preset number.
4. Press the
PROG/MEM/
button again to store it in memory.
5. Repeat steps 1-4 to store other stations.
Tuning in to a Preset Station
Press the
MEM.UP/
button to select a preset number.
For Better Reception
Fully unwind the antenna wire. Extend the antenna wire and place it in the position that
sounds best.
Notes:
when the reception is good, the “
STEREO
” indicator Will appear on the display.
Do not connect the FM antenna to an outside antenna.
1. Press the
button to turn on the unit.
2. Hold the
OPEN
knob up to open the CD door. Place a disc in the center with the label
side up and then close the CD door gently.
3. Press the
FUNCTION
button to select CD mode. “
” appears and “- -” blinks on
the display. Then the total track no. is shown on the display.
4. Press the
PLAY/PAUSE
button to start playing.
AdJust the volume levels.
To Pause Playback
Press the
PLAY/PAUSE
button.
To resume playback, press the
PLAY/PAUSE
button again.
To Stop Playback
Press the
STOP
button.
Skipping to Another Track
Press either the
or
button according to the desired direction.
Press the
button to skip to the start of the current track or skip to previous tracks.
Press the
button to skip to the beginning of the next track.
Locating a Particular Point on a Track
Keep either the
or
button pressed during playback, according to the desired
direction, and release at the desired point.
Repeat Current Track
Press the
MEM.UP/
button until “
” appears on the display.The current track Will
be played repeatedly.
Repeat the Entire CD
Press the
MEM.UP/
button until “
” appears on the display. All tracks Will be
played repeatedly.
Cancel Playback Mode
Press the
MEM.UP/
button until repeat indicator disappears.
Random Playback
Press the
RANDOM
button on the remote control and “
” Will be
shown on the display. All tracks will be played randomly. After all
tracks have played, the unit will stop automatically.
Cancel Random Playback
Press the
RANDOM
button on the remote control again during RANDOM playback to
return to normal playback.
A program of up to 20 tracks can be set to play in a preset order.
1. In CD stop mode, press the
PROG/MEM/
button, the “
00
” Will
blink and the
MEM
” indicator Will appear
on the display.
2. Press the
or
button to select the desired track then press
the
PROG/MEM/
button to store the track in memory.
3. To add additional tracks, repeat step 2 (up to 20 tracks).
4. To start playback, press the
PLAY/PAUSE
button.
To Check the Program
Press the
STOP
button and the
or
button. Each time the
button is
pressed, the track number appears on the display.
To Change the Programmed Tracks during Program Playback
Press the
STOP
button and press the
PROG/MEM/
button repeatedly to search
the program number, then press either the
or
button to select the desired
track. Press the
PROG/MEM/
button again to register the newly selected track into
program.
To Erase the Whole Program, Do One of the Following
Press the
STOP
button twice.
Press the
FUNCTION
button to change to Radio/iPod/AUX mode.
Press the
button to turn off the unit.
Hold the
OPEN
knob up to open the CD door.
EQ SETTING
LINE IN CONNECTION
Connecting to LINE IN for Other Sound Sources
You can connect audio devices such as your iPod, CD players or MP3 players to the unit
via the LINE IN Jack. To do this, connect an audio cable from the line out or headphone out
Jack of the other audio device to the LINE IN Jack on the unit’s front panel.
Listening to the Connected Device
1. Press the
FUNCTION
button to select LINE IN mode - "
AUX
" is shoWn on the display.
2. Turn on the audio device you’ve attached to the LINE IN Jack.
This system supports a variety of equalizers and sound effects.
During playback, press the
EQ/TIMER
button to select a desired music mode.
Each time the
EQ/TIMER
button is pressed, the music mode will be changed to the next one as follows:
(CLASSIC) ->
(ROCK) ->
->
The timer function will turn the unit on at a preset time.
To Set Timer
1. In standby mode, press and hold the
EQ/TIMER
button on the remote
control until the hour digits and time TIMER indicator blink.
2. Tap the
or
button to adjust the desired hours then tap the
EQ/
TIMER
button once to confirm. The minute digits will begin to blink.
3. Tap the
or
button to adjust the desired minutes then tap the
EQ/TIMER
button once to confirm.
4. Press the
FUNCTION
button to select the timer mode (RADIO, CD or iPod). The “
”,
” or “
” icon Will be shoWn on the display.
Tap the
EQ/TIMER
button once to
confirm.
For RADIO timer, tune in to a desired station.
For CD timer, insert a CD into the unit.
For iPod timer, insert your iPod/iPhone into the connector.
5. Press the
- VOLUME +
buttons to adjust the volume levels.
6.
Press the
EQ/TIMER
button to confirm. The timer indicator will stop blinking and remain on.
7. The unit Will Wake up to “
RADIO
”, “
iPod
” or “
CD
” When the timer reaches the preset
time.
Notes:
After the unit Wakes up, you can adJust the volume control to obtain the desired volume.
Press the
button once to shut off the timer (timer setting will stay active, it will turn on
again, 24 hours later the time that the timer is set to).
If timer is set for FM tuner, it Will Wake up to the last station you tuned in.
For CD/iPod timer, if no CD/iPod is inserted, it Will Wake up to radio mode and Jump to
the last station you tuned in.
To Cancel Timer
Press and hold the
EQ/TIMER
button on the remote control until the TIMER indicator
goes out.
PROBLEMS
SOLUTIONS
System does not turn on
Make sure AC adapter is secure in the outlet, and outlet
has power.
CD
Disc in place but unit
won’t play
Make sure you’ve selected CD mode.
Make sure disc label is facing up.
Make sure disc is clean.
Pause mode is activated.
Disc may be damaged or dirty; check disc.
Disc skips
Make sure the unit is on a secure spot. Vibration or Jarring
can cause the disc to skip.
RADIO
Poor FM reception
Make sure FM antenna Wire is fully extended.
Electrical interference in your home can cause poor
reception. Move the unit away from them (especially
those with motors and transformers).
iPod/iPhone
iPod/iPhone does not dock
properly or does not install
properly.
Remove your iPod/iPhone from the dock and check for
obstruction on the connectors in the dock and on your iPod/
iPhone.
iPod/iPhone does not
respond to the speaker
system.
Make sure that your iPod/iPhone is Working properly
before docking into the unit. Please refer to your iPod/
iPhone manual for details.
AVC MULTIMEDIA ("AVC")
makes the following limited warranty. These limited
warranties extend to the original consumer purchaser and is limited to non-commercial
user of the product.
One Year Parts & Labor Warranty
AVC
products purchased in the United States are Warranted to be free from defects in
materials or workmanship for a period of one year from the date of their original retail
purchase. If the unit fails to conform to this warranty, we will service the product using
new or refurbished parts and products, at
AVC
's sole discretion.
During a period of one year from the effective warranty date,
AVC
will provide, when
needed, service labor to repair a manufacturing defect at its designated Service Center.
To obtain Warranty service in the United States, you must first call our
Customer
Support Center at 1-877-252-6873, during the hours listed in the box below.
The
deternination of service will be made by
AVC
customer support.
PLEASE DO NOT RETURN YOUR UNIT TO AVC WITHOUT PRIOR AUTHORIZATION
.
NeW or remanufactured replacements for defective parts or products Will be used for
repairs by
AVC
at its designated Service Center for one year from the defective Warranty
date. Such replacement parts or products are Warranted for an additional one year
from the date of repair or replacement. The Customer will be required to ship the unit
to the Service Center indicated at the time Customer Support is contacted to make the
necessary repairs. The customer is responsible for all transportation charges to the
service facility.
Packaging and Shipping Instruction
When you send the product to the
AVC
service facility you must use the original carton
box and packing material or an equivalent as designated by
AVC
.
Your Responsibility
(1) You must retain your bill of sale to provide proof of purchase.
(2) These warranties are effective only if the product is purchased and operated in the
U.S.A. or Canada.
(3) Warranties extend only to defects in material or workmanship, and do not extend to
any product or parts which have been lost or discarded, or damage to product or parts
caused by misuse, accident, improper operation or maintenance, or use in violation
of instructions provided with the product, or to product which has been altered or
modified without authorization of
AVC
, or to products or parts thereof which have had
the serial number removed or changed.
Out of Warranty
In the event your product requires repair after the limited warranty period has expired,
please contact our Customer Support Center at
1-877-252-6873
or
www.RCAav.com
Hours: Monday-Thursday: 9am-7pm, Friday: 9am-5pm, Saturday: 9am-NOON Eastern
time.
Important:
You are responsible for any transportation, shipping or insurance relative to the return
of the product to our Product Returns Center.
All warranties implied by state law, including the implied warranties of merchantability
and fitness for a particular purpose, are expressly limited to the duration of the limited
warranties set forth above. With the exception of any warranties implied by state law
as hereby limited, the foregoing warranty is exclusive and in lieu of all other warranties,
guarantees, agreements and similar obligations of manufacturer or seller with respect to
the repair or replacement of any parts. In no event shall
AVC
be liable for consequential
or incidental damages.
No person, agent, distributor, dealer or company is authorized to change, modify or
extend the terms of these warranties in any manner whatsoever. The time within action
must be commenced to enforce any obligation of
AVC
arising under the warranty or
under any statute, or laW of the United States or any state thereof, is hereby limited to
one year from the date of purchase. This limitation does not apply to implied warranties
arising under state law.
This warranty gives you specific legal rights and you may also have other rights, which
may vary from state to state. Some states do not alloW limitation on hoW long an implied
warranty lasts, when an action may be brought, or the exclusion or limitation of incidental
or consequential damages, so the above provisions may not apply to you.
For more information on other products and services, please contact our web site at
www.RCAav.com
Important:
Also keep your “Bill of Sale” as proof of purchase.
Model no
.....................................................
Product name
...............................................
Type of set
...........................................................................................................................
Serial no
. ......................................................
Invoice no
. ....................................................
Date purchased
............................................
Dealer name
.................................................
FOR SUPPORT, SERVICE AND REPAIR, PLEASE VISIT
www.RCAav.com
.
Specifications and external appearance are subject to change without notice.
Printed in China
811-622791W011
- 5 -
- 6 -
- 7 -
iPod/iPhone Dock
Adapter
(not included)
MAINTENANCE
Cleaning the Unit
Do not use volatile chemicals on this unit. Clean by lightly wiping with a soft cloth.
Cleaning the CD
If the CD skips or will not play, the disc may need to be cleaned.
Before playing, Wipe the disc from the center outWards With a cleaning cloth. After playing,
store the disc in its case.
Handling the disc
Only touch the CD on the edge to avoid finger prints on its surface.
Do not stick paper or tape nor write anything on the surface.
SLEEP TIMER SETTING
The sleep timer automatically turns the unit off after a certain time.
1.
While the unit is on, press the
SLEEP
button, “
” and “
” Will appear on the display.
2. Press the
SLEEP
button repeatedly to select the desired sleep time as below:
3. After setting a desired sleep time, the “
” icon remains on.
4. The unit will automatically turn off once it counts down the sleep time.
To clear the preset sleep time, press the
SLEEP
button until “
” appears.