RCA RS2135I RS2135i Quick Start Guide - Page 1
RCA RS2135I - Compact Audio System Manual
 |
UPC - 062118400042
View all RCA RS2135I manuals
Add to My Manuals
Save this manual to your list of manuals |
Page 1 highlights
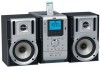
5642 9370 (EN/E) QuickStartGuide RS2135i www.rcaaudiovideo.com iPod not included. Congratulations on purchasing your new RCA Audio System. Please read these instructions for quick tips on using the unit. Setting Up Your Unit Main Speakers Connection Each speaker has a black/red wire. When connecting the speakers, match the black wires to the black jacks and the red wires to the red jacks on the main unit. AM/FM Antenna Connection Connect the AM loop antenna to the back of the unit. Adjust the position of the antenna for better reception. Push Speaker terminal tab down to insert wire. Release tab to lock wire in the terminal. NOTE: Ensure the insulation is completely removed from the ends of the speaker wires at all connection points. Connections of Antennas and Speakers 1. AM Loop antenna Jack 2. FM Pigtail Antenna 3. AUX IN 4. Main Speaker Jacks 1. 2. 3. 4. Setting Up Your Unit USB Drive Connection • Insert the USB drive's connector into the main unit's USB jack. Unplug the drive to disconnect. • Avoid disconnecting when USB is playing or recording. iPod Compatibility Made for: • iPod with video (30GB, 60GB, 80GB) 5th/5.5th generations • iPod photo (20GB U2 Special Edition, 30GB U2 Special Edition, 40GB, 60GB) 4th generation • iPod (10GB, 15GB, 20GB, 20GB U2 Special Edition, 30GB, 40GB) 3rd & 4th generations • iPod nano (1GB, 2GB, 4GB, 8GB) 1st & 2nd generations • iPod mini (4GB, 6GB) 1st & 2nd generations iPod is a trademark of Apple Computer, Inc., registered in the U.S. and other countries. Connecting Your iPod • Install the correct adaptor to the dock at the top of the unit. See page 7 of the User Manual for a list of all supported models and the suitable adaptor plate. dock Setting the Clock 1. Press and hold CLOCK on the remote control to set the clock. 2. Press / to set the time. Press CLOCK to advance from hour to minute and to save settings. Setting the Timer 1. Press and hold TIMER on the remote control to start setting the timer. 2. Press / to set the time for timer on and off. • Press TIMER to advance from hour to minute. 3. Press TIMER to select source. • Press / to select TUNER/TUNER REC/DISC/USB/iPod. If TUNER REC is selected, press / to select the preset station. 4. Press TIMER to set volume and to save setting. 5. You can press TIMER to activate or deactivate the timer anytime. Playing Music Selecting Source • Press SOURCE to select among CD player, USB, Tuner, AUX and iPod. In CD Player/USB/iPod Mode • Press to start and pause playback. • Press to stop playback. • Press / to skip to the previous or next track. In Tuner mode • Press BAND/INFO to select between FM and AM radio bands. • Press / to adjust frequencies. Press and hold / to scan frequencies. • Press and hold BAND/INFO of the main unit or BAND on the remote for two seconds for auto preset programming in FM band. This will erase all preset channels and re-program all of them. File Navigation in CD/USB Mode 1. Make sure the unit is in stop mode. Press if necessary. 2. Press SELECT on the main unit or on the remote control to enter navigation mode. 3. Turn VOLUME CONTROL knob on the main unit or press / on the remote control to select items on a list. 4. Press SELECT on the main unit or on the remote control to enter the highlighted folder or to play the highlighted song. 5. Press BACK on the main unit or on the remote control to go to the previous navigation menu. File Navigation in iPod Mode • Press MENU to enter navigation mode. • Turn the VOLUME CONTROL knob on the main unit or press / on the remote control to select items on a list. • Press SELECT on the main unit or on the remote control to confirm your selection. • Press BACK on the main unit or on the remote control to go to the previous navigation menu. Sound Control • Rotate VOLUME CONTROL knob on the main unit or press VOL / on the remote control to adjust volume. • Press EQ to select among FLAT, POP, JAZZ, CLASSIC, ROCK and CUSTOM. • Press BASS BOOST on the remote control to turn on/off bass boost.
-
 1
1
 |
 |
