RCA RT2770 Quick Start - RT2770 - Page 2
General controls - low optical volume
 |
UPC - 044319651300
View all RCA RT2770 manuals
Add to My Manuals
Save this manual to your list of manuals |
Page 2 highlights
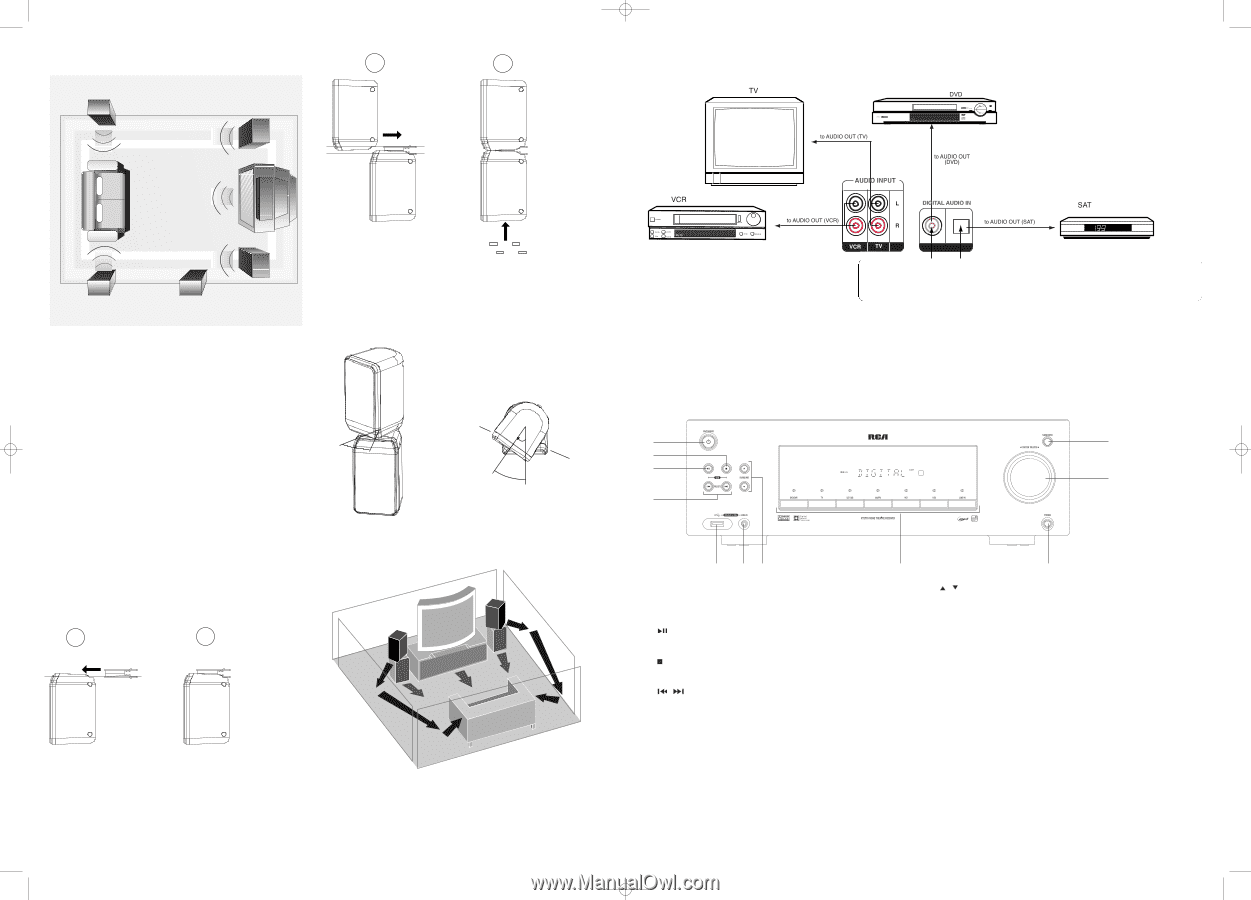
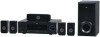
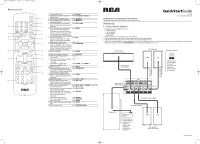
RT2770 QSG EN 6/3/07 5:19 PM Page 4 2. Positioning the Speakers 3 4 Left Rear Speaker (Surround) 3 Left Front Speaker 1 Rear Speaker 4. Connecting to Audio Components Front Speaker 2 Center 3 Right Rear Speaker (Surround) 4 Subwoofer 1 Right Front Speaker Courtesy Dolby Laboratories 1. Center: In surround mode, the center speaker carries most of the dialog as well as music and effects. It should be set between the left and right speakers. 2. Front Speakers: Front speakers carry primarily music and sound effects. 3. Rear Speakers: The rear speakers' overall sound balance should be as close as possible to the front speakers. Proper placement is vital to establish an evenly distributed sound field. 4. Subwoofer: A subwoofer is designed to reproduce powerful low bass effects (explosions, the rumble of spaceships, etc.) which dramatically heighten the action on the screen. 3. Front Surround sound Effect(FSsE) Setting (Optional) Front Surround sound Effect(FSsE) Setting If placing the rear speakers (surround speakers) at the back is not a good choice for you, you can use the Front Surround sound Effect(FSsE). Follow the following instruction for setting the speakers. Rubber Feet Adjusting the Angle of the Speakers To achieve the best Front Surround sound Effect (FSsE), adjust the mounted front left and the rear left speakers to the left for an angle of 25o - 45o from the center. Adjust the mounted front right and rear right speakers to the right in the same way. 25o - 45o Rear Speaker Rear Speaker Front Speaker 25 o - 45 o Center Front Speaker Mounting the Speakers 1. Match the front left and rear left speakers together and match the front right and rear right speakers together. Place the front speaker upside down. 2. Slide in the hinge to the bottom of the front speaker until the 'click' sound is heard. 3. Slide in the rear speaker to the hinge until the 'click' sound is heard. 4. Attach the four rubber feet provided to the top of the front speaker. Place the rear speakers and subwoofer a foot or more away from TV. After adjusting the angle, the speaker should look like this illustration. 1 2 Hinge Bottom Front Speaker Top COAXIAL OPTICAL DVD/SAT/CAB Digital Input Connect components capable of outputting Dolby digital (e.g. DVD or SAT) or standard PCM (CD) format digital signals. Read section on "Input Signal Setting" under "Advanced Sound Control" carefully to adjust the matching input settings. • The jacks on the back of the unit are used to connect to other components. One optical and one coaxial digital input jacks are provided for connection. • To connect a SAT receiver or a DVD player with a digital output, use an optical digital cable (not included) or a coaxial digital cable (included) to carry the audio signal and enjoy Dolby Digital sound quality. General controls Front panel controls 1 11 2 3 10 4 5 67 8 9 1. ON/STANDBY Turns on/off the unit. When the unit is turned on, the unit will go to the mode it was in before powered off. 2. Starts and pauses playback in USB mode. 3. Stops playback in USB mode. 4. / (PRESET buttons) Selects preset stations in AM/FM mode. Directly accesses the previous or next track in USB mode. 5. USB jack Connects USB devices. 6. LINE IN Connects components for audio input. 7. / (SURROUND buttons) Selects digital sound processor. (STEREO, HALL, CHURCH, CLUB, STADIUM, STUDIO, 3 STEREO, DOLBY PL EMULATION, DOLBY PL II MUSIC, DOLBY PL II MOVIE) 8. DVD/DVR, TV, SAT.CAB, AM/FM, VCR, USB and LINE-IN (SOURCE buttons) Selects sound source. 9. Headphones jack 10.MASTER VOLUME Adjusts the volume. 11.SUBWOOFER Selects among subwoofer output levels. (SOFT SUBWOOFER, BALANCE SUBWOOFER, STRONG SUBWOOFER, POWERFUL SUBWOOFER)
-
 1
1 -
 2
2
 |
 |