RCA VR6320 Owner/User Manual - Page 24
Accessing Recorded File Information, Recording - instructions
 |
View all RCA VR6320 manuals
Add to My Manuals
Save this manual to your list of manuals |
Page 24 highlights
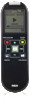
ENGLISH Accessing Recorded File Information While in stop mode, press and hold MENU to display recorded file information such as date of recording, time of recording, recording mode, and recording quality. Recording 1. While in stop mode, press REC•PAUSE to start recording. The red recording indicator will illuminate. Recording time will be displayed once you begin recording. 2. To pause recording, press REC•PAUSE once. The red recording indicator will be flashing. Press again to resume recording. 3. To stop recording, press STOP . AVR (Automatic Voice Recording) This feature allows the player to sense sound and to record only when you are speaking into the microphone. When dictation stops for about three seconds, recording will pause and then start again automatically when you resume dictation. 1. Select AVR ON in the Setting menu. Refer to Settings section for instructions on how to select AVR ON. 2. Press REC•PAUSE to enter AVR mode. 3. Start dictation. Recording starts automatically. 4. Press STOP to end AVR recording. To adjust the sensitivity (Low/Middle/High) of the microphone, press - Volume + during AVR recording. The higher the sensitivity, the less volume required to activate AVR. • AVR works better for dictation applications than lecture or conference recordings as background noise can cause some false triggers. • The first syllable or two may be lost when you start recording because this sound is used to turn on the AVR feature. It is a good practice to make some sounds or say a short word to activate the AVR before you begin actual dictation. The recording LED indicator will illuminate when AVR is active or will blink when AVR is inactive. 23
-
 1
1 -
2
-
3
-
4
-
5
-
6
-
7
-
8
-
9
-
10
-
11
-
12
-
13
-
14
-
15
-
16
-
17
-
18
-
 19
19 -
 20
20 -
 21
21 -
 22
22 -
 23
23 -
 24
24 -
 25
25 -
 26
26 -
 27
27 -
 28
28 -
 29
29 -
30
-
31
-
32
-
33
 |
 |
