Rane Sixty-One Sixty-One Quick Start with Scratch Live Keyboard Shortcuts - Page 2
Calibrating, Scratch Live, Connections - case
 |
View all Rane Sixty-One manuals
Add to My Manuals
Save this manual to your list of manuals |
Page 2 highlights
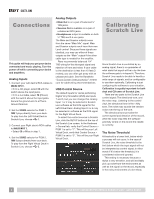
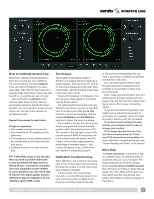
Connections This guide will help you get your decks connected and music playing. Turn the power off while connecting your decks and amplifiers. Analog Inputs 1. Connect your Left deck's RCA cables to Analog Input 1. • If it's a CD player, select CD with the switch above the input jacks. • If it's a turntable, select PH (Phono) with the switch above the input jacks. Secure the ground wire to a Phono Ground terminal. 2. Set the SOURCE selector for PGM 1. THRU 1 plays directly from your deck. To play from the Left Virtual Deck in Scratch Live, choose 1. 3. Connect your Right deck's RCA cables to Analog Input 3. • Select CD or PH as in step 1. 4. Set the SOURCE selector for PGM 2. THRU 3 plays directly from your deck. To play from the Right Virtual Deck in Scratch Live, choose 2. Analog Outputs • Main Out is on a pair of balanced ¼˝ TRS jacks. • Session Out is available on a pair of unbalanced RCA jacks. • Headphones output is available on both ¼˝ TRS and 3.5 mm jacks. The Main and Session outputs come from the same "Main Mix" signal. Main and Session outputs each have their own Level control. Because these signals are identical, you may use either of these outputs as the "Main" output if the other cable type is needed for the amplifier. Rane recommends balanced 1/4" TRS wiring for the strongest signal and rejection of hum and noise. If your cable to the destination is less than 10 feet (3 meters), you can often get away with an unbalanced cable. See the RaneNote "Sound System Interconnection" at rane. com for cable wiring recommendations. USB Control Source The default Inputs for decks performing Digital Vinyl Simulation (DVS) are Inputs 1 and 3, but you can change this. Analog Input 1 or 2 may be selected in Scratch Live software as the DVS signal for the Left Virtual Deck. Analog Input 3 or 4 may be selected in software as the DVS signal for the Right Virtual Deck. To select the control sources in Scratch Live, click the SETUP button at the top of the Scratch Live screen. In the Hardware > General tab, verify that Control Source > PGM 1 is set to "1". This will be your Left Virtual Deck. verify that Control Source > PGM 2 is set to "3". This will be your Right Virtual Deck. Calibrating Scratch Live Since Scratch Live is controlled by an analog signal, there is no guarantee of what state that signal will be in by the time the software gets to interpret it. Therefore, Scratch Live needs to be able to handle a wide range of signals, and be configurable to use them optimally. Calibrating is just configuring the software to your situation. Calibration is equally important for both vinyl and CD users of Scratch Live. There are two parts to the Scratch Live control signal: The directional tone, and the noise map. Listening to the control vinyl, the directional tone is the 1 kHz tone. The noise map sounds like random noise over the top of the tone. The directional tone provides the current speed and direction of the record, while the noise map tells the software precisely where on the record the needle is currently. The Noise Threshold A threshold is a lower limit, below which a process will not occur. In the case of Scratch Live, the noise threshold is the limit below which the input signal will not be interpreted as control signal; in other words if it's below the threshold, it is considered noise and ignored. This setting is necessary because a stylus is very sensitive, and will inevitably pick up noise from the environment as well as the signal on the record, especially in the noisy environment of a live show. 2 RANE SIXTY-ONE MIXER FOR SERATO SCRATCH LIVE • QUICK START
-
 1
1 -
 2
2 -
 3
3 -
 4
4
 |
 |
