Reebok R7.90 Treadmill English Manual
Reebok R7.90 Treadmill Manual
 |
View all Reebok R7.90 Treadmill manuals
Add to My Manuals
Save this manual to your list of manuals |
Reebok R7.90 Treadmill manual content summary:
- Reebok R7.90 Treadmill | English Manual - Page 1
if parts are damaged or missing, PLEASE CONTACT OUR CUSTOMER SERVICE DEPARTMENT DIRECTLY. CALL TOLL-FREE: 1-888-936-4266 Mon.-Fri., 7:30 until 16:30 ET (excluding holidays) OR E-MAIL US: [email protected] USERʼS MANUAL CAUTION Read all precautions and instructions in this manual before - Reebok R7.90 Treadmill | English Manual - Page 2
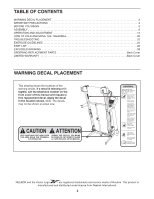
YOU BEGIN 5 ASSEMBLY 6 OPERATION AND ADJUSTMENT 14 HOW TO FOLD AND MOVE THE TREADMILL 20 TROUBLESHOOTING 22 EXERCISE GUIDELINES 25 PART LIST 26 EXPLODED DRAWING 28 ORDERING REPLACEMENT PARTS Back Cover LIMITED WARRANTY Back Cover WARNING DECAL PLACEMENT This drawing shows the locations of - Reebok R7.90 Treadmill | English Manual - Page 3
and in- structions in this manual and all warnings on your treadmill before using your treadmill. ICON assumes no responsibility for operate the treadmill if the power cord or plug is damaged, or if the treadmill is not working properly. (See TROUBLESHOOTING on page 22 if the treadmill is not - Reebok R7.90 Treadmill | English Manual - Page 4
procedures described in this manual. Never remove the motor hood un- less instructed to do so by an authorized ser- vice representative. Servicing other than the procedures in this manual should be performed by an authorized service representative only. 26. This treadmill is intended for in - Reebok R7.90 Treadmill | English Manual - Page 5
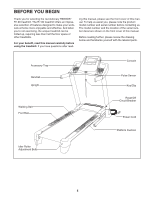
YOU BEGIN Thank you for selecting the revolutionary REEBOK® R7.90 treadmill. The R7.90 treadmill offers an impressive selection of features designed to make your workouts at home more enjoyable and effective. And when youʼre not exercising, the unique treadmill can be folded up, requiring less than - Reebok R7.90 Treadmill | English Manual - Page 6
walking belt or the shipping carton. This is normal and does not affect treadmill performance. If there is lubricant on top of the walking belt, simply the part, from the PART LIST near the end of this manual. The number after the parentheses is the quantity needed for assembly. Note: If a part is - Reebok R7.90 Treadmill | English Manual - Page 7
help of a second person, carefully tip the treadmill onto its left side. Partially fold the Frame (55) so that the treadmill is more stable; do not fully fold the the tie to pull the Upright Wire out of the hole. Attach two Base Pads (90) to the Base (95) in the locations shown with two #8 x 1" Tek - Reebok R7.90 Treadmill | English Manual - Page 8
3. Identify the Right Upright (85) and the Right Upright Spacer (91), which are marked with "Right" stickers. Align the oval hole in the Right Upright Spacer with the oval hole in the Base (95). If the holes do not line up, turn the Right Upright Spacer and try again. Insert the Upright Wire (87) - Reebok R7.90 Treadmill | English Manual - Page 9
its right side. Partially fold the Frame (55) so that the treadmill is more stable; do not fully fold the Frame yet. Remove and discard the two indicated the Patch Bolts yet. With the help of a second person, tip the treadmill so that the Base (95) is flat on the floor. 6 7 11 14 95 84 88 9 - Reebok R7.90 Treadmill | English Manual - Page 10
7. Insert the bracket on the Left Handrail (82) into the Left Upright (84). Insert the Upright Wire (87) several inches downward into the Right Upright (85); make sure that the wire tie does not fall into the Right Upright. Then, insert the Right Handrail (83) into the Right Upright. Be careful not - Reebok R7.90 Treadmill | English Manual - Page 11
9. With the help of a second person, hold the handrail assembly (B) upside-down near the console assembly (A). Connect the Console Ground Wires (6) in the handrail assembly to the ground wires in the console assembly. Insert the console wire (C) into the track in the console assembly (A). Insert the - Reebok R7.90 Treadmill | English Manual - Page 12
11. Slide the Left Upright Cover (80) onto the Left 11 Upright (84). Slide the Right Upright Cover (86) onto the Right Upright (85). 84 80 85 86 12. With the help of a second person, hold the console assembly (A) near the Right Upright (85) and the Left Upright (not shown). Insert the Upright - Reebok R7.90 Treadmill | English Manual - Page 13
Large Barrel 95 10 8 15. Make sure that all parts are properly tightened before you use the treadmill. If there are sheets of clear plastic on the treadmill decals, remove the plastic. To protect the floor or carpet, place a mat under the treadmill. Note: Extra hardware may be included. Keep the - Reebok R7.90 Treadmill | English Manual - Page 14
and grounded in accordance with all local codes and ordinances. IMPORTANT: The treadmill is not compatible with GFCI-equipped outlets. This product is for use on (TVSS). The surge suppressor must have a UL suppressed voltage rating of 400 volts or less and a minimum surge dissipation of 450 - Reebok R7.90 Treadmill | English Manual - Page 15
rate using the handgrip pulse sensor. In addition, the console features sixteen preset workouts-six calorie workouts and ten performance workouts. Each preset workout automatically controls the speed and incline of the treadmill as it guides manual. You can even listen to your favorite workout music - Reebok R7.90 Treadmill | English Manual - Page 16
mode, designed to be used if the treadmill is displayed in a store. If the displays instructions in this manual refer to miles. Each time the manual mode, use the increase and decrease buttons next to the Enter button and highlight START. Press the Enter button. If you have selected a workout - Reebok R7.90 Treadmill | English Manual - Page 17
following workout information: • The incline level of the treadmill. • The speed of the walking belt. Before using the handgrip pulse sensor, remove the sheets of clear plastic from the metal contacts. In addition, make sure that your hands are clean. Contacts To measure your heart rate, stand - Reebok R7.90 Treadmill | English Manual - Page 18
if you manually change the speed or incline of the treadmill during the workout, the number rate if desired. See step 6 on page 17. During the work- out, the profile will show your Current Segment progress. The flashing segment of the profile rep- resents the cur- rent segment of the workout - Reebok R7.90 Treadmill | English Manual - Page 19
treadmill to communicate with your wireless network and unlocks exciting new features. For example, you can download personalized workouts and track and analyze your workout router with SSID broadcast enabled (hidden networks are not supported). THE INFORMATION MODE The display will show whether an - Reebok R7.90 Treadmill | English Manual - Page 20
the key and unplug the power cord. CAUTION: You must be able to safely lift 45 lbs. (20 kg) to raise, lower, or move the treadmill. 1. Hold the metal frame firmly in the location shown by the arrow at the right. CAUTION: To decrease the possibility of injury, do not lift - Reebok R7.90 Treadmill | English Manual - Page 21
USE 1. Hold the upper end of the treadmill with your right hand. Pull the latch knob to the left and hold it. It may be necessary to push the frame forward as you - Reebok R7.90 Treadmill | English Manual - Page 22
TROUBLESHOOTING Most treadmill problems can be solved by following the simple steps below. Find the symptom that applies, and follow the steps listed. If further assistance is needed, see the front cover of this manual. PROBLEM: The power does not turn on SOLUTION: a. Make sure that the power - Reebok R7.90 Treadmill | English Manual - Page 23
treadmill for a few minutes to check for a correct speed reading. PROBLEM: The incline of the treadmill button. The treadmill will automatically the console. PROBLEM: The walking is overtightened, treadmill performance may decrease the key, and run the treadmill for a few minutes. Repeat until - Reebok R7.90 Treadmill | English Manual - Page 24
PROBLEM: The walking belt is off-center or slips when walked on SOLUTION: Be careful not to overtighten the walking belt. Then, plug in the power cord, insert the key, and run the treadmill for a few minutes. Repeat until the walking belt is centered. b. If the walking belt slips when walked on, - Reebok R7.90 Treadmill | English Manual - Page 25
You can use your heart rate as a guide to find the proper intensity level. The chart below shows recommended heart rates for fat burning and aerobic intensity of your exercise until your heart rate is near the highest number in your training zone. WORKOUT GUIDELINES Warming Up-Start with 5 to 10 - Reebok R7.90 Treadmill | English Manual - Page 26
No. RBTL69810.3 R1210A To locate the parts listed below, see the EXPLODED DRAWING near the end of this manual. Key No. Qty. 1 4 2 Warning Decal Platform Cushion Belt Guide Walking Platform Frame Cap Frame 81 2 82 1 83 1 84 1 85 1 86 1 87 1 88 1 89 2 90 4 91 1 92 2 93 1 94 2 95 1 96 2 97 1 98 1 - Reebok R7.90 Treadmill | English Manual - Page 27
1 107 4 108 1 109 1 * - Description Console Base #8 x 1" Screw Left Speaker French Latch Decal Userʼs Manual Note: Specifications are subject to change without notice. For information about ordering replacement parts, see the back cover of this manual. *These parts are not illustrated. 27 - Reebok R7.90 Treadmill | English Manual - Page 28
EXPLODED DRAWING A 30 28 19 56 34 33 24 30 41 21 39 30 30 40 30 20 43 36 32 17 42 17 44 17 45 46 47 48 60 19 28 59 15 24 61 33 34 58 21 109 57 56 54 30 55 17 30 30 17 52 10 49 23 20 46 45 36 43 30 42 32 30 17 50 10 39 8 51 28 Model No. RBTL69810.3 R1210A 15 - Reebok R7.90 Treadmill | English Manual - Page 29
EXPLODED DRAWING B 1 Model No. RBTL69810.3 R1210A 37 1 37 1 37 64 22 66 62 31 28 65 28 67 73 15 76 17 74 78 79 75 77 17 72 15 28 22 68 69 70 28 15 71 15 29 - Reebok R7.90 Treadmill | English Manual - Page 30
EXPLODED DRAWING C Model No. RBTL69810.3 R1210A 63 9 12 4 82 13 13 81 4 38 63 2 9 12 84 7 11 83 38 87 81 2 4 4 13 13 88 89 35 85 27 80 14 92 95 90 8 5 94 25 10 90 29 96 5 97 35 93 10 26 35 98 96 8 87 92 27 35 89 90 91 5 94 90 5 86 11 7 14 11 7 30 - Reebok R7.90 Treadmill | English Manual - Page 31
EXPLODED DRAWING D Model No. RBTL69810.3 R1210A 99 101 100 1 103 3 3 3 3 108 3 3 102 106 3 105 3 16 3 3 3 6 28 107 3 105 18 3 3 107 104 3 3 3 53 31 - Reebok R7.90 Treadmill | English Manual - Page 32
part(s) (see the PART LIST and the EXPLODED DRAWING near the end of this manual) LIMITED WARRANTY ICON of Canada, Inc. (ICON) warrants this product to be free from defects in workmanship and material, under normal use and service , or repairs not provided by an ICON authorized service center;
-
 1
1 -
 2
2 -
 3
3 -
 4
4 -
 5
5 -
 6
6 -
 7
7 -
8
-
9
-
10
-
11
-
12
-
13
-
14
-
15
-
16
-
17
-
18
-
19
-
20
-
21
-
22
-
23
-
24
-
25
-
26
-
27
-
28
-
29
-
30
-
31
-
32
 |
 |

Serial Number
Decal
Model No. RBTL69810.3
Serial No.
Write the serial number in the space
above for reference.
CAUTION
Read all precautions and instruc-
tions in this manual before using
this equipment. Save this manual
for future reference.
QUESTIONS?
If you have questions, or if parts are
damaged or missing,
PLEASE
CONTACT OUR CUSTOMER SER-
VICE DEPARTMENT DIRECTLY.
CALL TOLL-FREE:
1-888-936-4266
Mon.–Fri., 7:30 until 16:30 ET
(excluding holidays)
OR E-MAIL US:
USERʼS MANUAL
www.reebokfitness.com