Rheem 500 Series Installation Guide - Page 16
Programmable Mode, Temporary Program Override, Permanent Temperature Hold, Non-Programmable Mode - manual
 |
View all Rheem 500 Series manuals
Add to My Manuals
Save this manual to your list of manuals |
Page 16 highlights
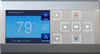
Using the Thermostat Programmable Mode If Program days per week is set for 7 (7 days) in the Thermostat Options Configuration Menu the thermostat can follow the program entered. Press the Run Schedule key. The thermostat will follow the program that you entered or the factory program. Temporary Program Override This feature will override the program temperature setting until the next program period begins. Touch or keys to adjust the temperature. The display will indicate "Temporary Hold At" to the left of the setpoint temperature. To cancel the temporary setting before the next period begins, touch Run Schedule to return to the program. Example: If you turn up the heat during the Morning program, it will remain at the new temperature until the time for the next period (Day program). Permanent Temperature Hold The Permanent Temperature Hold feature bypasses the program and allows you to adjust the temperature manually as needed. The temperature you set in HOLD will be maintained indefinitely. Touch Run Schedule to cancel HOLD and resume the programmed schedule. Touch or keys to adjust the temperature. The Hold key will appear on the screen. Touch the Hold key to maintain the new setpoint temperature. "Hold At" will display to the left of the temperature setpoint. To cancel the permanent hold setting at any time and return to the program, touch Run Schedule. Example: If you turn up the heat during the Morning program and touch the Hold key, it will remain at the new temperature until you touch Run Schedule or you manually adjust to another temperature. Non-Programmable Mode If Program days per week is set for 0 Days (Non-programmable) in the Thermostat Options Configuration Menu, the thermostat will not follow any program periods. Time of day and day of week will not display. Touch the SYSTEM key to select Heat or Cool and use the or buttons to adjust the temperature to your desired setting. 2 2 3 3 Advanced Installer Configuration Menu Touch or to step through the list of equipment submenus. Each equipment may have different submenus. 1 When the equipment submenu you want is showing in the scrolling message area, touch Installer Config. The scrolling message area will show "WORKING", then change to the first parameter on the equipment submenu. Settings for the parameter will also appear on the display. Touch or to step through the items of the equipment submenu and view settings. 1 If a setting can be adjusted, the or keys will appear. Change the setting as required. Then touch or to step to the next item. "WORKING" will appear and then the display will show "DONE" to indicate the change is accepted or "FAIL" to indicate the change was not made. The display will return to the fault status screen. Repeat the process. Some of the parameters being displayed on a submenu are long and switching between the name and the value. Touch 2 the Hold key to momentarily stop the display from switching.
-
 1
1 -
2
-
3
-
4
-
5
-
6
-
7
-
8
-
9
-
10
-
 11
11 -
 12
12 -
 13
13 -
 14
14 -
 15
15 -
 16
16 -
 17
17 -
 18
18
 |
 |
