| Section |
Page |
| <GRAPHIC> |
1 |
| <GRAPHIC> |
1 |
| Copy Reference |
1 |
| <GRAPHIC> |
1 |
| <GRAPHIC> |
1 |
| <GRAPHIC> |
1 |
| <GRAPHIC> |
1 |
| Read this manual carefully before you use this product and keep it handy for future reference. Fo... |
1 |
| Read this manual carefully before you use this product and keep it handy for future reference. Fo... |
1 |
| Type for 3515/DSm415/LD015 /Aficio 1515 Type for 3515F/DSm415f/LD015f /Aficio 1515F Type for 3515... |
2 |
| Printed in China |
2 |
| EN USA |
2 |
| B129-6607 |
2 |
| Introduction |
3 |
| Introduction |
3 |
| Introduction |
3 |
| This manual describes detailed instructions on the operation and notes about the use of this mach... |
3 |
| This manual describes detailed instructions on the operation and notes about the use of this mach... |
3 |
| Important |
3 |
| Important |
3 |
| Contents of this manual are subject to change without prior notice. In no event will the company ... |
3 |
| Contents of this manual are subject to change without prior notice. In no event will the company ... |
3 |
| Notes |
3 |
| Notes |
3 |
| Notes |
3 |
| Notes |
3 |
| Some illustrations in this manual might be slightly different from the machine. |
3 |
| Certain options might not be available in some countries. For details, please contact your local ... |
3 |
| Laser Safety: |
3 |
| Laser Safety: |
3 |
| CDRH Regulations |
3 |
| CDRH Regulations |
3 |
| This equipment complies with requirements of 21 CFR subchapter J for class 1 laser products. This... |
3 |
| Caution: |
3 |
| Caution: |
3 |
| Use of controls or adjustments or performance of procedures other than those specified in this ma... |
3 |
| Use of controls or adjustments or performance of procedures other than those specified in this ma... |
3 |
| Notes: |
3 |
| Notes: |
3 |
| Certain types might not be available in some countries. For details, please contact your local de... |
3 |
| Certain types might not be available in some countries. For details, please contact your local de... |
3 |
| Two kinds of size notation are employed in this manual. With this machine refer to the inch version. |
3 |
| Two kinds of size notation are employed in this manual. With this machine refer to the inch version. |
3 |
| Two kinds of size notation are employed in this manual. With this machine refer to the inch version. |
3 |
| For good copy quality, the supplier recommends that you use genuine toner from the supplier. |
3 |
| For good copy quality, the supplier recommends that you use genuine toner from the supplier. |
3 |
| For good copy quality, the supplier recommends that you use genuine toner from the supplier. |
3 |
| The supplier shall not be responsible for any damage or expense that might result from the use of... |
3 |
| The supplier shall not be responsible for any damage or expense that might result from the use of... |
3 |
| The supplier shall not be responsible for any damage or expense that might result from the use of... |
3 |
| Power Source |
3 |
| Power Source |
3 |
| 120V, 60Hz, 8A or more |
3 |
| 120V, 60Hz, 8A or more |
3 |
| Please be sure to connect the power cord to a power source as above. For details about power sour... |
3 |
| In accordance with IEC 60417, this machine uses the following symbols for the main power switch: |
4 |
| In accordance with IEC 60417, this machine uses the following symbols for the main power switch: |
4 |
| In accordance with IEC 60417, this machine uses the following symbols for the main power switch: |
4 |
| In accordance with IEC 60417, this machine uses the following symbols for the main power switch: |
4 |
| Trademark |
4 |
| Trademark |
4 |
| PostScript |
4 |
| PostScript |
4 |
| Other product names used herein are for identification purposes only and might be trademarks of t... |
4 |
| Copyright © 2003 |
4 |
| Copyright © 2003 |
4 |
| Manuals for This Machine |
5 |
| Manuals for This Machine |
5 |
| Manuals for This Machine |
5 |
| The following manuals describe the operational procedures of this machine. For particular functio... |
5 |
| The following manuals describe the operational procedures of this machine. For particular functio... |
5 |
| Manuals provided are specific to machine type. |
5 |
| Manuals provided are specific to machine type. |
5 |
| Adobe Acrobat Reader is necessary to view the manuals as a PDF file. |
5 |
| Two CD-ROMs are provided: |
5 |
| General Settings Guide |
5 |
| General Settings Guide |
5 |
| General Settings Guide |
5 |
| Provides an overview of the machine and describes |
5 |
| Provides an overview of the machine and describes |
5 |
| Refer to this manual for Address Book procedures such as registering fax numbers, e-mail addresse... |
5 |
| Network Guide (PDF file - CD-ROM1) |
5 |
| Network Guide (PDF file - CD-ROM1) |
5 |
| Describes procedures for configuring the machine and computers in a network environment. |
5 |
| Describes procedures for configuring the machine and computers in a network environment. |
5 |
| Copy Reference (this manual) |
5 |
| Copy Reference (this manual) |
5 |
| Describes operations, functions, and troubleshooting for the machine's copier function. |
5 |
| Describes operations, functions, and troubleshooting for the machine's copier function. |
5 |
| Facsimile Reference <Basic Features> |
5 |
| Facsimile Reference <Basic Features> |
5 |
| Describes operations, functions, and troubleshooting for the machine's facsimile function. |
5 |
| Describes operations, functions, and troubleshooting for the machine's facsimile function. |
5 |
| Facsimile Reference <Advanced Features> |
5 |
| Facsimile Reference <Advanced Features> |
5 |
| Describes advanced functions and settings for key operators. |
5 |
| Describes advanced functions and settings for key operators. |
5 |
| Printer Reference 1 |
5 |
| Printer Reference 1 |
5 |
| Describes system settings and operations for the machine's printer function. |
5 |
| Describes system settings and operations for the machine's printer function. |
5 |
| Printer Reference 2 (PDF file - CD-ROM1) |
5 |
| Printer Reference 2 (PDF file - CD-ROM1) |
5 |
| Describes operations, functions, and troubleshooting for the machine's printer function. |
5 |
| Describes operations, functions, and troubleshooting for the machine's printer function. |
5 |
| Scanner Reference (PDF file - CD-ROM1) |
5 |
| Scanner Reference (PDF file - CD-ROM1) |
5 |
| Describes operations, functions, and troubleshooting for the machine's scanner function. |
5 |
| Describes operations, functions, and troubleshooting for the machine's scanner function. |
5 |
| Manuals for DeskTopBinder V2 Lite |
6 |
| Manuals for DeskTopBinder V2 Lite |
6 |
| DeskTopBinder V2 Lite is a utility included on the CD-ROM labeled \ |
6 |
| DeskTopBinder V2 Lite is a utility included on the CD-ROM labeled \ |
6 |
| • DeskTopBinder V2 Lite Setup Guide (PDF file - CD-ROM2) |
6 |
| • DeskTopBinder V2 Lite Setup Guide (PDF file - CD-ROM2) |
6 |
| • DeskTopBinder V2 Lite Setup Guide (PDF file - CD-ROM2) |
6 |
| Describes installation of, and the operating environment for DeskTopBinder V2 Lite in detail. Thi... |
6 |
| • DeskTopBinder V2 Introduction Guide (PDF file - CD-ROM2) |
6 |
| • DeskTopBinder V2 Introduction Guide (PDF file - CD-ROM2) |
6 |
| Describes operations of DeskTopBinder V2 Lite and provides an overview of its functions. This gui... |
6 |
| • Auto Document Link Guide (PDF file - CD-ROM2) |
6 |
| • Auto Document Link Guide (PDF file - CD-ROM2) |
6 |
| Describes operations and functions of Auto Document Link installed with DeskTopBinder V2 Lite. Th... |
6 |
| Manuals for ScanRouter V2 Lite |
6 |
| Manuals for ScanRouter V2 Lite |
6 |
| ScanRouter V2 Lite is a utility included on the CD-ROM labeled \ |
6 |
| ScanRouter V2 Lite is a utility included on the CD-ROM labeled \ |
6 |
| • ScanRouter V2 Lite Setup Guide (PDF file - CD-ROM2) |
6 |
| • ScanRouter V2 Lite Setup Guide (PDF file - CD-ROM2) |
6 |
| • ScanRouter V2 Lite Setup Guide (PDF file - CD-ROM2) |
6 |
| Describes installation of, settings, and the operating environment for ScanRouter V2 Lite in deta... |
6 |
| • ScanRouter V2 Lite Management Guide (PDF file - CD-ROM2) |
6 |
| • ScanRouter V2 Lite Management Guide (PDF file - CD-ROM2) |
6 |
| Describes delivery server management and operations, and provides an overview of ScanRouter V2 Li... |
6 |
| Other manuals |
6 |
| Other manuals |
6 |
| • PostScript3 Supplement (PDF file - CD-ROM1) |
6 |
| • PostScript3 Supplement (PDF file - CD-ROM1) |
6 |
| • PostScript3 Supplement (PDF file - CD-ROM1) |
6 |
| • PostScript3 Supplement (PDF file - CD-ROM1) |
6 |
| • Unix Supplement (Available from an authorized dealer, or as a PDF file on our Web site.) |
6 |
| • Unix Supplement (Available from an authorized dealer, or as a PDF file on our Web site.) |
6 |
| TABLE OF CONTENTS |
7 |
| TABLE OF CONTENTS |
7 |
| Manuals for This Machine i |
7 |
| Notice |
9 |
| Notice |
9 |
| Notice |
9 |
| Important |
9 |
| Important |
9 |
| Do not make copies of any item for which copying is prohibited by law. |
9 |
| Do not make copies of any item for which copying is prohibited by law. |
9 |
| Copying the following items is normally prohibited by local law: |
9 |
| Bank billes, revenue stamps, bonds, stock certificates, bank drafts, checks, passports, driver's ... |
9 |
| Notice To Wireless LAN Interface (option) Users |
9 |
| Notice To Wireless LAN Interface (option) Users |
9 |
| Notes to users in the United States of America |
9 |
| Notes to users in the United States of America |
9 |
| Notes to users in the United States of America |
9 |
| Notice: |
9 |
| Notice: |
9 |
| This equipment has been tested and found to comply with the limits for a Class B digital device, ... |
9 |
| • Reorient or relocate the receiving antenna. |
9 |
| • Reorient or relocate the receiving antenna. |
9 |
| • Reorient or relocate the receiving antenna. |
9 |
| • Increase the separation between the equipment and receiver. |
9 |
| • Increase the separation between the equipment and receiver. |
9 |
| • Connect the equipment into an outlet on a circuit different from that to which the receiver is ... |
9 |
| • Connect the equipment into an outlet on a circuit different from that to which the receiver is ... |
9 |
| • Consult the dealer or an experienced radio/TV technician for help. |
9 |
| • Consult the dealer or an experienced radio/TV technician for help. |
9 |
| This device complies with part 15 of the FCC Rules. |
9 |
| Operation is subject to the following two conditions: |
9 |
| (1) This device may not cause harmful interference, and (2) this device must accept any interfere... |
9 |
| Warning |
9 |
| Warning |
9 |
| Changes or modifications not expressly approved by the party responsible for compliance could voi... |
9 |
| Note to users in Canada |
10 |
| Note to users in Canada |
10 |
| Note: |
10 |
| Note: |
10 |
| This Class B digital apparatus complies with Canadian ICES-003. |
10 |
| Operation is subject to the following two conditions: |
10 |
| (1) This device may not cause interference, and (2) this device must accept any interference, inc... |
10 |
| IEEE 802.11b Interface Unit Type D: |
10 |
| This device complies with RSS-210 of Industry Canada. |
10 |
| The term “IC:” before the certification/registration number only signifies that the Industry Cana... |
10 |
| To prevent radio interference to the licensed service, this device is intended to be operated ind... |
10 |
| Remarque concernant les utilisateurs au Canada |
10 |
| Remarque concernant les utilisateurs au Canada |
10 |
| Avertissement: |
10 |
| Avertissement: |
10 |
| Cet appareil numérique de la classe B est conforme á la norme NMB-003 du Canada. |
10 |
| L'utilisation de ce dispositif est autorisée seulement aux conditions suivantes: (1) il ne doit p... |
10 |
| IEEE 802.11b Interface Unit Type D: |
10 |
| Ce dispositif est conforme á la norme CNR-210 d'Industrie Canada. |
10 |
| L'expression «IC:» avant le numéro d'homologation/enregistrement signifie seulement que les spéci... |
10 |
| Pour empêcher que cet appareil cause du brouillage au service faisant l'objet d'une licence, il d... |
10 |
| Si le matériel (ou son antenne d'emission) est installe á l'extérieur, il doit faire l'objet d'un... |
10 |
| How to Read This Manual |
11 |
| How to Read This Manual |
11 |
| Symbols |
11 |
| Symbols |
11 |
| The following set of symbols is used in this manual. |
11 |
| The following set of symbols is used in this manual. |
11 |
| This symbol indicates a potentially hazardous situation that might result in death or serious inj... |
11 |
| This symbol indicates a potentially hazardous situation that might result in minor or moderate in... |
11 |
| * The statements above are notes for your safety. |
11 |
| If this instruction is not followed, paper might be misfed, originals might be damaged, or data m... |
11 |
| This symbol indicates information or preparations required prior to operating. |
11 |
| This symbol indicates precautions for operation, or actions to take after abnormal operation. |
11 |
| This symbol indicates numerical limits, functions that cannot be used together, or conditions in ... |
11 |
| This symbol indicates a reference. |
11 |
| Keys that appear on the machine's display panel. |
11 |
| Keys that appear on the machine's display panel. |
11 |
| Keys that appear on the machine's display panel. |
11 |
| Keys built into the machine's control panel. |
11 |
| Keys built into the machine's control panel. |
11 |
| Keys built into the machine's control panel. |
11 |
| Safety Information |
12 |
| Safety Information |
12 |
| When using this machine, the following safety precautions should always be followed. |
12 |
| When using this machine, the following safety precautions should always be followed. |
12 |
| Safety During Operation |
12 |
| Safety During Operation |
12 |
| In this manual, the following important symbols are used: |
12 |
| In this manual, the following important symbols are used: |
12 |
| <TABLE> |
12 |
| <TABLE> |
12 |
| <TABLE> |
12 |
| <TABLE> |
12 |
| <TABLE> |
12 |
| <TABLE> |
12 |
| <TABLE BODY> |
12 |
| <TABLE ROW> |
12 |
| • Disconnect the power plug (by pulling the plug, not the cable) if the power cable or plug becom... |
12 |
| • Disconnect the power plug (by pulling the plug, not the cable) if the power cable or plug becom... |
12 |
| • To avoid hazardous electric shock or laser radiation exposure, do not remove any covers or scre... |
12 |
| • Turn off the power and disconnect the power plug (by pulling the plug, not the cable) if any of... |
12 |
| • Do not incinerate spilled toner or used toner. Toner dust might ignite when exposed to an open ... |
12 |
| • Disposal can take place at our authorized dealer. |
12 |
| • Dispose of the used toner bottle in accordance with the local regulations. |
12 |
| • Connect the machine only to the power source described on the inside front cover of this manual... |
12 |
| • Do not damage, break or make any modifications to the power cord. Do not place heavy objects on... |
12 |
| <TABLE> |
13 |
| <TABLE> |
13 |
| <TABLE> |
13 |
| <TABLE> |
13 |
| <TABLE> |
13 |
| <TABLE> |
13 |
| <TABLE BODY> |
13 |
| <TABLE ROW> |
13 |
| • Protect the machine from dampness or wet weather, such as rain and snow. |
13 |
| • Protect the machine from dampness or wet weather, such as rain and snow. |
13 |
| • Unplug the power cord from the wall outlet before you move the machine. While moving the machin... |
13 |
| • When you disconnect the power plug from the wall outlet, always pull the plug (not the cable). |
13 |
| • Do not allow paper clips, staples, or other small metallic objects to fall inside the machine. |
13 |
| • Keep toner (used or unused) and toner bottle out of the reach of children. |
13 |
| • For environmental reasons, do not dispose of the machine or expended supply waste at household ... |
13 |
| • The inside of the machine could be very hot. Do not touch the parts with a label indicating the... |
13 |
| • Keep the machine away from humidity and dust. Otherwise a fire or an electric shock might occur. |
13 |
| • Do not place the machine on an unstable or tilted surface. If it topples over, an injury might ... |
13 |
| • When the optional paper tray unit is installed, do not push the upper part of the main unit hor... |
13 |
| • If you use the machine in a confined space, make sure there is a continuous air turnover. |
13 |
| Positions of RWARNING and RCAUTION Labels |
14 |
| Positions of RWARNING and RCAUTION Labels |
14 |
| This machine has labels for RWARNING and RCAUTION at the positions shown below. For safety, pleas... |
14 |
| This machine has labels for RWARNING and RCAUTION at the positions shown below. For safety, pleas... |
14 |
| The inside of this machine gets very hot. Do not touch the inside. Doing so could result in a burn. |
14 |
| The inside of this machine gets very hot. Do not touch the inside. Doing so could result in a burn. |
14 |
| The inside of this machine gets very hot. Do not touch the inside. Doing so could result in a burn. |
14 |
| <GRAPHIC> |
14 |
| A |
14 |
| <GRAPHIC> |
14 |
| B The anti-condensation heater in the lower part of the machine interior gets very hot. Do not to... |
14 |
| <GRAPHIC> |
14 |
| C The anti-condensation heater in the upper part of the machine interior gets very hot. Do not to... |
14 |
| <GRAPHIC> |
15 |
| The anti-condensation heater is optional. For details, contact your service representative. |
15 |
| The anti-condensation heater is optional. For details, contact your service representative. |
15 |
| Control Panel |
16 |
| Control Panel |
16 |
| Copier only |
16 |
| Copier only |
16 |
| Copier only |
16 |
| <GRAPHIC> |
16 |
| Fax, printer and/or scanner installed |
16 |
| Fax, printer and/or scanner installed |
16 |
| <GRAPHIC> |
16 |
| Copy |
16 |
| Copy |
16 |
| Copy |
16 |
| Press to activate the copier function. |
16 |
| 2.� Indicators |
16 |
| 2.� Indicators |
16 |
| Display errors and machine status. |
16 |
| • h: Error indicator |
16 |
| • h: Error indicator |
16 |
| • h: Error indicator |
16 |
| See “Control Panel”, |
16 |
| • D: Add Toner indicator |
16 |
| • D: Add Toner indicator |
16 |
| See |
16 |
| • B: Load Paper indicator |
16 |
| • B: Load Paper indicator |
16 |
| See |
16 |
| 3.� Display |
16 |
| 3.� Display |
16 |
| Displays operation status and messages. |
16 |
| 4.� Selection keys |
16 |
| 4.� Selection keys |
16 |
| Correspond to items on the display. Press to select the corresponding item. |
16 |
| 5.� Scroll keys |
16 |
| 5.� Scroll keys |
16 |
| Press to select an item. |
16 |
| U |
16 |
| U |
16 |
| T |
16 |
| T |
16 |
| V |
16 |
| V |
16 |
| W |
16 |
| W |
16 |
| See |
16 |
| See |
16 |
| User Tools/Counter |
16 |
| User Tools/Counter |
16 |
| User Tools/Counter |
16 |
| • User Tools |
16 |
| • User Tools |
16 |
| • User Tools |
16 |
| Press to change default and conditions according to requirement. See |
16 |
| • Counter |
16 |
| • Counter |
16 |
| Press to check or print the counter value. |
16 |
| Clear Modes |
16 |
| Clear Modes |
16 |
| Clear Modes |
16 |
| Press to clear the current settings. |
16 |
| Clear/Stop |
16 |
| Clear/Stop |
16 |
| Clear/Stop |
16 |
| Clear: clears an entered numeric value. |
16 |
| Stop: stops copying. |
16 |
| 9.� Main power indicator |
16 |
| 9.� Main power indicator |
16 |
| Main power indicator |
16 |
| Lights when the main power switch is turned on. |
16 |
| p.11 “Turning On the Power” |
16 |
| p.11 “Turning On the Power” |
16 |
| p.11 “Turning On the Power” |
16 |
| 10.� On indicator |
17 |
| 10.� On indicator |
17 |
| On indicator |
17 |
| Lights when the operation switch is on. |
17 |
| p.11 “Turning On the Power” |
17 |
| p.11 “Turning On the Power” |
17 |
| p.11 “Turning On the Power” |
17 |
| 11.� Operation switch |
17 |
| 11.� Operation switch |
17 |
| Operation switch |
17 |
| Press to turn the power on. The On indicator lights. To turn the power off, press again. |
17 |
| This key is inactivate during scanning or while setting defaults. |
17 |
| This key is inactivate during scanning or while setting defaults. |
17 |
| Duplex |
17 |
| Duplex |
17 |
| Duplex |
17 |
| Makes two-sided copies. |
17 |
| See |
17 |
| See |
17 |
| Combine |
17 |
| Combine |
17 |
| Combine |
17 |
| Press to make combine copies. |
17 |
| p.32 “One-Sided Combine” |
17 |
| p.32 “One-Sided Combine” |
17 |
| p.32 “One-Sided Combine” |
17 |
| p.33 “Two-Sided Combine” |
17 |
| p.33 “Two-Sided Combine” |
17 |
| Sort |
17 |
| Sort |
17 |
| Sort |
17 |
| Automatically sorts copies. |
17 |
| Lighter |
17 |
| Lighter |
17 |
| Lighter |
17 |
| Press to change the image density setting. Select the image density in five increments, lighter t... |
17 |
| Original Type |
17 |
| Original Type |
17 |
| Original Type |
17 |
| Press to select the original type registered with |
17 |
| Cancel |
17 |
| Cancel |
17 |
| Cancel |
17 |
| Press to cancel an operation or return to the previous display. |
17 |
| OK |
17 |
| OK |
17 |
| OK |
17 |
| Press to set a selected item or entered numeric value. |
17 |
| 19.� Number keys |
17 |
| 19.� Number keys |
17 |
| Press to enter numeric values. |
17 |
| Start |
17 |
| Start |
17 |
| Start |
17 |
| Press to start copying. |
17 |
| Display |
17 |
| Display |
17 |
| Display |
17 |
| This section explains how to read the display and use the Selection key. |
17 |
| This section explains how to read the display and use the Selection key. |
17 |
| The copy display is set as the default screen when the machine is turned on. |
17 |
| The copy display is set as the default screen when the machine is turned on. |
17 |
| Initial copy display |
17 |
| Initial copy display |
17 |
| Initial copy display |
17 |
| <GRAPHIC> |
17 |
| 1.� Operational status or messages |
17 |
| 1.� Operational status or messages |
17 |
| 2.� Messages and the selected tray appear here. Currently selected items appear in brackets. |
17 |
| 2.� Messages and the selected tray appear here. Currently selected items appear in brackets. |
17 |
| 3.� Number of copies set. |
17 |
| 3.� Number of copies set. |
17 |
| 4.� Reduce/Enlarge ratio function for non-fixed ratios. |
17 |
| 4.� Reduce/Enlarge ratio function for non-fixed ratios. |
17 |
| Reading the Display and Using Keys |
18 |
| Reading the Display and Using Keys |
18 |
| Reading display |
18 |
| Using keys |
18 |
| The display is not touch sensitive. Use the following keys to select the keys and items displayed... |
18 |
| The display is not touch sensitive. Use the following keys to select the keys and items displayed... |
18 |
| <GRAPHIC> |
18 |
| <GRAPHIC> |
18 |
| 1.� Selection keys |
18 |
| 1.� Selection keys |
18 |
| 1.� Selection keys |
18 |
| Correspond to items at the bottom line on the display. |
18 |
| Example: when the combine function is set |
18 |
| • When the instruction “press |
18 |
| • When the instruction “press |
18 |
| • When the instruction “press |
18 |
| • When the instruction “press |
18 |
| • When the instruction “press |
18 |
| • When the instruction “press |
18 |
| • When the instruction “press |
18 |
| Cancel |
18 |
| Cancel |
18 |
| Cancel |
18 |
| Press to cancel an operation or return to the previous display. |
18 |
| OK |
18 |
| OK |
18 |
| OK |
18 |
| Press to set a selected item or entered numeric value. |
18 |
| 4.� Scroll keys |
18 |
| 4.� Scroll keys |
18 |
| Press to move the cursor to each direction one by one. |
18 |
| When |
18 |
| Turning On the Power |
19 |
| Turning On the Power |
19 |
| Power |
19 |
| This machine has two power switches. |
19 |
| This machine has two power switches. |
19 |
| Operation switch |
19 |
| Operation switch |
19 |
| Operation switch |
19 |
| Press to activate the machine. When the machine has finished warming up, you can operate the mach... |
19 |
| Press to activate the machine. When the machine has finished warming up, you can operate the mach... |
19 |
| Main power switch |
19 |
| Main power switch |
19 |
| Turning off this switch makes the main power indicator on the right side of the control panel go ... |
19 |
| Turning off this switch makes the main power indicator on the right side of the control panel go ... |
19 |
| When the fax unit is installed, fax files in memory may be lost if you turn this switch off. Use ... |
19 |
| This machine automatically enters Energy Saver mode or turns itself off if you do not use it for ... |
19 |
| This machine automatically enters Energy Saver mode or turns itself off if you do not use it for ... |
19 |
| Turning On the Main Power |
19 |
| Turning On the Main Power |
19 |
| Turning On the main power |
19 |
| A Make sure the power cord is firmly plugged into the wall outlet. |
19 |
| A Make sure the power cord is firmly plugged into the wall outlet. |
19 |
| A Make sure the power cord is firmly plugged into the wall outlet. |
19 |
| A Make sure the power cord is firmly plugged into the wall outlet. |
19 |
| B Turn on the main power switch. |
19 |
| B Turn on the main power switch. |
19 |
| <GRAPHIC> |
19 |
| The main power indicator goes on. |
19 |
| Do not turn off the main power switch immediately after turning it on. Doing so may result in dam... |
19 |
| Do not turn off the main power switch immediately after turning it on. Doing so may result in dam... |
19 |
| Turning On the Power |
19 |
| Turning On the Power |
19 |
| Turning On the power |
19 |
| A Press the operation switch. |
19 |
| A Press the operation switch. |
19 |
| A Press the operation switch. |
19 |
| A Press the operation switch. |
19 |
| The |
19 |
| <GRAPHIC> |
19 |
| If the power does not come on when the operation switch is pressed, check the main power switch i... |
19 |
| If the power does not come on when the operation switch is pressed, check the main power switch i... |
19 |
| Turning Off the Power |
20 |
| Turning Off the Power |
20 |
| Turning Off the power |
20 |
| A Press the operation switch. |
20 |
| A Press the operation switch. |
20 |
| A Press the operation switch. |
20 |
| A Press the operation switch. |
20 |
| The |
20 |
| <GRAPHIC> |
20 |
| Even if you press the operation switch, the indicator does not go out, but blinks in the followin... |
20 |
| Even if you press the operation switch, the indicator does not go out, but blinks in the followin... |
20 |
| Turning Off the Main Power |
20 |
| Turning Off the Main Power |
20 |
| Turning Off the main power |
20 |
| Do not turn off the main power switch when the |
20 |
| Do not turn off the main power switch when the |
20 |
| Do not turn off the main power switch when the |
20 |
| Make sure 100% is shown as available memory on the initial scanner display before turning off the... |
20 |
| Be sure to turn off the main power switch before pulling out the power plug. Not doing this may r... |
20 |
| A Be sure the |
20 |
| A Be sure the |
20 |
| A Be sure the |
20 |
| B Turn off the main power switch. |
20 |
| B Turn off the main power switch. |
20 |
| The main power indicator goes out. |
20 |
| - When the fax unit is installed |
20 |
| - When the fax unit is installed |
20 |
| When the main power switch is turned off while using the fax function, waiting fax and print jobs... |
20 |
| Make sure 100% is shown as available memory on the display before turning off the main power swit... |
20 |
| Make sure 100% is shown as available memory on the display before turning off the main power swit... |
20 |
| If the |
20 |
| Saving Energy |
21 |
| Saving Energy |
21 |
| • Low Power/Auto Off |
21 |
| • Low Power/Auto Off |
21 |
| • Low Power/Auto Off |
21 |
| • Low Power/Auto Off |
21 |
| The machine automatically enters Low Power mode automatically after a job is finished, and the se... |
21 |
| After a specified period has passed, following job completion, the machine automatically turns of... |
21 |
| You can change the Energy Saver Timer and Auto Off Timer. See |
21 |
| You can change the Energy Saver Timer and Auto Off Timer. See |
21 |
| The Low Power Timer and Auto Off Timer function will not operate in the following cases: |
21 |
| 1.� Placing Originals |
23 |
| 1.� Placing Originals |
23 |
| Originals |
23 |
| Originals |
23 |
| Sizes and Weights of Recommended Originals |
23 |
| Sizes and Weights of Recommended Originals |
23 |
| Metric version |
23 |
| Metric version |
23 |
| Metric version |
23 |
| <TABLE> |
23 |
| <TABLE> |
23 |
| <TABLE HEADING> |
23 |
| <TABLE ROW> |
23 |
| Original location |
23 |
| Original size |
23 |
| Original weight |
23 |
| <TABLE BODY> |
23 |
| <TABLE ROW> |
23 |
| Exposure glass |
23 |
| Up to A4L |
23 |
| Up to A4L |
23 |
| -- |
23 |
| <TABLE ROW> |
23 |
| ADF |
23 |
| A4L – A5KL |
23 |
| A4L – A5KL |
23 |
| 52–105 g/m2 |
23 |
| Inch version |
23 |
| Inch version |
23 |
| <TABLE> |
23 |
| <TABLE> |
23 |
| <TABLE HEADING> |
23 |
| <TABLE ROW> |
23 |
| Original location |
23 |
| Original size |
23 |
| Original weight |
23 |
| <TABLE BODY> |
23 |
| <TABLE ROW> |
23 |
| Exposure glass |
23 |
| Up to 81/2\ |
23 |
| Up to 8 |
23 |
| -- |
23 |
| <TABLE ROW> |
23 |
| ADF |
23 |
| 81/2\ |
23 |
| 8 |
23 |
| 14–28 lb. |
23 |
| About 30 originals can be placed in the ADF. |
23 |
| About 30 originals can be placed in the ADF. |
23 |
| Non-compatible originals for the ADF |
23 |
| Non-compatible originals for the ADF |
23 |
| Placing the following types of originals in the ADF can cause paper misfeeds or result in damage ... |
23 |
| Placing the following types of originals in the ADF can cause paper misfeeds or result in damage ... |
23 |
| Sizes Selectable as Regular Size Originals |
24 |
| Sizes Selectable as Regular Size Originals |
24 |
| You can select the following original sizes on the display: |
24 |
| You can select the following original sizes on the display: |
24 |
| A4L, B5 JIS (Japan Industrial Standard)L, A5KL, 8 |
24 |
| *1 Selectable when originals are placed in the ADF. |
24 |
| *1 Selectable when originals are placed in the ADF. |
24 |
| *1 Selectable when originals are placed in the ADF. |
24 |
| Exposure glass |
24 |
| Exposure glass |
24 |
| <GRAPHIC> |
24 |
| ADF |
24 |
| <GRAPHIC> |
24 |
| When you copy custom size originals, make sure you specify the size of the originals. If not, the... |
24 |
| Missing Image Area |
24 |
| Missing Image Area |
24 |
| Even if you place originals in the ADF, or on the exposure glass correctly, 4 mm (0.2”) margins o... |
24 |
| Even if you place originals in the ADF, or on the exposure glass correctly, 4 mm (0.2”) margins o... |
24 |
| Placing Originals |
25 |
| Placing Originals |
25 |
| Take care to place originals only after any correction fluid and ink has completely dried. Not ta... |
25 |
| Take care to place originals only after any correction fluid and ink has completely dried. Not ta... |
25 |
| Take care to place originals only after any correction fluid and ink has completely dried. Not ta... |
25 |
| For original sizes you can set, see |
25 |
| For original sizes you can set, see |
25 |
| Original Orientation |
25 |
| Original Orientation |
25 |
| You can set the original orientation in the following ways. |
25 |
| You can set the original orientation in the following ways. |
25 |
| This function is useful for copying torn or large originals. |
25 |
| Originals should normally be aligned to the rear left corner. However, some copy functions may pr... |
25 |
| Originals should normally be aligned to the rear left corner. However, some copy functions may pr... |
25 |
| Placing Originals on the Exposure Glass |
25 |
| Placing Originals on the Exposure Glass |
25 |
| A Lift the ADF. |
25 |
| A Lift the ADF. |
25 |
| A Lift the ADF. |
25 |
| A Lift the ADF. |
25 |
| Do not lift the ADF forcefully. If you do, the ADF cover might open or be damaged. |
25 |
| Do not lift the ADF forcefully. If you do, the ADF cover might open or be damaged. |
25 |
| B Place the original face down on the exposure glass. It should be aligned with the rear left cor... |
25 |
| B Place the original face down on the exposure glass. It should be aligned with the rear left cor... |
25 |
| <GRAPHIC> |
25 |
| <GRAPHIC> |
25 |
| 1.� Positioning mark |
25 |
| 1.� Positioning mark |
25 |
| 1.� Positioning mark |
25 |
| 2.� Left scale |
25 |
| 2.� Left scale |
25 |
| Start with the first page to be copied. |
25 |
| Start with the first page to be copied. |
25 |
| C Lower the ADF. |
25 |
| C Lower the ADF. |
25 |
| Placing Originals in the ADF |
26 |
| Placing Originals in the ADF |
26 |
| Do not stack originals over the limit mark on the side fence of the ADF. |
26 |
| Do not stack originals over the limit mark on the side fence of the ADF. |
26 |
| Do not stack originals over the limit mark on the side fence of the ADF. |
26 |
| The last page should be on the bottom. |
26 |
| Do not place anything on the ADF cover, doing so could cause a malfunction. |
26 |
| <GRAPHIC> |
26 |
| A Set the document guide to the original size. |
26 |
| A Set the document guide to the original size. |
26 |
| A Set the document guide to the original size. |
26 |
| B Align the edges of the originals and place them in the ADF with the side to be copied facing up. |
26 |
| B Align the edges of the originals and place them in the ADF with the side to be copied facing up. |
26 |
| <GRAPHIC> |
26 |
| <GRAPHIC> |
26 |
| 1.� Limit mark |
26 |
| 1.� Limit mark |
26 |
| 1.� Limit mark |
26 |
| 2.� Document guide |
26 |
| 2.� Document guide |
26 |
| Straighten curls in the originals before placing them in the ADF. |
26 |
| Straighten curls in the originals before placing them in the ADF. |
26 |
| To prevent multiple sheets feeding in at once, fan the originals before placing them in the ADF. |
26 |
| Set the original squarely. |
26 |
| Placing Regular Size Originals |
26 |
| Placing Regular Size Originals |
26 |
| If you do not specify the original size, the machine will make copies on the paper size in the tr... |
26 |
| If you do not specify the original size, the machine will make copies on the paper size in the tr... |
26 |
| If you do not specify the original size, the machine will make copies on the paper size in the tr... |
26 |
| If you do not specify the original size, the machine will make copies on the paper size in the tr... |
26 |
| A Place originals face down on the exposure glass, or face up into the ADF. |
26 |
| A Place originals face down on the exposure glass, or face up into the ADF. |
26 |
| B Select the paper tray or bypass tray using |
26 |
| B Select the paper tray or bypass tray using |
26 |
| <GRAPHIC> |
26 |
| C Select |
26 |
| <GRAPHIC> |
26 |
| If you selected the bypass tray, first select |
26 |
| If you selected the bypass tray, first select |
26 |
| D Select the paper size using the scroll keys, and then press the |
27 |
| D Select the paper size using the scroll keys, and then press the |
27 |
| <GRAPHIC> |
27 |
| The “ |
27 |
| When the regular size originals settings are registered, |
27 |
| <GRAPHIC> |
27 |
| To cancel the registered original size, press the |
27 |
| To cancel the registered original size, press the |
27 |
| E Press the |
27 |
| E Press the |
27 |
| Placing Custom Size Originals |
27 |
| Placing Custom Size Originals |
27 |
| Enter the size of your original if it is not one of the following: A4L, B5 JIS L, A5KL, 8 |
27 |
| Enter the size of your original if it is not one of the following: A4L, B5 JIS L, A5KL, 8 |
27 |
| Enter the size of your original if it is not one of the following: A4L, B5 JIS L, A5KL, 8 |
27 |
| On the exposure glass, paper sizes that can be set with this function are: vertical 139–216 mm (5... |
27 |
| For the ADF, paper sizes that can be set with this function are: vertical 139–216 mm (5.5\ |
27 |
| A Place originals face down on the exposure glass, or face up into the ADF. |
27 |
| A Place originals face down on the exposure glass, or face up into the ADF. |
27 |
| A Place originals face down on the exposure glass, or face up into the ADF. |
27 |
| B Select the paper tray or bypass tray using |
27 |
| B Select the paper tray or bypass tray using |
27 |
| <GRAPHIC> |
27 |
| C Select |
27 |
| <GRAPHIC> |
27 |
| If you selected the bypass tray, first select |
27 |
| If you selected the bypass tray, first select |
27 |
| D Enter the horizontal size of the original using the number keys, and then press the |
28 |
| D Enter the horizontal size of the original using the number keys, and then press the |
28 |
| <GRAPHIC> |
28 |
| If you make a mistake, press the |
28 |
| If you make a mistake, press the |
28 |
| E Enter the vertical size of the original using the number keys, and then press the |
28 |
| E Enter the vertical size of the original using the number keys, and then press the |
28 |
| <GRAPHIC> |
28 |
| The “ |
28 |
| When the custom size originals settings are registered, |
28 |
| <GRAPHIC> |
28 |
| To cancel the registered original size, press the |
28 |
| To cancel the registered original size, press the |
28 |
| F Press the |
28 |
| F Press the |
28 |
| 2.� Copying |
29 |
| 2.� Copying |
29 |
| Basic Procedure |
29 |
| Basic Procedure |
29 |
| A If the machine has user codes set, enter a user code (up to eight digits) using the number keys... |
29 |
| A If the machine has user codes set, enter a user code (up to eight digits) using the number keys... |
29 |
| A If the machine has user codes set, enter a user code (up to eight digits) using the number keys... |
29 |
| A If the machine has user codes set, enter a user code (up to eight digits) using the number keys... |
29 |
| The machine is ready to copy. |
29 |
| For user codes, see “ |
29 |
| For user codes, see “ |
29 |
| B Make sure \ |
29 |
| B Make sure \ |
29 |
| Initial copy display |
29 |
| Initial copy display |
29 |
| <GRAPHIC> |
29 |
| C Make sure no previous settings remain. |
29 |
| C Make sure no previous settings remain. |
29 |
| When there are previous settings remaining, press the |
29 |
| When there are previous settings remaining, press the |
29 |
| D Place your originals. |
29 |
| D Place your originals. |
29 |
| p.17 “Placing Originals” |
29 |
| p.17 “Placing Originals” |
29 |
| p.17 “Placing Originals” |
29 |
| E Make the necessary settings. |
29 |
| E Make the necessary settings. |
29 |
| See the explanations for each function. |
29 |
| See the explanations for each function. |
29 |
| F Enter the number of copies using the number keys. |
29 |
| F Enter the number of copies using the number keys. |
29 |
| <GRAPHIC> |
29 |
| The maximum copy quantity that can be set is 99. |
29 |
| The maximum copy quantity that can be set is 99. |
29 |
| G Press the |
29 |
| G Press the |
29 |
| Copying starts. |
29 |
| Copies are delivered face down. |
29 |
| Copies are delivered face down. |
29 |
| - How to operate |
29 |
| - How to operate |
29 |
| To switch between pages or select functions: |
29 |
| To switch between pages or select functions: |
29 |
| To switch between pages or select functions: |
29 |
| Press the scroll key. |
29 |
| Press the scroll key. |
29 |
| To stop the machine during a multi- copy run: |
29 |
| To stop the machine during a multi- copy run: |
29 |
| Press the |
29 |
| Press the |
29 |
| To return the machine to the initial condition after copying: |
29 |
| To return the machine to the initial condition after copying: |
29 |
| Press the |
29 |
| Press the |
29 |
| To clear an entered value. |
29 |
| To clear an entered value. |
29 |
| Press the |
29 |
| Press the |
29 |
| Copying from the Bypass Tray |
30 |
| Copying from the Bypass Tray |
30 |
| Use the bypass tray to copy onto OHP transparencies, thick paper, envelopes and copy paper that c... |
30 |
| Use the bypass tray to copy onto OHP transparencies, thick paper, envelopes and copy paper that c... |
30 |
| Paper of 14.01 inch length, or larger, is likely to jam, crease, or not feed in properly. |
30 |
| Paper of 14.01 inch length, or larger, is likely to jam, crease, or not feed in properly. |
30 |
| Paper of 14.01 inch length, or larger, is likely to jam, crease, or not feed in properly. |
30 |
| You cannot use the duplex function when copying from the bypass tray. |
30 |
| You cannot use the duplex function when copying from the bypass tray. |
30 |
| If you do not use standard size copy paper, or if you use special paper, you should enter its ver... |
30 |
| If you do not use standard size copy paper, or if you use special paper, you should enter its ver... |
30 |
| When copying onto OHP transparencies or paper heavier than 105 g/m |
30 |
| The maximum number of sheets you can load at the same time depends on paper type. The maximum num... |
30 |
| A Open the bypass tray. |
30 |
| A Open the bypass tray. |
30 |
| A Open the bypass tray. |
30 |
| <GRAPHIC> |
30 |
| B Push up the paper guide release lever. |
30 |
| <GRAPHIC> |
30 |
| <GRAPHIC> |
30 |
| 1.� Paper guide release lever |
30 |
| 1.� Paper guide release lever |
30 |
| 1.� Paper guide release lever |
30 |
| C Insert the paper with the side you want to copy facing down, and then adjust the paper guide wi... |
31 |
| C Insert the paper with the side you want to copy facing down, and then adjust the paper guide wi... |
31 |
| <GRAPHIC> |
31 |
| <GRAPHIC> |
31 |
| 1.� Horizontal size |
31 |
| 1.� Horizontal size |
31 |
| 1.� Horizontal size |
31 |
| 2.� Vertical size |
31 |
| 2.� Vertical size |
31 |
| 3.� Extender |
31 |
| 3.� Extender |
31 |
| 4.� Paper guides |
31 |
| 4.� Paper guides |
31 |
| If the guides are not flush against the copy paper, images might be skewed or paper misfeeds migh... |
31 |
| If the guides are not flush against the copy paper, images might be skewed or paper misfeeds migh... |
31 |
| Do not stack paper over the limit mark, otherwise images might be skewed or paper misfeeds might ... |
31 |
| Swing out the extender to support paper sizes larger than A4L, 8 |
31 |
| Fan paper to get air between the sheets and avoid a multi-sheet feed. |
31 |
| D Pull down the paper guide release lever (step |
31 |
| D Pull down the paper guide release lever (step |
31 |
| The bypass tray is selected on the display. |
31 |
| <GRAPHIC> |
31 |
| If |
31 |
| If |
31 |
| E Press the |
31 |
| E Press the |
31 |
| p.24 “When copying onto regular size paper” |
31 |
| p.24 “When copying onto regular size paper” |
31 |
| p.24 “When copying onto regular size paper” |
31 |
| p.24 “When copying onto custom size paper” |
31 |
| p.24 “When copying onto custom size paper” |
31 |
| p.25 “When copying onto special paper” |
31 |
| p.25 “When copying onto special paper” |
31 |
| p.25 “When copying onto envelopes” |
31 |
| p.25 “When copying onto envelopes” |
31 |
| F Place your originals, and then press the |
31 |
| F Place your originals, and then press the |
31 |
| When copying onto OHP transparencies, remove copied sheets one by one. |
31 |
| When copying onto OHP transparencies, remove copied sheets one by one. |
31 |
| fi p.17 “Placing Originals” |
31 |
| fi p.17 “Placing Originals” |
31 |
| fi p.17 “Placing Originals” |
31 |
| When copying onto regular size paper |
32 |
| When copying onto regular size paper |
32 |
| A Make sure the bypass tray is selected. |
32 |
| A Make sure the bypass tray is selected. |
32 |
| A Make sure the bypass tray is selected. |
32 |
| A Make sure the bypass tray is selected. |
32 |
| If any other paper tray is selected, using |
32 |
| If any other paper tray is selected, using |
32 |
| B Press the |
32 |
| B Press the |
32 |
| C Select |
32 |
| C Select |
32 |
| <GRAPHIC> |
32 |
| D Select |
32 |
| <GRAPHIC> |
32 |
| E Select the paper size using the scroll keys, and then press the |
32 |
| <GRAPHIC> |
32 |
| The “ |
32 |
| When copying onto custom size paper |
32 |
| When copying onto custom size paper |
32 |
| You should specify the size of copy paper to avoid paper misfeeds. |
32 |
| You should specify the size of copy paper to avoid paper misfeeds. |
32 |
| You should specify the size of copy paper to avoid paper misfeeds. |
32 |
| You should specify the size of copy paper to avoid paper misfeeds. |
32 |
| A Make sure the bypass tray is selected. |
32 |
| A Make sure the bypass tray is selected. |
32 |
| If any other paper tray is selected, using |
32 |
| If any other paper tray is selected, using |
32 |
| B Press the |
32 |
| B Press the |
32 |
| C Select |
32 |
| C Select |
32 |
| <GRAPHIC> |
32 |
| D Select |
32 |
| <GRAPHIC> |
32 |
| E Enter the horizontal size of the original using the number keys, and then press the |
32 |
| <GRAPHIC> |
32 |
| If you make a mistake, press the |
32 |
| If you make a mistake, press the |
32 |
| F Enter the vertical size of the original using the number keys, and then press the |
33 |
| F Enter the vertical size of the original using the number keys, and then press the |
33 |
| <GRAPHIC> |
33 |
| The “ |
33 |
| When copying onto special paper |
33 |
| When copying onto special paper |
33 |
| A Make sure the bypass tray is selected. |
33 |
| A Make sure the bypass tray is selected. |
33 |
| A Make sure the bypass tray is selected. |
33 |
| A Make sure the bypass tray is selected. |
33 |
| If any other paper tray is selected, using |
33 |
| If any other paper tray is selected, using |
33 |
| B Press the |
33 |
| B Press the |
33 |
| C Select |
33 |
| C Select |
33 |
| <GRAPHIC> |
33 |
| D Select the paper type, and then press the |
33 |
| <GRAPHIC> |
33 |
| The “ |
33 |
| When copying onto envelopes |
33 |
| When copying onto envelopes |
33 |
| A Make sure the bypass tray is selected. |
33 |
| A Make sure the bypass tray is selected. |
33 |
| A Make sure the bypass tray is selected. |
33 |
| A Make sure the bypass tray is selected. |
33 |
| If any other paper tray is selected, using |
33 |
| If any other paper tray is selected, using |
33 |
| When copying onto small-sized envelopes, align the flaps to the paper guide on the left. |
33 |
| B Press the |
33 |
| B Press the |
33 |
| C Select |
33 |
| C Select |
33 |
| <GRAPHIC> |
33 |
| D Select |
33 |
| <GRAPHIC> |
34 |
| E Select the envelope size from |
34 |
| <GRAPHIC> |
34 |
| The “ |
34 |
| F Press the |
34 |
| F Press the |
34 |
| <GRAPHIC> |
34 |
| G Select |
34 |
| <GRAPHIC> |
34 |
| H Select |
34 |
| <GRAPHIC> |
34 |
| The “ |
34 |
| Copier Functions |
35 |
| Copier Functions |
35 |
| Adjusting Image Density |
35 |
| Adjusting Image Density |
35 |
| You can adjust copy image density to match your originals. |
35 |
| You can adjust copy image density to match your originals. |
35 |
| If you require darker or lighter copies, adjust image density accordingly. |
35 |
| A Press the |
35 |
| A Press the |
35 |
| A Press the |
35 |
| <GRAPHIC> |
35 |
| The image density changes in five increments as follows: |
35 |
| <GRAPHIC> |
35 |
| Selecting Original Type Setting |
35 |
| Select one of the following two types to match your originals: |
35 |
| Select one of the following two types to match your originals: |
35 |
| p.45 “Original Type Setting” |
35 |
| p.45 “Original Type Setting” |
35 |
| p.45 “Original Type Setting” |
35 |
| A Press the |
35 |
| A Press the |
35 |
| A Press the |
35 |
| <GRAPHIC> |
35 |
| Press the |
35 |
| Press the |
35 |
| Selecting Copy Paper |
36 |
| Selecting Copy Paper |
36 |
| Choose the tray containing the paper you want to copy onto: a paper tray or the bypass tray. |
36 |
| Choose the tray containing the paper you want to copy onto: a paper tray or the bypass tray. |
36 |
| A Select the paper tray or bypass tray using |
36 |
| A Select the paper tray or bypass tray using |
36 |
| A Select the paper tray or bypass tray using |
36 |
| The selected tray and the paper size appear. |
36 |
| <GRAPHIC> |
36 |
| p.22 “Copying from the Bypass Tray” |
36 |
| p.22 “Copying from the Bypass Tray” |
36 |
| p.22 “Copying from the Bypass Tray” |
36 |
| Preset Reduce/Enlarge |
36 |
| Preset Reduce/Enlarge |
36 |
| You can select a preset ratio for copying. |
36 |
| You can select a preset ratio for copying. |
36 |
| <GRAPHIC> |
36 |
| Base Point |
36 |
| Base Point |
36 |
| Base Point |
36 |
| The base point of Reduce/Enlarge differs depending on how the original is scanned. When the origi... |
36 |
| The base point of Reduce/Enlarge differs depending on how the original is scanned. When the origi... |
36 |
| <GRAPHIC> |
36 |
| <GRAPHIC> |
36 |
| 1.� Base point when placing on the exposure glass. |
36 |
| 1.� Base point when placing on the exposure glass. |
36 |
| 1.� Base point when placing on the exposure glass. |
36 |
| 2.� Base point when placing in the ADF. |
36 |
| 2.� Base point when placing in the ADF. |
36 |
| Related default settings |
36 |
| Related default settings |
36 |
| p.46 “Reproduction Ratio” |
36 |
| p.46 “Reproduction Ratio” |
36 |
| p.47 “Preset R/E Priority” |
36 |
| p.47 “Preset R/E Priority” |
36 |
| A Press |
36 |
| A Press |
36 |
| A Press |
36 |
| <GRAPHIC> |
36 |
| B Press |
36 |
| <GRAPHIC> |
37 |
| C Select a ratio using |
37 |
| The “ |
37 |
| D Place your originals, and then press the |
37 |
| D Place your originals, and then press the |
37 |
| Zoom |
37 |
| Zoom |
37 |
| Zoom |
37 |
| Zoom |
37 |
| You can change the reproduction ratio in increments of 1%. |
37 |
| <GRAPHIC> |
37 |
| You can also select a preset ratio close to the desired ratio using |
37 |
| You can also select a preset ratio close to the desired ratio using |
37 |
| A Press |
37 |
| A Press |
37 |
| A Press |
37 |
| <GRAPHIC> |
37 |
| B Press |
37 |
| <GRAPHIC> |
37 |
| C Enter the ratio. |
37 |
| <GRAPHIC> |
37 |
| To select the ratio using |
37 |
| To select the ratio using |
37 |
| A Adjust the ratio using |
37 |
| A Adjust the ratio using |
37 |
| If you have incorrectly entered the ratio, readjust using |
37 |
| If you have incorrectly entered the ratio, readjust using |
37 |
| To change the ratio in increments of 10%, press and hold down |
37 |
| B Press the |
37 |
| B Press the |
37 |
| The “ |
37 |
| To enter the ratio using the number keys |
37 |
| To enter the ratio using the number keys |
37 |
| A Enter the desired ratio using the number keys. |
37 |
| A Enter the desired ratio using the number keys. |
37 |
| B Press the |
37 |
| B Press the |
37 |
| The “ |
37 |
| D Place your originals, and then press the |
37 |
| D Place your originals, and then press the |
37 |
| Sort |
38 |
| Sort |
38 |
| Sort |
38 |
| Sort |
38 |
| You can scan originals into memory and automatically sort copies. |
38 |
| Copies are assembled as sequentially ordered sets. |
38 |
| <GRAPHIC> |
38 |
| A Press the |
38 |
| A Press the |
38 |
| A Press the |
38 |
| <GRAPHIC> |
38 |
| When canceling the |
38 |
| When canceling the |
38 |
| B Enter the number of copy sets using the number keys. |
38 |
| B Enter the number of copy sets using the number keys. |
38 |
| <GRAPHIC> |
38 |
| C Place your originals. |
38 |
| When placing originals on the exposure glass, start from the first page to be copied. When placin... |
38 |
| When placing originals on the exposure glass, start from the first page to be copied. When placin... |
38 |
| D Press the |
38 |
| D Press the |
38 |
| When placing originals on the exposure glass, press the |
38 |
| When placing originals on the exposure glass, press the |
38 |
| Changing the number of sets |
38 |
| Changing the number of sets |
38 |
| You can change the number of copy sets during copying. |
38 |
| You can change the number of copy sets during copying. |
38 |
| This function can only be used when the Sort function is selected. |
38 |
| This function can only be used when the Sort function is selected. |
38 |
| A While “ |
38 |
| A While “ |
38 |
| A While “ |
38 |
| <GRAPHIC> |
38 |
| B Press |
38 |
| C Enter the number of copy sets with the number keys, and then press |
38 |
| C Enter the number of copy sets with the number keys, and then press |
38 |
| Copying starts again. |
38 |
| The number of sets you can enter differs depending on when the |
38 |
| The number of sets you can enter differs depending on when the |
38 |
| Duplex |
39 |
| Duplex |
39 |
| 1 Sided Æ 2 Sided |
39 |
| 1 Sided Æ 2 Sided |
39 |
| 1 Sided Æ 2 Sided |
39 |
| 1 Sided Æ 2 Sided |
39 |
| 1 Sided Æ 2 Sided |
39 |
| 1 sided <FmSymbol>ョ<Default Para Font> 2 sided |
39 |
| Copies 2 one-sided pages onto 1 two-sided page. |
39 |
| <GRAPHIC> |
39 |
| Original orientation and completed copies |
39 |
| The resulting copy image will differ according to the orientation in which you place the original... |
39 |
| The resulting copy image will differ according to the orientation in which you place the original... |
39 |
| <GRAPHIC> |
39 |
| *1 The table shows the orientation of images on the front and back of copies, not the orientation... |
39 |
| *1 The table shows the orientation of images on the front and back of copies, not the orientation... |
39 |
| *1 The table shows the orientation of images on the front and back of copies, not the orientation... |
39 |
| You cannot use the bypass tray with this function. |
39 |
| You cannot use the bypass tray with this function. |
39 |
| The maximum paper weight that can be used with duplex copying is 64–90 g/m |
39 |
| You can change the original orientation. See |
39 |
| You can change the margin. See |
39 |
| A Press the |
39 |
| A Press the |
39 |
| A Press the |
39 |
| <GRAPHIC> |
39 |
| To select the orientation |
39 |
| To select the orientation |
39 |
| You can select the original orientation when |
39 |
| You can select the original orientation when |
39 |
| A Select the original orientation using |
39 |
| A Select the original orientation using |
39 |
| <GRAPHIC> |
40 |
| B Select the copy orientation using |
40 |
| <GRAPHIC> |
40 |
| The “ |
40 |
| B Place your originals. |
40 |
| B Place your originals. |
40 |
| When placing originals on the exposure glass |
40 |
| When placing originals on the exposure glass |
40 |
| A Place the original, and then press the |
40 |
| A Place the original, and then press the |
40 |
| Start from the first page to be copied. |
40 |
| Start from the first page to be copied. |
40 |
| B Place the next original, and then press the |
40 |
| B Place the next original, and then press the |
40 |
| When placing a stack of originals in the ADF |
40 |
| When placing a stack of originals in the ADF |
40 |
| A Place the originals with the first page on the top, and then press the |
40 |
| A Place the originals with the first page on the top, and then press the |
40 |
| One-Sided Combine |
40 |
| One-Sided Combine |
40 |
| You can combine two pages onto one side of a sheet. |
40 |
| You can combine two pages onto one side of a sheet. |
40 |
| 1 Sided 2 Pages Æ Combine 1 Side |
40 |
| 1 Sided 2 Pages Æ Combine 1 Side |
40 |
| 1 Sided 2 Pages Æ Combine 1 Side |
40 |
| Copies 2 one-sided originals onto one side of a sheet. |
40 |
| Copies 2 one-sided originals onto one side of a sheet. |
40 |
| A Press the |
40 |
| A Press the |
40 |
| A Press the |
40 |
| B Select |
40 |
| B Select |
40 |
| <GRAPHIC> |
40 |
| p.31 “Original orientation and completed copies” |
40 |
| p.31 “Original orientation and completed copies” |
40 |
| p.31 “Original orientation and completed copies” |
40 |
| To select the orientation |
41 |
| To select the orientation |
41 |
| You can select the original orientation when |
41 |
| You can select the original orientation when |
41 |
| A Select the orientation using |
41 |
| A Select the orientation using |
41 |
| <GRAPHIC> |
41 |
| The “ |
41 |
| C Select the paper size using |
41 |
| C Select the paper size using |
41 |
| <GRAPHIC> |
41 |
| The machine calculates the ratio automatically based on the original size, if specified, or the c... |
41 |
| The machine calculates the ratio automatically based on the original size, if specified, or the c... |
41 |
| D Place your originals, and then press the |
41 |
| D Place your originals, and then press the |
41 |
| Two-Sided Combine |
41 |
| Two-Sided Combine |
41 |
| You can combine 4 pages of originals into one sheet with two sides. |
41 |
| You can combine 4 pages of originals into one sheet with two sides. |
41 |
| 1 Sided 4 Pages Æ Combine 2 Side |
41 |
| 1 Sided 4 Pages Æ Combine 2 Side |
41 |
| 1 Sided 4 Pages Æ Combine 2 Side |
41 |
| Copies 4 one-sided originals onto one sheet with two pages per side. |
41 |
| Copies 4 one-sided originals onto one sheet with two pages per side. |
41 |
| <GRAPHIC> |
41 |
| A Press the |
41 |
| A Press the |
41 |
| B Select |
41 |
| B Select |
41 |
| <GRAPHIC> |
42 |
| To select the orientation |
42 |
| To select the orientation |
42 |
| You can select the original orientation when |
42 |
| You can select the original orientation when |
42 |
| A Select the original orientation using |
42 |
| A Select the original orientation using |
42 |
| <GRAPHIC> |
42 |
| B Select the copy orientation using |
42 |
| <GRAPHIC> |
42 |
| The “ |
42 |
| C Select the paper size using |
42 |
| C Select the paper size using |
42 |
| <GRAPHIC> |
42 |
| The machine calculates the ratio automatically based on the original size, if specified, or the c... |
42 |
| The machine calculates the ratio automatically based on the original size, if specified, or the c... |
42 |
| D Place your originals, and then press the |
42 |
| D Place your originals, and then press the |
42 |
| 3.� Troubleshooting |
43 |
| 3.� Troubleshooting |
43 |
| If Your Machine Does Not Operate As You Want |
43 |
| If Your Machine Does Not Operate As You Want |
43 |
| When a Message Is Displayed |
43 |
| When a Message Is Displayed |
43 |
| The following chart contains explanations for common messages. If other messages appear, follow t... |
43 |
| The following chart contains explanations for common messages. If other messages appear, follow t... |
43 |
| For messages not listed here, see |
43 |
| For messages not listed here, see |
43 |
| <TABLE> |
43 |
| <TABLE> |
43 |
| <TABLE HEADING> |
43 |
| <TABLE ROW> |
43 |
| Message |
43 |
| Causes |
43 |
| Solutions |
43 |
| <TABLE BODY> |
43 |
| <TABLE ROW> |
43 |
| Cannot dup. copy this size |
43 |
| Cannot dup. copy this size |
43 |
| A paper size not available with the Duplex function has been selected. |
43 |
| The following paper sizes are available for the Duplex function: 81/2\ |
43 |
| <TABLE ROW> |
43 |
| Cannot sort this size |
43 |
| Cannot sort this size |
43 |
| A paper size not available with the Sort function has been specified. |
43 |
| Use copy paper of length under 14.01 inch. |
43 |
| <TABLE ROW> |
43 |
| Size error in Combine mode |
43 |
| Size error in Combine mode |
43 |
| A paper size not available with the Combine function has been specified. |
43 |
| Use copy paper of length under 14.01 inch. |
43 |
| <TABLE ROW> |
43 |
| Max. number of sets is * |
43 |
| Max. number of sets is |
43 |
| The number of copies exceeds maximum copy quantity. |
43 |
| You can change the maximum copy quantity. See p.46 “Max. Number of Sets”. |
43 |
| If You Cannot Make Clear Copies |
44 |
| If You Cannot Make Clear Copies |
44 |
| <TABLE> |
44 |
| <TABLE> |
44 |
| <TABLE> |
44 |
| <TABLE HEADING> |
44 |
| <TABLE ROW> |
44 |
| Problem |
44 |
| Causes |
44 |
| Solutions |
44 |
| <TABLE BODY> |
44 |
| <TABLE ROW> |
44 |
| Copies appear dirty. |
44 |
| Copies appear dirty. |
44 |
| Image density is too dark. |
44 |
| Adjust the image density. See p.27 “Adjusting Image Density”. |
44 |
| <TABLE ROW> |
44 |
| The reverse side of an original image is copied. |
44 |
| The reverse side of an original image is copied. |
44 |
| Image density is too dark. |
44 |
| Adjust the image density. See p.27 “Adjusting Image Density”. |
44 |
| <TABLE ROW> |
44 |
| A shadow appears on copies if you use pasted originals. |
44 |
| A shadow appears on copies if you use pasted originals. |
44 |
| Image density is too dark. |
44 |
| Adjust the image density. See p.27 “Adjusting Image Density”. |
44 |
| <TABLE ROW> |
44 |
| The same copy area is dirty whenever making copies. |
44 |
| The same copy area is dirty whenever making copies. |
44 |
| The exposure glass or ADF is dirty. |
44 |
| Clean them. See p.53 “Maintaining Your Machine”. |
44 |
| <TABLE ROW> |
44 |
| Copies are too light. |
44 |
| Copies are too light. |
44 |
| Image density is too light. |
44 |
| Adjust the image density. See p.27 “Adjusting Image Density”. |
44 |
| <TABLE ROW> |
44 |
| The paper size is not appropriate. |
44 |
| Use the recommended paper. |
44 |
| Use the recommended paper. |
44 |
| A light copy may result when you use damp or rough grain paper. |
44 |
| A light copy may result when you use damp or rough grain paper. |
44 |
| <TABLE ROW> |
44 |
| Toner bottle is almost empty. |
44 |
| Add toner. See p.40 “D Adding Toner”. |
44 |
| <TABLE ROW> |
44 |
| Parts of the paper are not copied. |
44 |
| Parts of the paper are not copied. |
44 |
| The original is not placed correctly. |
44 |
| Place originals correctly. See p.17 “Placing Originals”. |
44 |
| <TABLE ROW> |
44 |
| An improper paper size is selected. |
44 |
| Select the proper paper size. |
44 |
| <TABLE ROW> |
44 |
| Copies are blank. |
44 |
| Copies are blank. |
44 |
| The original is not placed correctly. |
44 |
| When using the exposure glass, place originals face down. When using the ADF, place them face up.... |
44 |
| <TABLE ROW> |
44 |
| A moiré pattern is produced on copies. |
44 |
| A moiré pattern is produced on copies. |
44 |
| Your original has a dot pattern image or many lines. |
44 |
| Place the original on the exposure glass at a slight angle. |
44 |
| If You Cannot Make Copies As You Want |
45 |
| If You Cannot Make Copies As You Want |
45 |
| This section explains causes and remedies when copy results are not as expected. |
45 |
| This section explains causes and remedies when copy results are not as expected. |
45 |
| Basic |
45 |
| Basic |
45 |
| <TABLE> |
45 |
| <TABLE> |
45 |
| <TABLE HEADING> |
45 |
| <TABLE ROW> |
45 |
| Problem |
45 |
| Causes |
45 |
| Solutions |
45 |
| <TABLE BODY> |
45 |
| <TABLE ROW> |
45 |
| You cannot combine several functions. |
45 |
| Selected functions cannot be used together. |
45 |
| Check the combination of functions and make the settings again. |
45 |
| Combine |
45 |
| Combine |
45 |
| <TABLE> |
45 |
| <TABLE> |
45 |
| <TABLE HEADING> |
45 |
| <TABLE ROW> |
45 |
| Problem |
45 |
| Causes |
45 |
| Solutions |
45 |
| <TABLE BODY> |
45 |
| <TABLE ROW> |
45 |
| When using Combine, parts of the image are not copied. |
45 |
| The copy paper you specified does not match the sizes of your originals. |
45 |
| Make sure the originals can be combined into the copy paper you selected. |
45 |
| Make sure the originals can be combined into the copy paper you selected. |
45 |
| <TABLE ROW> |
45 |
| Copies are not in correct order. |
45 |
| You placed the originals in the incorrect order. |
45 |
| When placing a stack of originals in the ADF, the last page should be on the bottom. |
45 |
| <TABLE ROW> |
45 |
| If you place an original on the exposure glass, start with the first page to be copied. |
45 |
| Duplex |
45 |
| Duplex |
45 |
| <TABLE> |
45 |
| <TABLE> |
45 |
| <TABLE HEADING> |
45 |
| <TABLE ROW> |
45 |
| Problem |
45 |
| Causes |
45 |
| Solutions |
45 |
| <TABLE BODY> |
45 |
| <TABLE ROW> |
45 |
| Order of copies is not correct. |
45 |
| You set originals in the incorrect order. |
45 |
| When setting a stack of originals in the ADF, the last page should be on the bottom. |
45 |
| <TABLE ROW> |
45 |
| If you set an original on the exposure glass, start with the first page to be copied. |
45 |
| <TABLE ROW> |
45 |
| In Duplex Margin mode, parts of the original image are not copied. |
45 |
| The margin is too wide. |
45 |
| Set a narrower margin with User Tools. You can set the width between 0–50 mm (0\ |
45 |
| <TABLE ROW> |
45 |
| There is a lack of margin space on the opposite side of the binding position. |
45 |
| <TABLE ROW> |
45 |
| When using Duplex, copy is made Top to Top even though Top to Bottom is selected. |
45 |
| You placed the originals in the wrong orientation. |
45 |
| Place the originals in the correct orientation. See p.17 “Original Orientation” . |
45 |
| When Memory Is Full |
46 |
| When Memory Is Full |
46 |
| <TABLE> |
46 |
| <TABLE> |
46 |
| <TABLE> |
46 |
| <TABLE HEADING> |
46 |
| <TABLE ROW> |
46 |
| Messages |
46 |
| Causes |
46 |
| Solutions |
46 |
| <TABLE BODY> |
46 |
| <TABLE ROW> |
46 |
| Memory is full. [Print] scanned orig., [Clear] to cancel/clear |
46 |
| Memory is full. [Print] scanned orig., [Clear] to cancel/clear |
46 |
| Memory is full. [Print] scanned orig., [Clear] to cancel/clear |
46 |
| memory. |
46 |
| memory. |
46 |
| Clear |
46 |
| Clear |
46 |
| Print |
46 |
| Copying will stop and this message will be displayed when the memory is full. |
46 |
| Copying will stop and this message will be displayed when the memory is full. |
46 |
| The scanned original exceeds the number of pages that can be stored in memory. |
46 |
| Press [Print] to copy scanned originals and cancel the scanning data. Press [Clear] to cancel the... |
46 |
| <TABLE ROW> |
46 |
| Reset * orig., then press [Resume] to scan and copy the remaining originals. |
46 |
| Reset * orig., then press [Resume] to scan and copy the remaining originals. |
46 |
| Reset * orig., then press [Resume] to scan and copy the remaining originals. |
46 |
| Stop |
46 |
| Stop |
46 |
| The machine checks if the remaining originals should be copied, after the scanned original has be... |
46 |
| To continue copying, remove all copies, and then press [Resume]. To stop copying, press [Stop]. |
46 |
| To continue copying, remove all copies, and then press |
46 |
| B Loading Paper |
47 |
| B Loading Paper |
47 |
| For paper types and sizes, see |
47 |
| For paper types and sizes, see |
47 |
| For paper types and sizes, see |
47 |
| Loading Paper |
47 |
| Loading Paper |
47 |
| You can change the paper size, see |
47 |
| You can change the paper size, see |
47 |
| You can change the paper size, see |
47 |
| This illustration shows Tray 1. |
47 |
| A Pull the paper tray out slowly until it stops. |
47 |
| A Pull the paper tray out slowly until it stops. |
47 |
| A Pull the paper tray out slowly until it stops. |
47 |
| B Push the metal plate down, and then square the paper and load it in the tray. |
47 |
| B Push the metal plate down, and then square the paper and load it in the tray. |
47 |
| Check the top of the stack is not higher than the limit mark inside the tray. |
47 |
| Check the top of the stack is not higher than the limit mark inside the tray. |
47 |
| If paper is left in the paper tray, and then you add paper, a misfeed might occur. |
47 |
| Fan the paper before loading. |
47 |
| Fan the paper before loading. |
47 |
| Straighten curled or warped paper before loading. |
47 |
| When using paper tray 2, load paper so that the paper touches the right side of the tray, or misf... |
47 |
| C Push the paper tray in, until it stops. |
47 |
| C Push the paper tray in, until it stops. |
47 |
| D Adding Toner |
48 |
| D Adding Toner |
48 |
| When D appears, it is time to add toner. |
48 |
| When D appears, it is time to add toner. |
48 |
| Handling Toner |
48 |
| Handling Toner |
48 |
| Handling toner |
48 |
| Toner:handling |
48 |
| <TABLE> |
48 |
| <TABLE> |
48 |
| <TABLE> |
48 |
| <TABLE> |
48 |
| <TABLE> |
48 |
| <TABLE BODY> |
48 |
| <TABLE ROW> |
48 |
| • Do not incinerate used toner or toner containers. Toner dust might ignite when exposed to an op... |
48 |
| • Do not incinerate used toner or toner containers. Toner dust might ignite when exposed to an op... |
48 |
| <TABLE> |
48 |
| <TABLE> |
48 |
| <TABLE> |
48 |
| <TABLE> |
48 |
| <TABLE BODY> |
48 |
| <TABLE ROW> |
48 |
| • Keep toner (used or unused) and toner containers out of reach of children. |
48 |
| • Keep toner (used or unused) and toner containers out of reach of children. |
48 |
| Faults may occur if you use toner other than the recommended type. |
48 |
| Faults may occur if you use toner other than the recommended type. |
48 |
| When adding toner, do not turn off the operation switch. If you do, settings will be lost. |
48 |
| Always add toner when the machine instructs you. |
48 |
| Do not repeatedly install and remove toner bottles. This will result in toner leakage. |
48 |
| Do not shake the removed toner bottle. Remaining toner might scatter. |
48 |
| You can make about 50 copies even after the D symbol begins flashing, but replace toner early to ... |
48 |
| You can make about 50 copies even after the D symbol begins flashing, but replace toner early to ... |
48 |
| Toner Storage |
48 |
| Toner Storage |
48 |
| When storing toner, the following precautions should always be followed: |
48 |
| When storing toner, the following precautions should always be followed: |
48 |
| Used Toner |
48 |
| Used Toner |
48 |
| Used toner |
48 |
| Toner:used |
48 |
| Toner cannot be re-used. |
48 |
| Toner cannot be re-used. |
48 |
| Toner cannot be re-used. |
48 |
| Removing Toner |
49 |
| Removing Toner |
49 |
| Removing toner |
49 |
| Toner:removing |
49 |
| <TABLE> |
49 |
| <TABLE> |
49 |
| <TABLE> |
49 |
| <TABLE BODY> |
49 |
| <TABLE ROW> |
49 |
| <GRAPHIC> |
49 |
| • 1: Open the front cover of the machine. |
49 |
| • 1: Open the front cover of the machine. |
49 |
| • 1: Open the front cover of the machine. |
49 |
| • 2: Lift the green lever. |
49 |
| • 2: Lift the green lever. |
49 |
| • 2: Lift the green lever. |
49 |
| <TABLE ROW> |
49 |
| <GRAPHIC> |
49 |
| • 3: Push the green lever, and then gently pull out the holder. |
49 |
| • 3: Push the green lever, and then gently pull out the holder. |
49 |
| • 3: Push the green lever, and then gently pull out the holder. |
49 |
| <TABLE ROW> |
49 |
| <GRAPHIC> |
49 |
| • 4: Press the toner bottle back to raise its top, and then gently pull it out. |
49 |
| • 4: Press the toner bottle back to raise its top, and then gently pull it out. |
49 |
| • 4: Press the toner bottle back to raise its top, and then gently pull it out. |
49 |
| Inserting Toner |
50 |
| Inserting Toner |
50 |
| Inserting toner |
50 |
| Toner:inserting |
50 |
| <TABLE> |
50 |
| <TABLE> |
50 |
| <TABLE> |
50 |
| <TABLE BODY> |
50 |
| <TABLE ROW> |
50 |
| <GRAPHIC> |
50 |
| • 1: Hold the new bottle horizontally and shake it from side to side five or six times. |
50 |
| • 1: Hold the new bottle horizontally and shake it from side to side five or six times. |
50 |
| • 1: Hold the new bottle horizontally and shake it from side to side five or six times. |
50 |
| 2: Remove the black cap. |
50 |
| Do not remove the black cap before shaking. |
50 |
| Do not remove the black cap before shaking. |
50 |
| Do not remove the inner cap. |
50 |
| <TABLE ROW> |
50 |
| <GRAPHIC> |
50 |
| • 3: Put the toner bottle on the holder, and then pull its top forward. |
50 |
| • 3: Put the toner bottle on the holder, and then pull its top forward. |
50 |
| • 3: Put the toner bottle on the holder, and then pull its top forward. |
50 |
| <TABLE ROW> |
50 |
| <GRAPHIC> |
50 |
| • 4: Push in the green lever until it clicks. |
50 |
| • 4: Push in the green lever until it clicks. |
50 |
| • 4: Push in the green lever until it clicks. |
50 |
| <TABLE ROW> |
50 |
| <GRAPHIC> |
50 |
| • 5: Press down the green lever. |
50 |
| • 5: Press down the green lever. |
50 |
| • 5: Press down the green lever. |
50 |
| • 6: Close the machine's front cover. |
50 |
| • 6: Close the machine's front cover. |
50 |
| • 6: Close the machine's front cover. |
50 |
| 4.� User Tools ( |
51 |
| 4.� User Tools ( |
51 |
| Accessing User Tools |
51 |
| Accessing User Tools |
51 |
| This section is for key operators in charge of this machine. Key operators can change or make def... |
51 |
| This section is for key operators in charge of this machine. Key operators can change or make def... |
51 |
| Be sure to quit User Tools and return to the initial copy display when all settings are complete.... |
51 |
| Be sure to quit User Tools and return to the initial copy display when all settings are complete.... |
51 |
| Be sure to quit User Tools and return to the initial copy display when all settings are complete.... |
51 |
| Selected settings are highlighted. |
51 |
| Any changes made with User Tools remain in effect even if the main power switch or operation swit... |
51 |
| For details about |
51 |
| For details about |
51 |
| Changing Default Settings |
51 |
| Changing Default Settings |
51 |
| If a key operator code is set, the key operator code input display appears before you can change ... |
51 |
| If a key operator code is set, the key operator code input display appears before you can change ... |
51 |
| If a key operator code is set, the key operator code input display appears before you can change ... |
51 |
| A Press the |
51 |
| A Press the |
51 |
| A Press the |
51 |
| <GRAPHIC> |
51 |
| B Select |
51 |
| <GRAPHIC> |
51 |
| C Select the menu using |
51 |
| <GRAPHIC> |
52 |
| D Change settings by following instructions on the display, and then press the |
52 |
| <GRAPHIC> |
52 |
| The “ |
52 |
| To discontinue the operation and return to the initial display, press the |
52 |
| To discontinue the operation and return to the initial display, press the |
52 |
| Quitting User Tools |
52 |
| Quitting User Tools |
52 |
| A Press the |
52 |
| A Press the |
52 |
| A Press the |
52 |
| A Press the |
52 |
| <GRAPHIC> |
52 |
| The change is made, and the machine is ready to copy. |
52 |
| Settings You Can Change with User Tools |
53 |
| Settings You Can Change with User Tools |
53 |
| Auto Tray Switching |
53 |
| Auto Tray Switching |
53 |
| Auto Tray Switching |
53 |
| Auto tray switching |
53 |
| If you load paper of the same size and in the same orientation in two trays, the machine automati... |
53 |
| Default: |
53 |
| Default: |
53 |
| Off |
53 |
| Off |
53 |
| To enable this function, the APS settings of Paper Type: Tray 1 and 2 have to be selected |
53 |
| Original Type Setting |
53 |
| Original Type Setting |
53 |
| Original Type Setting |
53 |
| You can adjust copy finish quality level according to original type. You can choose these functio... |
53 |
| You can adjust copy finish quality level according to original type. You can choose these functio... |
53 |
| • Text Mode 1 |
53 |
| • Text Mode 1 |
53 |
| • Text Mode 1 |
53 |
| • Text Mode 1 |
53 |
| normal text originals |
53 |
| • Text Mode 2 |
53 |
| • Text Mode 2 |
53 |
| • Text Mode 2 |
53 |
| newspapers, semi-transparent originals (reverse side print faintly visible) |
53 |
| • Photo Mode 1 |
53 |
| • Photo Mode 1 |
53 |
| • Photo Mode 1 |
53 |
| text/photo images containing mostly photo areas |
53 |
| • Photo Mode 2 |
53 |
| • Photo Mode 2 |
53 |
| • Photo Mode 2 |
53 |
| text/photo images containing mostly text areas |
53 |
| • Photo Mode 3 |
53 |
| • Photo Mode 3 |
53 |
| • Photo Mode 3 |
53 |
| actual photographic paper |
53 |
| • Special Mode 1 |
53 |
| • Special Mode 1 |
53 |
| • Special Mode 1 |
53 |
| Highly transparent originals (reverse side clearly visible), or light text on a colored backgroun... |
53 |
| • Special Mode 2 |
53 |
| • Special Mode 2 |
53 |
| • Special Mode 2 |
53 |
| originals with colored text and lines |
53 |
| • Special Mode 3 |
53 |
| • Special Mode 3 |
53 |
| • Special Mode 3 |
53 |
| photo images created by dithering (visible dots), such as newspaper photos - normal resolution |
53 |
| • Special Mode 4 |
53 |
| • Special Mode 4 |
53 |
| • Special Mode 4 |
53 |
| photo images created by dithering (visible dots), such as newspaper photos - coarse resolution |
53 |
| • Special Mode 5 |
53 |
| • Special Mode 5 |
53 |
| • Special Mode 5 |
53 |
| normal text originals (reproducing the background) |
53 |
| Default: |
53 |
| Default: |
53 |
| Duplex Mode Priority |
53 |
| Duplex Mode Priority |
53 |
| Duplex Mode Priority |
53 |
| Duplex mode priority |
53 |
| You can select the type of Duplex function effective when the machine is turned on, reset, or mod... |
53 |
| Default: |
53 |
| Default: |
53 |
| Orientation |
54 |
| Orientation |
54 |
| Orientation |
54 |
| Orientation |
54 |
| • You can select the original orientation when making Combine copies. |
54 |
| • You can select the original orientation when making Combine copies. |
54 |
| • You can select the original orientation when making Combine copies. |
54 |
| Default: |
54 |
| Default: |
54 |
| When you select |
54 |
| Max. Number of Sets |
54 |
| Max. Number of Sets |
54 |
| Max. Number of Sets |
54 |
| Max. number of sets |
54 |
| The maximum copy quantity can be set between 1 and 99 using number keys. |
54 |
| Default: |
54 |
| Default: |
54 |
| Original Count Display |
54 |
| Original Count Display |
54 |
| Original Count Display |
54 |
| Original count display |
54 |
| You can set to display the count of originals and copying pages on the display when |
54 |
| Default: |
54 |
| Default: |
54 |
| Reproduction Ratio |
54 |
| Reproduction Ratio |
54 |
| Reproduction Ratio |
54 |
| Reproduction ratio |
54 |
| You can select which reduce, enlarge, or input ratio is shown on the display with priority when |
54 |
| Default: |
54 |
| Default: |
54 |
| You can set a ratio other than the above. |
54 |
| Preset R/E Priority |
55 |
| Preset R/E Priority |
55 |
| Preset R/E Priority |
55 |
| You can set the ratio with priority when |
55 |
| You can set the ratio with priority when |
55 |
| Default: |
55 |
| Default: |
55 |
| Duplex Margin |
55 |
| Duplex Margin |
55 |
| Duplex Margin |
55 |
| Duplex margin |
55 |
| You can specify left margin on the back side of copies, and top margin on the front side. Select |
55 |
| • Top Margin: 0 - 50 mm, 0” – 2” |
55 |
| • Top Margin: 0 - 50 mm, 0” – 2” |
55 |
| • Top Margin: 0 - 50 mm, 0” – 2” |
55 |
| • Left Margin: 0 - 50 mm, 0” – 2” |
55 |
| • Left Margin: 0 - 50 mm, 0” – 2” |
55 |
| Default: |
55 |
| Default: |
55 |
| 5.� Remarks |
57 |
| 5.� Remarks |
57 |
| Do's and Don'ts |
57 |
| Do's and Don'ts |
57 |
| <TABLE> |
57 |
| <TABLE> |
57 |
| <TABLE> |
57 |
| <TABLE> |
57 |
| <TABLE> |
57 |
| <TABLE BODY> |
57 |
| <TABLE ROW> |
57 |
| • Unplug the power cord from the wall outlet before you move the machine. While moving the machin... |
57 |
| • Unplug the power cord from the wall outlet before you move the machine. While moving the machin... |
57 |
| Do not turn the power off while the On indicator is lit or blinking. Doing so may damage the memory. |
57 |
| Do not turn the power off while the On indicator is lit or blinking. Doing so may damage the memory. |
57 |
| Before unplugging the power cord or turning off the main power switch, make sure remaining memory... |
57 |
| • When you use this machine for a long time in a confined space without good ventilation, you may... |
57 |
| • When you use this machine for a long time in a confined space without good ventilation, you may... |
57 |
| • When you use this machine for a long time in a confined space without good ventilation, you may... |
57 |
| • Do not touch areas on or around the fusing unit. These areas get hot. |
57 |
| • Do not touch areas on or around the fusing unit. These areas get hot. |
57 |
| • After making copies continuously, the exposure glass may become warm—this is not a malfunction. |
57 |
| • After making copies continuously, the exposure glass may become warm—this is not a malfunction. |
57 |
| • The area around the ventilation hole might feel warm. This is caused by exhaust air and is not ... |
57 |
| • The area around the ventilation hole might feel warm. This is caused by exhaust air and is not ... |
57 |
| • When the machine is not in use and in stand-by mode, you may hear a small noise inside. This is... |
57 |
| • When the machine is not in use and in stand-by mode, you may hear a small noise inside. This is... |
57 |
| • Do not turn off the operation switch while copying or printing. Make sure all copying or printi... |
57 |
| • Do not turn off the operation switch while copying or printing. Make sure all copying or printi... |
57 |
| • The machine might not produce good copy images if condensation forms inside as a result of rapi... |
57 |
| • The machine might not produce good copy images if condensation forms inside as a result of rapi... |
57 |
| • Do not open the covers of the machine while copying or printing. If you do, misfeeds might occur. |
57 |
| • Do not open the covers of the machine while copying or printing. If you do, misfeeds might occur. |
57 |
| • Do not move the machine during copying or printing. |
57 |
| • Do not move the machine during copying or printing. |
57 |
| • If you operate the machine improperly or a machine failure occurs, settings might be lost. Be s... |
57 |
| • If you operate the machine improperly or a machine failure occurs, settings might be lost. Be s... |
57 |
| • The manufacturer shall not be liable for any loss or damage resulting from mechanical failure, ... |
57 |
| • The manufacturer shall not be liable for any loss or damage resulting from mechanical failure, ... |
57 |
| Where to Put Your Machine |
58 |
| Where to Put Your Machine |
58 |
| Machine Environment |
58 |
| Machine Environment |
58 |
| Choose your machine's location carefully. Environmental conditions greatly affect its performance. |
58 |
| Choose your machine's location carefully. Environmental conditions greatly affect its performance. |
58 |
| Optimum environmental conditions |
58 |
| Optimum environmental conditions |
58 |
| <TABLE> |
58 |
| <TABLE> |
58 |
| <TABLE> |
58 |
| <TABLE> |
58 |
| <TABLE> |
58 |
| <TABLE BODY> |
58 |
| <TABLE ROW> |
58 |
| • Keep the machine away from humidity and dust. Otherwise a fire or an electric shock might occur. |
58 |
| • Keep the machine away from humidity and dust. Otherwise a fire or an electric shock might occur. |
58 |
| • Do not place the machine on an unstable or tilted surface. If it topples over, an injury might ... |
58 |
| <TABLE> |
58 |
| <TABLE> |
58 |
| <TABLE> |
58 |
| <TABLE BODY> |
58 |
| <TABLE ROW> |
58 |
| • If you use the machine in a confined space, make sure there is a continuous air turnover. |
58 |
| • If you use the machine in a confined space, make sure there is a continuous air turnover. |
58 |
| • Temperature: 10-32 °C (50-89.6 °F) (humidity to be 54% at 32 °C, 89.6 °F) |
58 |
| • Temperature: 10-32 °C (50-89.6 °F) (humidity to be 54% at 32 °C, 89.6 °F) |
58 |
| • Temperature: 10-32 °C (50-89.6 °F) (humidity to be 54% at 32 °C, 89.6 °F) |
58 |
| • Humidity: 15-80% (temperature to be 27 °C, 80.6 °F at 80%) |
58 |
| • Humidity: 15-80% (temperature to be 27 °C, 80.6 °F at 80%) |
58 |
| • A strong and level base. |
58 |
| • A strong and level base. |
58 |
| • The machine must be level within 5 mm, 0.2 inches: both front to rear, and left to right. |
58 |
| • The machine must be level within 5 mm, 0.2 inches: both front to rear, and left to right. |
58 |
| • To avoid possible buildup of ozone, be sure to locate this machine in a large well ventilated r... |
58 |
| • To avoid possible buildup of ozone, be sure to locate this machine in a large well ventilated r... |
58 |
| Environments to avoid |
58 |
| Environments to avoid |
58 |
| • Locations exposed to direct sunlight or other sources of strong light (more than 1,500 lux). |
58 |
| • Locations exposed to direct sunlight or other sources of strong light (more than 1,500 lux). |
58 |
| • Locations exposed to direct sunlight or other sources of strong light (more than 1,500 lux). |
58 |
| • Locations exposed to direct sunlight or other sources of strong light (more than 1,500 lux). |
58 |
| • Locations directly exposed to cool air from an air conditioner or heated air from a heater. (Su... |
58 |
| • Locations directly exposed to cool air from an air conditioner or heated air from a heater. (Su... |
58 |
| • Locations close to machines generating ammonia, such as a diazo copy machine. |
58 |
| • Locations close to machines generating ammonia, such as a diazo copy machine. |
58 |
| • Places where the machine will be subject to frequent strong vibration. |
58 |
| • Places where the machine will be subject to frequent strong vibration. |
58 |
| • Dusty areas. |
58 |
| • Dusty areas. |
58 |
| • Areas with corrosive gases. |
58 |
| • Areas with corrosive gases. |
58 |
| Moving |
59 |
| Moving |
59 |
| <TABLE> |
59 |
| <TABLE> |
59 |
| <TABLE> |
59 |
| <TABLE> |
59 |
| <TABLE> |
59 |
| <TABLE BODY> |
59 |
| <TABLE ROW> |
59 |
| • Unplug the power cord from the wall outlet before you move the machine. While moving the machin... |
59 |
| • Unplug the power cord from the wall outlet before you move the machine. While moving the machin... |
59 |
| <TABLE> |
59 |
| <TABLE> |
59 |
| <TABLE> |
59 |
| <TABLE BODY> |
59 |
| <TABLE ROW> |
59 |
| • When the paper tray unit is installed, do not push the upper part of the main unit horizontally... |
59 |
| • When the paper tray unit is installed, do not push the upper part of the main unit horizontally... |
59 |
| Be careful when moving the machine. Take the following precautions: |
59 |
| Be careful when moving the machine. Take the following precautions: |
59 |
| Do not take off the holding stand. |
59 |
| Protect the machine from strong shocks. Impact can damage the memory. |
59 |
| Power Connection |
59 |
| Power Connection |
59 |
| <TABLE> |
59 |
| <TABLE> |
59 |
| <TABLE> |
59 |
| <TABLE> |
59 |
| <TABLE> |
59 |
| <TABLE BODY> |
59 |
| <TABLE ROW> |
59 |
| • Connect the machine only to the power source described on the inside front cover of this manual... |
59 |
| • Connect the machine only to the power source described on the inside front cover of this manual... |
59 |
| • Do not damage, break or make any modifications to the power cord. Do not place heavy objects on... |
59 |
| <TABLE> |
59 |
| <TABLE> |
59 |
| <TABLE> |
59 |
| <TABLE> |
59 |
| <TABLE BODY> |
59 |
| <TABLE ROW> |
59 |
| • Unplug the power cord from the wall outlet before you move the machine. While moving the machin... |
59 |
| • Unplug the power cord from the wall outlet before you move the machine. While moving the machin... |
59 |
| <TABLE> |
59 |
| <TABLE> |
59 |
| <TABLE> |
59 |
| <TABLE BODY> |
59 |
| <TABLE ROW> |
59 |
| • When you disconnect the power plug from the wall outlet, always pull the plug (not the cable). |
59 |
| • When you disconnect the power plug from the wall outlet, always pull the plug (not the cable). |
59 |
| • When the main power switch is in the stand-by position, the optional anti-condensation heaters ... |
59 |
| • When the main power switch is in the stand-by position, the optional anti-condensation heaters ... |
59 |
| • When the main power switch is in the stand-by position, the optional anti-condensation heaters ... |
59 |
| • When you unplug the power cord, the anti-condensation heaters turn off. |
59 |
| • When you unplug the power cord, the anti-condensation heaters turn off. |
59 |
| • Make sure the plug is inserted firmly in the wall outlet. |
59 |
| • Make sure the plug is inserted firmly in the wall outlet. |
59 |
| • Voltage must not fluctuate by more than 10%. |
59 |
| • Voltage must not fluctuate by more than 10%. |
59 |
| • The wall outlet shall be installed near the machine and shall be easily accessible. |
59 |
| • The wall outlet shall be installed near the machine and shall be easily accessible. |
59 |
| Access to the Machine |
60 |
| Access to the Machine |
60 |
| Place the machine near the power source, providing the clearance areas shown. |
60 |
| Place the machine near the power source, providing the clearance areas shown. |
60 |
| <GRAPHIC> |
60 |
| <GRAPHIC> |
60 |
| 1.� Rear: 1 cm (0.4\ |
60 |
| 1.� Rear: 1 cm (0.4\ |
60 |
| 1.� Rear: 1 cm (0.4\ |
60 |
| 2.� Right: 1 cm (0.4\ |
60 |
| 2.� Right: 1 cm (0.4\ |
60 |
| 3.� Front: 75 cm (29.6\ |
60 |
| 3.� Front: 75 cm (29.6\ |
60 |
| 4.� Left: 1 cm (0.4\ |
60 |
| 4.� Left: 1 cm (0.4\ |
60 |
| For the required space when options are installed, contact your service representative. |
60 |
| For the required space when options are installed, contact your service representative. |
60 |
| Maintaining Your Machine |
61 |
| Maintaining Your Machine |
61 |
| If the exposure glass, or ADF belt is dirty, copy clarity may be reduced. Clean these parts if th... |
61 |
| If the exposure glass, or ADF belt is dirty, copy clarity may be reduced. Clean these parts if th... |
61 |
| Cleaning the machine |
61 |
| Cleaning the machine |
61 |
| Cleaning the machine |
61 |
| Wipe the machine with a soft, damp cloth. Then wipe it with a dry cloth to remove the water. |
61 |
| Wipe the machine with a soft, damp cloth. Then wipe it with a dry cloth to remove the water. |
61 |
| Do not use chemical cleaner or organic solvents such as thinner or benzene. If such substances ge... |
61 |
| Do not use chemical cleaner or organic solvents such as thinner or benzene. If such substances ge... |
61 |
| Do not clean parts other than those explicitly specified in this manual. Other parts should only ... |
61 |
| Cleaning the Exposure Glass |
61 |
| Cleaning the Exposure Glass |
61 |
| <GRAPHIC> |
61 |
| <GRAPHIC> |
61 |
| Cleaning the ADF |
61 |
| <GRAPHIC> |
61 |
| <GRAPHIC> |
63 |
| 6.� Specifications |
63 |
| Combination Chart |
63 |
| Combination Chart |
63 |
| The combination chart below shows which functions can be used together. When you read the chart, ... |
63 |
| The combination chart below shows which functions can be used together. When you read the chart, ... |
63 |
| The following shows the combinations of functions. |
63 |
| <GRAPHIC> |
64 |
| Supplementary Information |
64 |
| Bypass Tray Copy |
64 |
| Bypass Tray Copy |
64 |
| Bypass Tray Copy |
64 |
| Bypass Tray Copy |
64 |
| • The following paper sizes can be selected as standard sizes: |
64 |
| • The following paper sizes can be selected as standard sizes: |
64 |
| • The following paper sizes can be selected as standard sizes: |
64 |
| • The following paper sizes can be selected as standard sizes: |
64 |
| A4L, A5KL, B5 JISL, 8 |
64 |
| • When the beeper is turned off, it will not sound if you insert paper into the bypass tray. See |
64 |
| • When the beeper is turned off, it will not sound if you insert paper into the bypass tray. See |
64 |
| Preset Reduce/Enlarge |
64 |
| Preset Reduce/Enlarge |
64 |
| • You can select one of 5 preset ratios (2 enlargement ratios, 3 reduction ratios). |
64 |
| • You can select one of 5 preset ratios (2 enlargement ratios, 3 reduction ratios). |
64 |
| • You can select one of 5 preset ratios (2 enlargement ratios, 3 reduction ratios). |
64 |
| • You can select one of 5 preset ratios (2 enlargement ratios, 3 reduction ratios). |
64 |
| • You can select a ratio regardless of the size of an original or copy paper. With some ratios, p... |
64 |
| • You can select a ratio regardless of the size of an original or copy paper. With some ratios, p... |
64 |
| • Copies can be reduced or enlarged as follows: |
64 |
| • Copies can be reduced or enlarged as follows: |
64 |
| Zoom |
65 |
| Zoom |
65 |
| Zoom |
65 |
| Zoom |
65 |
| • The reproduction ratios you can specify are 50–200%. |
65 |
| • The reproduction ratios you can specify are 50–200%. |
65 |
| • The reproduction ratios you can specify are 50–200%. |
65 |
| • You can select a ratio regardless of the size of an original or copy paper. With some ratios, p... |
65 |
| • You can select a ratio regardless of the size of an original or copy paper. With some ratios, p... |
65 |
| Duplex |
65 |
| Duplex |
65 |
| Duplex |
65 |
| Duplex |
65 |
| • You cannot use the following copy paper with this function: |
65 |
| • You cannot use the following copy paper with this function: |
65 |
| • You cannot use the following copy paper with this function: |
65 |
| • Paper smaller than B5 JISL or 8 |
65 |
| • Paper smaller than B5 JISL or 8 |
65 |
| • Paper smaller than B5 JISL or 8 |
65 |
| • Paper thicker than 105 g/m |
65 |
| • Paper thicker than 105 g/m |
65 |
| • Paper thinner than 64 g/m |
65 |
| • Paper thinner than 64 g/m |
65 |
| • Translucent paper |
65 |
| • Translucent paper |
65 |
| • OHP transparencies |
65 |
| • OHP transparencies |
65 |
| • Label paper (adhesive labels) |
65 |
| • Label paper (adhesive labels) |
65 |
| • Postcards |
65 |
| • Postcards |
65 |
| • When an odd number of originals is placed in the ADF, the back of the last page of copied paper... |
65 |
| • When an odd number of originals is placed in the ADF, the back of the last page of copied paper... |
65 |
| • When an odd number of originals is placed in the ADF, the back of the last page of copied paper... |
65 |
| • During copying, the image is shifted to allow for the binding margin. |
65 |
| • During copying, the image is shifted to allow for the binding margin. |
65 |
| • The following paper sizes can be duplexed: A4L, B5 JISL, 8 |
65 |
| • The following paper sizes can be duplexed: A4L, B5 JISL, 8 |
65 |
| • The following paper sizes can be duplexed: A4L, B5 JISL, 8 |
65 |
| Combine |
66 |
| Combine |
66 |
| • When using this function, the machine selects the reproduction ratio automatically. This reprod... |
66 |
| • When using this function, the machine selects the reproduction ratio automatically. This reprod... |
66 |
| • When using this function, the machine selects the reproduction ratio automatically. This reprod... |
66 |
| • When using this function, the machine selects the reproduction ratio automatically. This reprod... |
66 |
| • If the calculated ratio is under the minimum ratio, it is automatically adjusted to within avai... |
66 |
| • If the calculated ratio is under the minimum ratio, it is automatically adjusted to within avai... |
66 |
| • You cannot use custom size paper of 14.01 inch in length, or larger. |
66 |
| • You cannot use custom size paper of 14.01 inch in length, or larger. |
66 |
| • If the orientation of originals is different from that of the copy paper, the machine will auto... |
66 |
| • If the orientation of originals is different from that of the copy paper, the machine will auto... |
66 |
| • If the number of originals placed is less than the number specified for combining, the last pag... |
66 |
| • If the number of originals placed is less than the number specified for combining, the last pag... |
66 |
| Duplex Margin |
66 |
| Duplex Margin |
66 |
| Duplex Margin |
66 |
| Duplex Margin |
66 |
| Duplex margin |
66 |
| • If you set a binding margin that is too wide, part of the image may not be copied. |
66 |
| • If you set a binding margin that is too wide, part of the image may not be copied. |
66 |
| • If you set a binding margin that is too wide, part of the image may not be copied. |
66 |
| • When making copies using the Combine function, the binding margin is added to the copies when c... |
66 |
| • When making copies using the Combine function, the binding margin is added to the copies when c... |
66 |
| INDEX |
67 |
| INDEX |
67 |
 1
1 57
57 58
58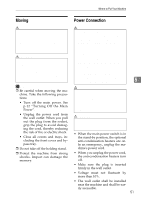 59
59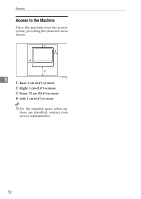 60
60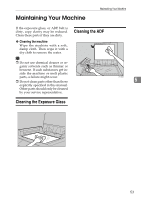 61
61 62
62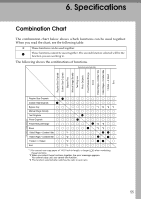 63
63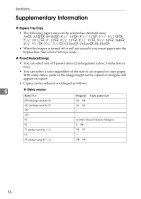 64
64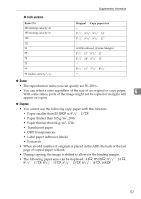 65
65 66
66 67
67