Ricoh AP410 Quick Installation Guide - Page 2
Turning The Power On, Selecting, The Display Language, Test Printing, Connecting The Printer, To - printer driver
 |
UPC - 026649023484
View all Ricoh AP410 manuals
Add to My Manuals
Save this manual to your list of manuals |
Page 2 highlights
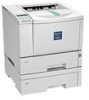
Lift the front side of the tray, and then pull it out of the printer. ZKEY145E Load the new paper into paper tray with print side up. ZKEY135E Important ❒ Confirm that the top of the stack is not higher than the limit mark inside the tray. ❒ Confirm that the paper fits under the rear guide. Carefully slide the paper tray into the printer until it stops. ZKEY155E Important ❒ Confirm that the setting of the paper size dial matches the size and feed direction of the paper in the tray. Otherwise, the printer might be damaged or a printing problem might occur. ❒ Do not slide the paper tray in and out with force. If you do, the front and side paper guides will move out of the place. Insert the paper tray aligning the M mark on the back of the printer with the L mark on the paper tray cover, and then push in the paper tray cover in the direction shown by the arrow in the illustration. ZKEX120E Note ❒ Do not install the paper tray cover if the duplex unit is installed. TURNING THE POWER ON Follow the procedure below to turn the power on. Warning • Plug and unplug the power cable with dry hands, or an electric shock could occur. Make sure the power is set to "O" Off. Plug in the power cable. ZKEH205E Important ❒ Make sure the power cable is plugged securely into the wall outlet. ❒ Turn the power off when plugging and unplugging the power plug. Turn the power to "I" On. AFE301S SELECTING THE DISPLAY LANGUAGE Select a language using the procedure described here. The message for the selected language will appear on the display. If you want to use the display in English, the following procedures are unnecessary. Note ❒ The default setting is English. Press the {Menu} key. AFE200S The [Menu] screen appears on the display. Press the {L} or {M} key to display [Language]. Menu: Language Press the {# Enter} key. The following message appears on the display: Language: *English Press the {L} or {M} key until the language you want to select appears. Press the {# Enter} key. Wait for two seconds. The [Menu] screen appears on the display. Press the {Online} key. The initial screen appears. Ready TEST PRINTING The following explains the procedure for test printing of the configuration page. Test print in order to verify that the printer is working normally. Test printing checks printer performance only; it does not test the connection to the computer. Press the {Menu} key. The [Menu] screen appears on the display. Press the {L} or {M} key to display [List/Test Print], and then press the {# Enter} key. Menu: List/Test Print The menu for selecting the contents to be test printed appears. Press the {L} or {M} key to display [Config. Page], and then press the {# Enter} key. List/Test Print: Config. Page The following message appears and the configuration page is printed. Printing... Note ❒ If printing is not normal, check to see if an error message appears on the display. If there is an error message, see "Troubleshooting", Maintenance Guide. Check the options. Note ❒ For details about the configuration page, see "Interpreting the Configuration Page", Software Guide. Press the {Online} key. The initial screen appears. Ready CONNECTING THE PRINTER TO A COMPUTER ❖ Network connection Follow the procedure below to connect the printer to the computer through the network. Prepare the hub and other network devices before connecting the 10 BASE-T or 100 BASE-TX cable to the machine's Ethernet port. Important ❒ Use shielded Ethernet cable. Unshielded cables create electromagnetic interference that could cause malfunctions. ❒ Ethernet cable is not supplied with this machine. Select your cable according to the network environment. For basic model printer with the network interface board installed, connect the ferrite core to the interface cable. The network interface cable loop should be about 15 cm (5.9 inches) (ቢ) from the end of the cable (on the end closest to the printer). ZKEH126E Connect the Ethernet cable to the Ethernet port. For basic model printer, connect the Ethernet cable to the network interface board. AFE302S For network standard model printer, connect the Ethernet cable to the standard Ethernet port. AFE303S Connect the other end of the cable to the printer's network, such as a hub. Reference ❒ For details about network environment settings, see Software Guide. Check the LEDs on the Ethernet port. A: Basic model printer B: Network standard model printer ❖ Parallel connection Important ❒ The parallel interface cable is not provided with the printer. ❒ The printer's parallel connection is a standard bidirectional interface that requires an IEEE 1284-compliant 36-pin parallel cable and host computer parallel port. ❒ Use shielded interface cable. Unshielded cables create electromagnetic interference that could cause malfunctions. Turn off the printer and computer. Connect the cable to the interface connector. AFE304S 1 is lit when 100BASE-TX is in use and not lit when 10BASE-T is in use. 2 is lit when the printer is securely connected to the network. ❖ USB connection Important ❒ USB2.0 interface cable is not supplied. Obtain it separately, according to the computer you are using. ❒ USB connection is possible under Windows 98 SE/Me/2000/XP, Windows Server 2003, Mac OS 9.x, and Mac OS X v10.3 or higher. ❒ Windows 98SE/Me supports USB1.1 speeds. ❒ USB connection with Macintosh is only possible via the printer's USB port. Connect the square-shaped connector of the USB2.0 cable to the USB port. ZKEX115E Securely attach the other end of the parallel cable to your computer's parallel port. Secure the cable. Reference ❒ For details about settings for parallel connection printing, see Software Guide. SETTING UP FOR PRINTING Printing requires installation of a printer driver for the operating system. Reference ❒ See "Installing the Printer Driver", Setup Guide. ❒ If you want to install options, see "Installing Options", Setup Guide. ZKET300E Connect the opposite end's flat connector to devices such as your computer's USB interface, or a USB hub. Reference ❒ For details about settings for USB connection printing, see Software Guide. Copyright © 2004 G112-8626 Printed in The Netherlands GB GB
-
 1
1 -
 2
2
 |
 |