Ricoh Aficio SP 4110N-KP Operating Instructions - Page 144
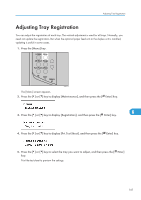
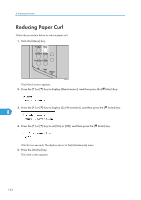
key to select [Adjustment], and then press, key to set the registration value mm
 |
View all Ricoh Aficio SP 4110N-KP manuals
Add to My Manuals
Save this manual to your list of manuals |
Page 144 highlights
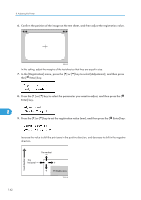
8. Adjusting the Printer 6. Confirm the position of the image on the test sheet, and then adjust the registration value. ZKEX480E In this setting, adjust the margins of the test sheet so that they are equal in size. 7. In the [Registration] menu, press the [ ] or [ ] key to select [Adjustment], and then press the [ Enter] key. 8. Press the [ ] or [ ] key to select the parameter you want to adjust, and then press the [ Enter] key. 8 9. Press the [ ] or [ ] key to set the registration value (mm), and then press the [ Enter] key. Increase the value to shift the print area in the positive direction, and decrease to shift in the negative direction. 142 TS3X001N
-
 1
1 -
2
-
3
-
4
-
5
-
6
-
7
-
8
-
9
-
10
-
11
-
12
-
13
-
14
-
15
-
16
-
17
-
18
-
19
-
20
-
21
-
22
-
23
-
24
-
25
-
26
-
27
-
28
-
29
-
30
-
31
-
32
-
33
-
34
-
35
-
36
-
37
-
38
-
39
-
40
-
41
-
42
-
43
-
44
-
45
-
46
-
47
-
48
-
49
-
50
-
51
-
52
-
53
-
54
-
55
-
56
-
57
-
58
-
59
-
60
-
61
-
62
-
63
-
64
-
65
-
66
-
67
-
68
-
69
-
70
-
71
-
72
-
73
-
74
-
75
-
76
-
77
-
78
-
79
-
80
-
81
-
82
-
83
-
84
-
85
-
86
-
87
-
88
-
89
-
90
-
91
-
92
-
93
-
94
-
95
-
96
-
97
-
98
-
99
-
100
-
101
-
102
-
103
-
104
-
105
-
106
-
107
-
108
-
109
-
110
-
111
-
112
-
113
-
114
-
115
-
116
-
117
-
118
-
119
-
120
-
121
-
122
-
123
-
124
-
125
-
126
-
127
-
128
-
129
-
130
-
131
-
132
-
133
-
134
-
135
-
136
-
137
-
138
-
 139
139 -
 140
140 -
 141
141 -
 142
142 -
 143
143 -
 144
144 -
 145
145 -
 146
146 -
 147
147 -
 148
148 -
 149
149 -
150
-
151
-
152
-
153
-
154
-
155
-
156
-
157
-
158
-
159
-
160
-
161
-
162
-
163
-
164
-
165
-
166
-
167
-
168
-
169
-
170
-
171
-
172
-
173
-
174
-
175
-
176
-
177
-
178
-
179
-
180
-
181
-
182
-
183
-
184
-
185
-
186
-
187
-
188
-
189
-
190
-
191
-
192
-
193
-
194
-
195
-
196
-
197
-
198
-
199
-
200
-
201
-
202
-
203
-
204
 |
 |
6.
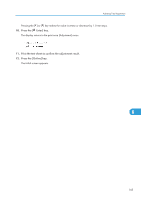
Confirm the position of the image on the test sheet, and then adjust the registration value.
ZKEX480E
In this setting, adjust the margins of the test sheet so that they are equal in size.
7.
In the [Registration] menu, press the [
] or [
] key to select [Adjustment], and then press
the [
Enter] key.
8.
Press the [
] or [
] key to select the parameter you want to adjust, and then press the [
Enter] key.
9.
Press the [
] or [
] key to set the registration value (mm), and then press the [
Enter] key.
Increase the value to shift the print area in the positive direction, and decrease to shift in the negative
direction.
TS3X001N
8. Adjusting the Printer
142
8