Ricoh C222DN Administration Guide - Page 98
Gripping its center, carefully pull the print cartridge upward and out.
 |
UPC - 026649060113
View all Ricoh C222DN manuals
Add to My Manuals
Save this manual to your list of manuals |
Page 98 highlights
Replacing the Print Cartridge A Pull up Top Cover Open Lever to open the top cover. ASH004S From the rear, the print cartridges are installed in the order of cyan (C), magenta (M), yellow (Y), and black (K). B Gripping its center, carefully pull the print cartridge upward and out. 5 ASH005S • Do not shake the removed print cartridge. Remaining toner may leak. • Place the old print cartridge on paper or some other material to avoid dirt- ying your workspace. • Color is labeled on each print cartridge. C Take the new print cartridge out of the box, and then take it out of the plas- tic bag. ASH006S 53
-
 1
1 -
2
-
3
-
4
-
5
-
6
-
7
-
8
-
9
-
10
-
11
-
12
-
13
-
14
-
15
-
16
-
17
-
18
-
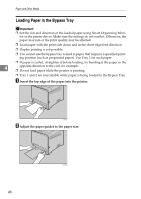
19
-
20
-
21
-
22
-
23
-
24
-
25
-
26
-
27
-
28
-
29
-
30
-
31
-
32
-
33
-
34
-
35
-
36
-
37
-
38
-
39
-
40
-
41
-
42
-
43
-
44
-
45
-
46
-
47
-
48
-
49
-
50
-
51
-
52
-
53
-
54
-
55
-
56
-
57
-
58
-
59
-
60
-
61
-
62
-
63
-
64
-
65
-
66
-
67
-
68
-
69
-
70
-
71
-
72
-
73
-
74
-
75
-
76
-
77
-
78
-
79
-
80
-
81
-
82
-
83
-
84
-
85
-
86
-
87
-
88
-
89
-
90
-
91
-
92
-
 93
93 -
 94
94 -
 95
95 -
 96
96 -
 97
97 -
 98
98 -
 99
99 -
 100
100 -
 101
101 -
 102
102 -
 103
103 -
104
-
105
-
106
-
107
-
108
-
109
-
110
-
111
-
112
-
113
-
114
-
115
-
116
-
117
-
118
-
119
-
120
-
121
-
122
-
123
-
124
-
125
-
126
-
127
-
128
-
129
-
130
-
131
-
132
-
133
-
134
-
135
-
136
-
137
-
138
-
139
-
140
-
141
-
142
-
143
-
144
-
145
-
146
-
147
-
148
-
149
-
150
-
151
-
152
-
153
-
154
-
155
-
156
-
157
-
158
-
159
-
160
-
161
-
162
-
163
-
164
-
165
-
166
-
167
-
168
-
169
-
170
-
171
-
172
-
173
-
174
-
175
-
176
-
177
-
178
-
179
-
180
-
181
-
182
-
183
-
184
-
185
-
186
-
187
-
188
-
189
-
190
-
191
-
192
-
193
-
194
-
195
-
196
-
197
-
198
-
199
-
200
-
201
-
202
-
203
-
204
-
205
-
206
-
207
-
208
-
209
-
210
-
211
-
212
-
213
-
214
-
215
-
216
-
217
-
218
-
219
-
220
-
221
-
222
-
223
-
224
-
225
-
226
-
227
-
228
-
229
-
230
-
231
-
232
-
233
-
234
-
235
-
236
-
237
-
238
-
239
-
240
-
241
-
242
-
243
-
244
-
245
-
246
-
247
-
248
-
249
-
250
-
251
-
252
-
253
-
254
-
255
-
256
-
257
-
258
-
259
-
260
-
261
-
262
-
263
-
264
-
265
-
266
-
267
-
268
-
269
-
270
-
271
-
272
-
273
-
274
-
275
-
276
-
277
-
278
-
279
-
280
-
281
-
282
-
283
-
284
 |
 |

Replacing the Print Cartridge
53
5
A
Pull up Top Cover Open Lever to open the top cover.
From the rear, the print cartridges are installed in the order of cyan (C), ma-
genta (M), yellow (Y), and black (K).
B
Gripping its center, carefully pull the print cartridge upward and out.
•
Do not shake the removed print cartridge. Remaining toner may leak.
•
Place the old print cartridge on paper or some other material to avoid dirt-
ying your workspace.
•
Color is labeled on each print cartridge.
C
Take the new print cartridge out of the box, and then take it out of the plas-
tic bag.
ASH004S
ASH005S
ASH006S