Ricoh C410DN Quick Installation Guide - Page 3
Quick Insta, tion Guide - aficio sp c411dn
 |
UPC - 026649025341
View all Ricoh C410DN manuals
Add to My Manuals
Save this manual to your list of manuals |
Page 3 highlights
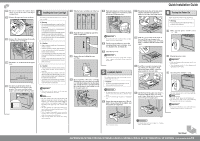
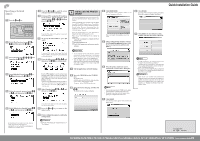
2/2 Quick Installation Guide Selecting the Display Language Select a language using the procedure described here. The message for the selected language will appear on the display. If you want to use the display in English, the following procedures are unnecessary. • The default setting is English. Press the {Menu} key. K C M Y AQC001S Select [Language] using {▼} or {▲}, and then press the {OK} key. Select the language using {▼} or {▲}, and then press the {OK} key. Press the {Menu} key to return to the initial screen. Test Printing The following explains the procedure for test printing of the configuration page. Test printing in order to verify that the printer is working normally. Test printing checks printer performance only; it does not test the connection to the computer. Press the {Menu} key. K C M Y AQC001S Select [List/Test Print] using {▼} or {▲}, and then press the {OK} key. Select [Config. Page] using {▼} or {▲}, and then press the {OK} key. The configuration page will be printed. If printing is not normal, check to see if an error message appears on the display. If there is an error message, see "Troubleshooting", Hardware Guide. Check the options. For details about the configuration page, see "Interpreting the Configuration Page", Software Guide. Press the {Menu} key to return to the initial screen. Network Connection Follow the procedure below to connect the printer to the computer through the network. Prepare the hub and other network devices before connecting the 10 BASET or 100 BASE-TX cable to the machine's Ethernet port. • Use shielded Ethernet cable. Unshielded cables create electromagnetic interference that could cause malfunctions. • The Ethernet cable is not supplied with this machine. Select your cable according to the network environment. Attach one ferrite core at the printer end of the Ethernet cable, and then attach the other ferrite core about 10 cm (4 inches) ( ) from this core. AET121S Connect the Ethernet cable to the Ethernet port. AET122S Connect the other end of the cable to the printer's network, such as a hub. • The printer's ethernet and USB ports are not available when the gigabit ethernet board is attached to the printer. • For details about network environment settings, see Software Guide. Reading the LED Lamps ❖ For standard ethernet port Ethernet Configuration Make the following network settings according to the network interface you are using. You can use SmartDeviceMonitor for Admin or a Web browser to make IP address-related settings in a TCP/ IP-capable environment. Quick Installation Guide Press the {Menu} key. K C M Y AQC070S 1. Yellow: comes on when 100BASE-TX is being used. It comes off when 10BASE-T is being used. 2. Green: comes on when the printer is properly connected to the network. USB Connection • USB2.0 interface cable is not supplied. Obtain it separately, according to the computer you are using. • USB connection is possible under Windows 98 SE/ Me/2000/XP, Windows Server 2003, Mac OS 9.x, and Mac OS X. • Windows 98SE/Me supports USB1.1 speeds. • USB connection with Macintosh is only possible via the printer's USB port. Connect the square-shaped connector of the USB2.0 cable to the USB port. • Configure the printer for the network using the control panel. • The following table shows the control panel settings and their default values. These items appear in the "Host Interface" menu. • After configuring the network settings, making security settings is recommended. For details, see the "Notes to Administrator" sheet. Setting Name Value Auto-Obtain (DHCP) On IPv4 Address 011.022.033.044 Subnet Mask 000.000.000.000 Gateway Address 000.000.000.000 Frame Type (NW) Auto Effective Protocol IPv4 Effective IPv6 Effective NetWare Effective SMB Effective AppleTalk Effective Ethernet Speed Auto LAN Type Auto • If Auto Obtain (DHCP) is in use, the IPv4 address, subnet mask, and gateway address are all set automatically. • Make this setting only when it is necessary. See Software Guide. AQC001S Select [Host Interface] using , {▼} or {▲}, and then press the {OK} key. Select [Network] using {▼} or {▲}, and then press the {OK} key. Select [Machine IPv4 Address] using {▼} or {▲}, and then press the {OK} key. Select [Auto-Obtain (DHCP)] using {▼} or {▲}, and then press the {OK} key. AET124S Connect the opposite end's flat connector to devices such as your computer's USB interface, or a USB hub. Detecting the Network Address Automatically (Using DHCP) • When you use this printer in DHCP environment, select [Auto-Obtain (DHCP)] following this procedure. • When [Auto-Obtain (DHCP)] is selected, you cannot make settings for the following items: • IP Address • Subnet Mask • Gateway Address • Consult your network administrator for information about making network settings. The address detected by the printer will appear. To check the detected addresses, press the followings: • [IP Add.] : IP address • [Subnet] : Subnet Mask Press the {MENU} key to return to the initial screen. Print a configuration page to confirm the settings made. • For details about printing the configuration page, see "Test Printing". CLP30DN/CLP27DN/C7531dn/C7526dn/LP231cn/LP226cn/Aficio SP C411DN/Aficio SP C410DN
-
 1
1 -
 2
2 -
 3
3 -
 4
4
 |
 |
