Ricoh IM C3500 Guide to Set Up OAuth 2.0 Authentication for Receiving Microsof - Page 3
Configuring an e-mail account to use for fax
 |
View all Ricoh IM C3500 manuals
Add to My Manuals
Save this manual to your list of manuals |
Page 3 highlights
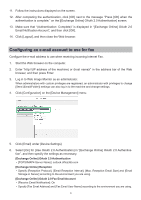
11. Follow the instructions displayed on the screen. 12. After completing the authentication, click [OK] next to the message "Press [OK] when the authentication is complete." on the [[Exchange Online] OAuth 2.0 Authentication] screen. 13. Make sure that "(Authentication: Complete)" is displayed in "[Exchange Online] OAuth 2.0 Email Notification Account", and then click [OK]. 14. Click [Logout], and then close the Web browser. Configuring an e-mail account to use for fax Configure the e-mail address to use when receiving incoming Internet Fax. 1. Start the Web browser on the computer. 2. Enter "http://(IP address of the machine) or (host name)/" in the address bar of the Web browser, and then press Enter. 3. Log in to Web Image Monitor as an administrator. When administrators with custom privileges are registered, an administrator with privileges to change [Send (Email/Folder)] settings can also log in to the machine and change settings. 4. Click [Configuration] on the [Device Management] menu. 5. Click [Email] under [Device Settings]. 6. Select [On] for [Use OAuth 2.0 Authentication] in "[Exchange Online] OAuth 2.0 Authentica- tion", and then specify the settings as necessary. [Exchange Online] OAuth 2.0 Authentication • [POP3/IMAP4 Server Name]: outlook.office365.com [Exchange Online] Reception • Specify [Reception Protocol], [Email Reception Interval], [Max. Reception Email Size] and [Email Storage in Server] according to the environment you are using. [Exchange Online] OAuth 2.0 Fax Email Account • [Receive Email Notification]: On • Specify [Fax Email Address] and [Fax Email User Name] according to the environment you are using. 3
-
 1
1 -
 2
2 -
 3
3 -
 4
4
 |
 |
