Ridgid R5011 Owners Manual - Page 11
Operation - 1 2 hammer drill
 |
View all Ridgid R5011 manuals
Add to My Manuals
Save this manual to your list of manuals |
Page 11 highlights
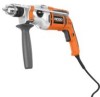
OPERATION WARNING: Do not allow familiarity with tools to make you careless. Remember that a careless fraction of a second is sufficient to inflict severe injury. LOCK-ON BUTTON WARNING: Always wear safety goggles or safety glasses with side shields when operating tools. Failure to do so could result in objects being thrown into your eyes resulting in possible serious injury. WARNING: Do not use any attachments or accessories not recommended by the manufacturer of this tool. The use of attachments or accessories not recommended can result in serious personal injury. SWITCH TRIGGER REVERSE Fig. 4 APPLICATIONS You may use this tool for the purposes listed below: Hammer drilling in concrete, brick, or other masonry Drilling in wood Drilling in ceramics, plastics, fiberglass, and laminates Drilling in metals Mixing paint SWITCH TRIGGER See Figure 4. To turn the drill ON, depress the switch trigger. To turn it OFF, release the switch trigger. VARIABLE SPEED The variable speed switch delivers higher speed with increased trigger pressure and lower speed with decreased trigger pressure. NOTE: You might hear a whistling or ringing noise from the switch during use. Do not be concerned; this is a normal part of the switch function. DIRECTION OF ROTATION SELECTOR (FORWARD/REVERSE) See Figure 5. The direction of bit rotation is reversible and is controlled by a selector located above the switch trigger. With the drill held in normal operating position, the direction of rotation selector should be positioned to the left of the switch trigger for forward drilling. The drilling direction is reversed when the selector is to the right of the switch trigger. FORWARD DIRECTION OR ROTATION SELECTOR (FORWARD/REVERSE) Fig. 5 CAUTION: To prevent gear damage, always allow the chuck to come to a complete stop before changing the direction of rotation. To stop the drill, release the switch trigger and allow the chuck to come to a complete stop. NOTE: The drill will not run unless the direction of rotation selector is pushed fully to the left or right. Avoid running the drill at low speeds for extended periods of time. Running at low speeds under constant usage may cause the drill to become overheated. If this occurs, cool the drill by running it without a load and at full speed. 11
-
 1
1 -
2
-
3
-
4
-
5
-
 6
6 -
 7
7 -
 8
8 -
 9
9 -
 10
10 -
 11
11 -
 12
12 -
 13
13 -
 14
14 -
 15
15 -
 16
16 -
17
-
18
-
19
-
20
 |
 |
