Rocketfish RF-G1401 Quick Setup Guide English - Page 1
Rocketfish RF-G1401 Manual
 |
View all Rocketfish RF-G1401 manuals
Add to My Manuals
Save this manual to your list of manuals |
Page 1 highlights
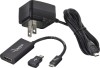
QUICK SETUP GUIDE RF-G1401 MHL HDTV Adapter PACKAGE CONTENTS • MHL adapter • Samsung adapter • Micro USB power adapter • Quick Setup Guide FEATURES • Supports 1080p HD and 4K × 2K resolution (2160p30) HD video and 7.1/5.1 digital audio surround sound playback (MHL 3 Enabled) • Connects from the micro-USB port on your MHL™-enabled phone or tablet to an HDMI® input on a TV, projector, or monitor (requires an HDMI® cable, not included) • Control your smart phone content with your TV remote • Simultaneously charge your phone while you are using it to send audio and video to your HDTV • Includes adapter for Samsung MHL-enabled devices (works with Galaxy S® III, 4, 5; Galaxy Note® II, 3, 4, Edge; and other Samsung products) COMPATIBILITY • Your smartphone or tablet needs to be MHL compatible. Check with your device's documentation or with the manufacturer to determine if it's MHL enabled. USING YOUR MHL ADAPTER 1 Connect the included micro USB power adapter to the micro USB jack on the MHL adapter and then into a power outlet. 2 Connect one end of your HDMI cable (not included) to the adapter and the other to an available HDMI input jack on your TV. MHL-enabled device OR Samsung Adapter (Included) Use with most Samsung devices micro USB power adapter (included) 3 Connect the micro USB connector of the adapter to an MHL-enabled smart phone or tablet. Important Note: Most Samsung MHL-enabled devices require the included Samsung adapter to be connected to the USB/MHL connector on the Samsung device. The micro USB connector on the MHL cable then connects to the Samsung adapter. 4 Turn on your smart phone or tablet. 5 Turn on your TV, then switch the input/source to the HDMI input/source that matches the HDMI input jack you connected the adapter to on your TV (HDMI1, HDMI2, etc.). Content from your smart phone or tablet is displayed on the TV. QUICK SETUP GUIDE Before using your new product, please read these instructions to prevent any damage. MHL HDTV adapter HDMI cable (not included)
-
 1
1 -
 2
2
 |
 |
