Rocketfish RF-RCMBO2 Quick Setup Guide (English) - Page 1
Rocketfish RF-RCMBO2 Manual
 |
View all Rocketfish RF-RCMBO2 manuals
Add to My Manuals
Save this manual to your list of manuals |
Page 1 highlights
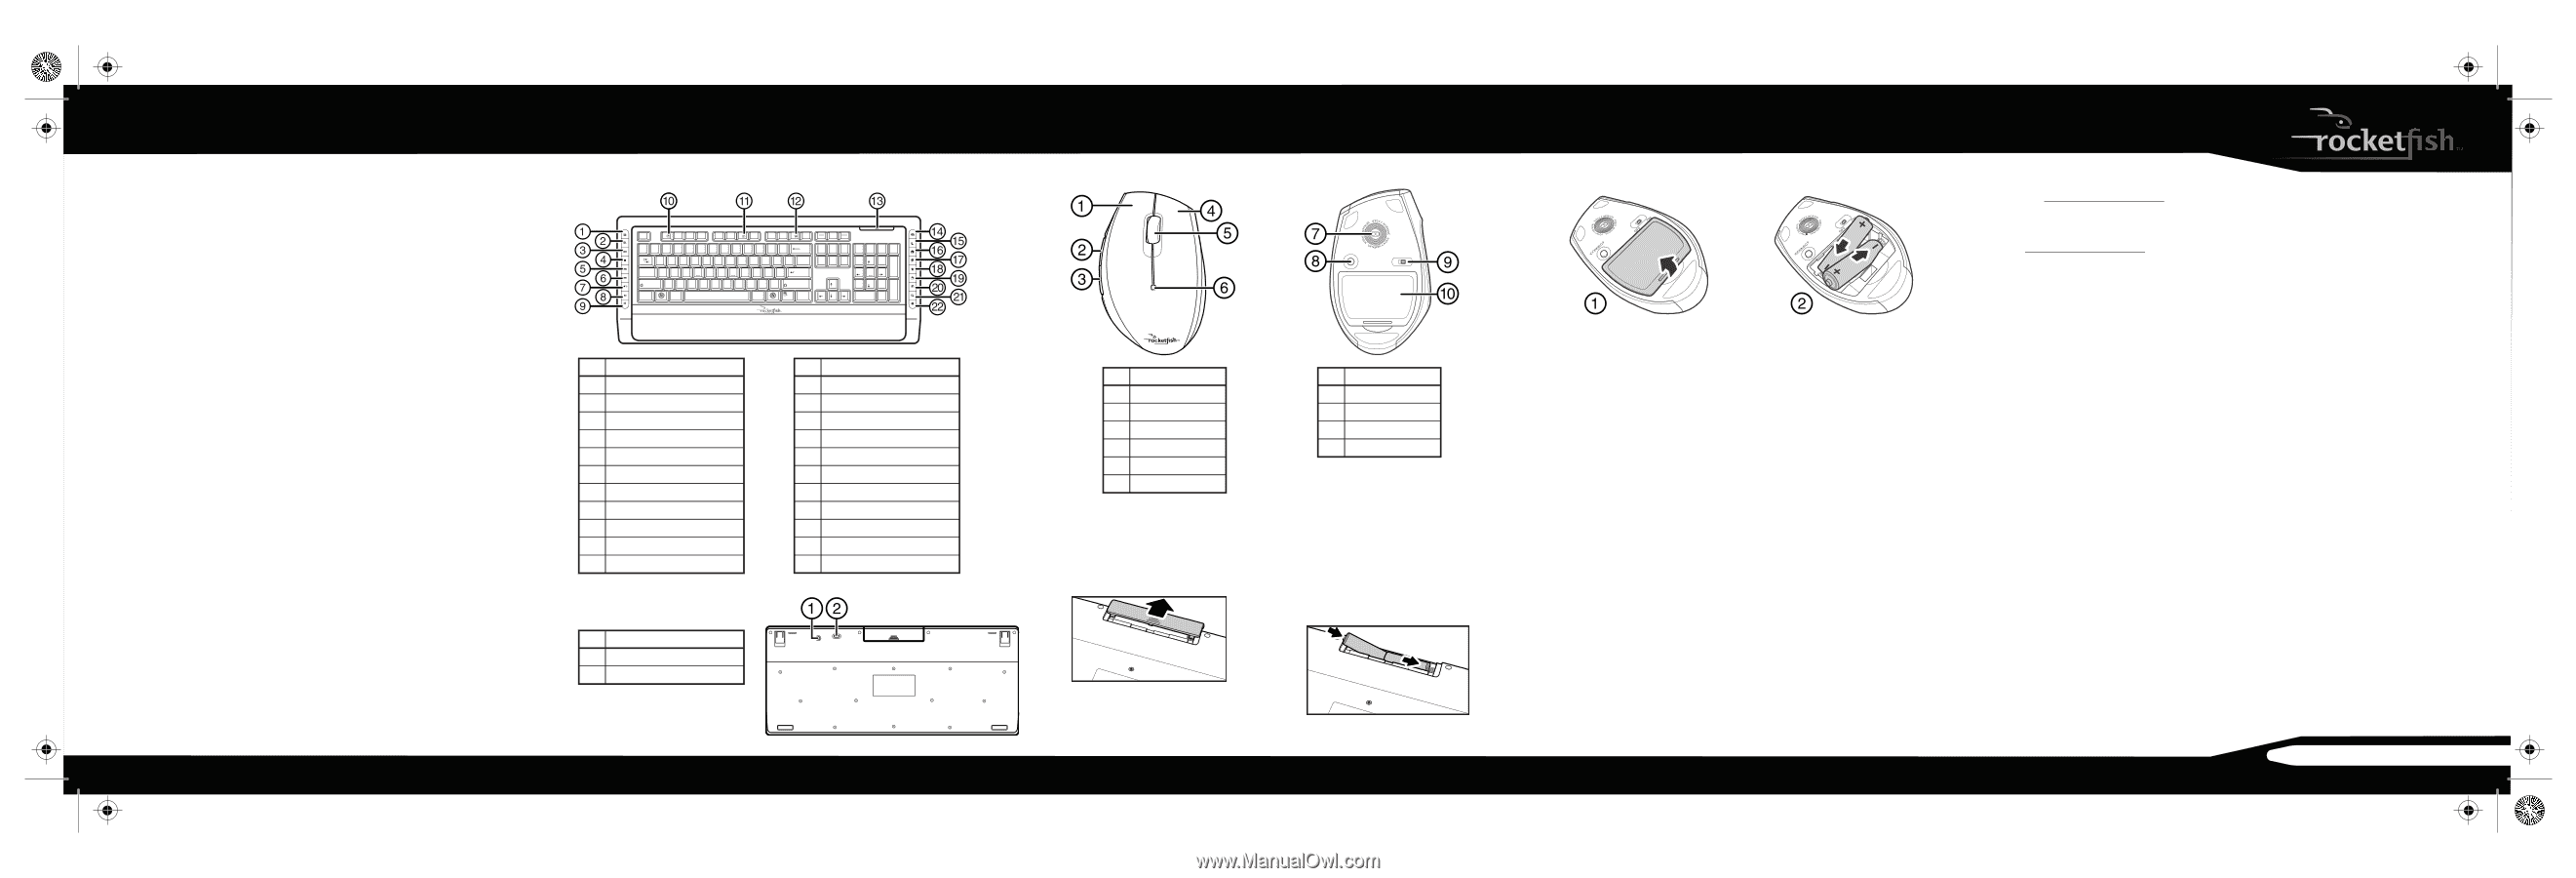
RF-RCMBO2_10-1281_QSG_V1_EN.eps 1 12/14/2010 2:00:39 PM RF-RCMBO2 2.4GHz Wireless Combo Package contents • Keyboard • 2.4G Receiver • Installation CD including User Guide • Laser mouse • AA batteries (4) • Quick Setup Guide Features Keyboard • 104-key design • Connect button • LED showing pairing and battery status • 18 hot-keys • Power switch • Soft palm rest Mouse • Three mouse buttons (left, right, and middle) • Tilt/scroll wheel • Two hot-key buttons • Power saving mode • Excellent performance • Working range up to 32.8 feet (10 meters) • Dual-color status LED indicator • Connect button • Power switch System requirements • One available USB port (USB 2.0 or 1.1) • Operating system: Microsoft® Windows® 7, Windows® Vista, or Windows® XP with Service Pack 3 or higher NOTE: For optimal performance, we recommend you place the dongle on the front of the computer. V1 FINAL FOR PRINT Keyboard top Esc F1 F2 F3 F4 F5 F6 F7 F8 F9 F10 F11 F12 ~! @ # $ % ^ & *( ) _ + `1 2 3 4 5 6 7 8 9 0 - = Q WE R T Y U I O P { Tab [ -- Backspace \ [ { A S D F G H J K L : " Caps Lock ; ' Enter Shift Z X C V B N M < > ? Shift , . / Ctrl Alt Alt Ctrl Prt Scr Scroll Screen Lock Pause Break Insert Home Page Up Delete End Page Down Num Lock / 7 8 Home 4 5 *_ 9 PgUp + 6 1 2 End 0 Ins 3 PgDn . Enter Del # Description 1 Calculator button 2 Application switch button 3 Play/Pause button 4 Stop button 5 Previous track button 6 Next track button 7 Volume + button 8 Volume - button 9 Mute button 10 Help button 11 Spelling button Keyboard bottom # Description 1 Connect button 2 Power switch # Description 12 Slide show button 13 Status LED 14 E-mail button 15 Sleep button 16 Home button 17 Search button 18 My Favorite button 19 Back web page button 20 Forward web page button 21 Refresh web page button 22 Stop web page button CO NN ECT OF F ON ENGLISH 10-1281 Mouse top Mouse bottom CONNECT OFF ON # Description 1 Left button 2 Forward button 3 Back button 4 Right button 5 Tilt/scroll button 6 LED indicator Setting up Installing the batteries To install the keyboard batteries: 1 Remove the battery cover on the bottom of the keyboard. # Description 7 Laser sensor 8 Connect button 9 Power button 10 Battery cover 2 Install two AA batteries (included). Make sure that the + and - symbols on the batteries match the symbols in the battery compartment. 3 Replace the battery cover. To install the mouse batteries: One-year limited warranty Visit www.rocketfishproducts.com for details. Contact Rocketfish: For customer service please call 1-800-620-2790 www.rocketfishproducts.com © 2010 BBY Solutions, Inc., All Rights Reserved Distributed by Best Buy Purchasing, LLC 7601 Penn Avenue South, Richfield, MN USA 55423-3645 1 Press the tab to release the battery cover on the bottom of the mouse. 2 Install two AA batteries (included). Make sure that the + and - symbols on the batteries match the symbols in the battery compartment. 3 Replace the battery cover. Setting up the keyboard and mouse 1 Plug the 2.4 GHz receiver into an available USB port on your computer. 2 Slide the power switch of the mouse to ON, to turn the mouse on. 3 Slide the power switch of the keyboard to ON, to turn the keyboard on. The computer recognizes the keyboard and mouse automatically. The keyboard and mouse are ready to use. Installing the combo driver To use advanced functions, such as tilt wheel driver, dynamic search and magnifier, you need to install the mouse driver and software. 1 Insert the installation CD (provided) in the CD drive on your computer. The installation program should start automatically. If it does not start automatically, open Windows Explorer, browse to the CD, then double-click autorun.exe. The Rocketfish wireless combo screen opens. 2 Click Install Combo Driver. The Welcome screen opens. 3 Click Next. The Start installation screen opens. 4 Click Next. An installation progress bar appears. When the installation is complete, the Setup Complete screen opens. 5 Click Finish. QUICK SETUP GUIDE
-
 1
1
 |
 |