Rocketfish RF-WHD100 Quick Setup Guide (English) - Page 1
Rocketfish RF-WHD100 Manual
 |
View all Rocketfish RF-WHD100 manuals
Add to My Manuals
Save this manual to your list of manuals |
Page 1 highlights
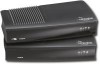
WirelessHD® Adapter RF-WHD100 QUICK SETUP GUIDE Important safety information This guide contains important safety instructions. Read and follow all instructions carefully while installing and using the adapter. Read this guide thoroughly before trying to unpack, install, or use your adapter. Save these instructions in a readily accessible place. • Caution: Always treat your adapter with care and keep it in a clean and dust-free place. • Do not expose your adapter to liquid or moisture or humidity. • Do not expose your adapter to temperatures above 104°F (40°C) when unit is operated. • Do not drop or throw your adapter. • Do not attempt to disassemble or modify your adapter. Only authorized personnel should perform service. • Your adapter is not water-resistant. Keep it dry. • Do not use a different AC adapter to avoid unit burn or smoke. Package contents • 60 GHz WirelessHD transmitter • 60 GHz WirelessHD receiver • HDMI cables (2) • Power adapters (2) • Base mounting brackets (2) • Quick Setup Guide Transmitter and receiver front panels 1 Link LED (blue) On-Indicates the receiver is linked to the transmitter. Off-Indicates devices are not linked. Reset both devices. Blinking-Waiting for a link. 2 Weak LED (green) On-Indicates the signal is weak. (The Strong LED will be off.) Off-Indicates there is no link or no signal. 3 Strong LED (green) On-Indicates the signal is strong. (The Weak LED will be on.) Off-Indicates the signal is weak. (The Weak LED will be on.) Warning: If all four LEDs are blinking at the same time, the internal cooling fan is not working. Turn off the adapter and contact Rocketfish customer service. 4 Power indicator On-Indicates power is connected and turned on. Off-Indicates power is turned off. Side panel RESET CFG 5 RESET AND CFG These buttons are for service at the factory only, please do not press them. Transmitter and receiver back panels 6 DC-IN Connect the power adapter to this jack and to a power outlet. 7 Power switch Press the Power switch to turn the unit on. 8 HDMI Used to connect the HDMI cables from the source component to the transmitter, and from the receiver to the TV/Projector. Setting up To attach the base stands: 1 Align the holes on the base stand with the mounting tabs on the bottom of the transmitter or receiver. 2 Press the stand down, then slide it to the left so the tabs hold the stand in place. To connect the transmitter and receiver: 1 Connect one HDMI cable from the output of the source component (Blu-ray/DVD player, Gaming console, Computer, etc.) to the input on the back of the transmitter unit. Note: The transmitter can be used in conjunction with Rocketfish model RF-HDMI4, 4-way HDMI Selector, to send HD signals wirelessly from up to four source components. Note: For connection to a computer with a DVI output, use Rocketfish model RF-G1174 HDMI-to-DVI Adapter. 2 Connect the other HDMI cable from the output on the back of the receiver unit to an available HDMI input on the HDTV or HD Projector. 3 Connect the power cords to the DC IN jacks on the transmitter and receiver and to a power outlet. 4 Turn on the connected devices, then press the power switches on the transmitter and receiver to the ON position. Positioning the transmitter and receiver For best results, the transmitter and receiver should: • Face each other within the same room • Be no more than 33 feet (10 meters) apart • Be on the same level (one should not be higher than the other) • In open spaces (not in a cabinet or an enclosed shelf) Note: If you begin to see your video breaking up, try repositioning the device providing the transmitter as many open paths to the receiver as possible.
-
 1
1 -
 2
2
 |
 |
