Ryobi CSB123 English Manual - Page 12
Assembly, Operation
 |
View all Ryobi CSB123 manuals
Add to My Manuals
Save this manual to your list of manuals |
Page 12 highlights
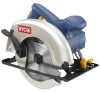
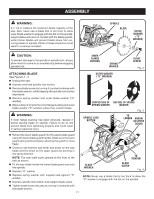
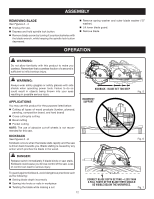
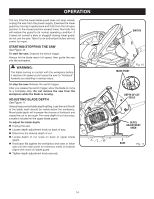
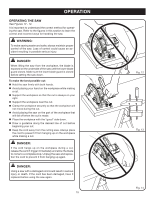
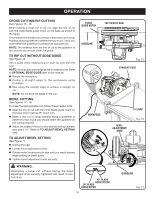
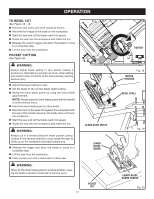
ASSEMBLY REMOVING BLADE See Figures 2 - 4. Unplug the saw. Depress and hold spindle lock button. Remove blade screw by turning it counterclockwise with the blade wrench, while keeping the spindle lock button depressed. Remove spring washer and outer blade washer ("D" washer). Lift lower blade guard. Remove blade. OPERATION WARNING: Do not allow familiarity with this product to make you careless. Remember that a careless fraction of a second is sufficient to inflict serious injury. 56 WARNING: Always wear safety goggles or safety glasses with side shields when operating power tools. Failure to do so could result in objects being thrown into your eyes resulting in possible serious injury. APPLICATIONS You may use this product for the purposes listed below: Cutting all types of wood products (lumber, plywood, paneling, composition board, and hard board) Cross cutting/rip cutting Bevel cutting Pocket cutting NOTE: The use of abrasive cut-off wheels is not recommended for this saw. KICKBACK See Figures 5 - 8. Kickback occurs when the blade stalls rapidly and the saw is driven back towards you. Blade stalling is caused by any action which pinches the blade in the wood. KICKBACK - BLADE SET TOO DEEP INCORRECT SUPPORT Fig. 5 Fig. 6 DANGER: Release switch immediately if blade binds or saw stalls. Kickback could cause you to lose control of the saw. Loss of control can lead to serious injury. To guard against kickback, avoid dangerous practices such as the following: Setting blade depth incorrectly Sawing into knots or nails in workpiece Twisting the blade while making a cut 12 CORRECT BLADE DEPTH SETTING = Less than a full tooth of the blade teeth should be visible below the workpiece. Fig. 7
-
 1
1 -
2
-
3
-
4
-
5
-
6
-
 7
7 -
 8
8 -
 9
9 -
 10
10 -
 11
11 -
 12
12 -
 13
13 -
 14
14 -
 15
15 -
 16
16 -
 17
17 -
18
-
19
-
20
-
21
-
22
 |
 |