Ryobi P1111 Operation Manual
Ryobi P1111 Manual
 |
View all Ryobi P1111 manuals
Add to My Manuals
Save this manual to your list of manuals |
Ryobi P1111 manual content summary:
- Ryobi P1111 | Operation Manual - Page 1
OPERATOR'S MANUAL MANUEL D'UTILISATION MANUAL DEL OPERADOR 18 VOLT 16 in. LAWN MOWER TONDEUSE DE 406,4 mm (16 po), 18 V PODADORA DE 406,4 mm (16 pulg.), 18 V P1100 ALL VERSIONS TOUTES LES VERSIONS TODAS LAS VERSIONES TABLE OF CONTENTS Important Safety Instructions........... 2-3 Symbols 4-5 - Ryobi P1111 | Operation Manual - Page 2
-out section for all of the figures referenced in the operator's manual. Consulter l'encart à volets afin d'examiner toutes les figures mentionnées dans le manuel d'utilisation. Consulte esta sección desplegable para ver todas las figuras a las que se hace referencia en el manual del operador. ii - Ryobi P1111 | Operation Manual - Page 3
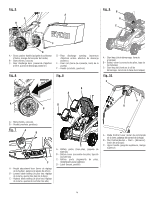
Fig. 1 E C D Fig. 3 A B L B F F M C E H A G H J K I A - Battery cover (couvercle des piles, tapa de las baterías) B - Motor/blade control assembly (dispositif de commande du moteur/de la lame, conjunto de control del motor/hoja) C - Start button (bouton « Start » [démarrer], botón de - Ryobi P1111 | Operation Manual - Page 4
Fig. 5 C A E B B F Fig. 9 B A C F D A - Grass catcher handle (poignée de collecteur d'herbe, mango del receptor de hierba) B - Slots (fentes, ranuras) C - Rear discharge door (couvercle d'éjection arrière, puerta de descarga posterior) Fig. 6 D - Rear discharge opening (ouverture d'éjection - Ryobi P1111 | Operation Manual - Page 5
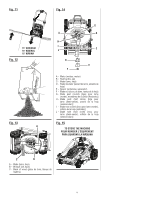
Fig. 11 15° MAXIMUM 15° MAXIMAL 15° MÁXIMA Fig. 12 Fig. 13 A Fig. 14 G A B H I J C D E F A - Motor (moteur, motor) B - Shaft (arbre, eje) C - Blade (lame, hoja) D - Blade insulator (isolant de lame, aislante de hoja) E - Spacer (entretoise, separador) F - Blade nut (écrou de lame, tuerca de - Ryobi P1111 | Operation Manual - Page 6
servicing them. Do not dispose of the battery in a fire. The cell may explode. Check with local codes for possible special disposal instructions. Stop the motor, wait until the blade comes to a complete stop, and remove the start key and battery pack before cleaning the lawn mower by supporting - Ryobi P1111 | Operation Manual - Page 7
432. Store idle lawn mower indoors - When not in use, mower should be stored indoors in a dry, locked place out of the reach of children. The start key and battery packs should also be removed and stored in a separate location out of the reach of children. Follow instructions for lubricating and - Ryobi P1111 | Operation Manual - Page 8
Read Operator's Manual Eye Protection To reduce the risk of injury, user must read and understand operator's manual before using this No Slope Keep Children and Bystanders Away Ricochet Do not reach hands or feet under mower deck. Do not operate on inclines greater than 15º. Mow across the face of - Ryobi P1111 | Operation Manual - Page 9
Time FEATURES PRODUCT SPECIFICATIONS Battery 18 Volt Cutting Path 16 in. KNOW YOUR LAWN MOWER See Figure 1. The safe use of this product requires an understanding of the information on the product and in this operator's manual as well as a knowledge of the project you are attempting. Before use - Ryobi P1111 | Operation Manual - Page 10
with missing or damaged parts can result in serious personal injury. PACKING LIST Lawn Mower Start Key Mulching Plug Grass Catcher Operator's Manual UNFOLDING AND ADJUSTING HANDLE ASSEMBLY See Figures 2 - 3. To raise handle assembly: Open the lower handle locks. Pull up and back on the lower - Ryobi P1111 | Operation Manual - Page 11
. SETTING BLADE HEIGHT See Figure 7. When shipped, the wheels on the mower are set to a low-cutting position. Before using the mower for the first time, raise the cutting position to the height best suited for your lawn. The average lawn should be between 1-1/2 in. to 2 in. during cool months and - Ryobi P1111 | Operation Manual - Page 12
For complete charging instructions, see the operator's manuals for your battery pack and charger. STARTING/STOPPING THE MOWER See Figures 9 - 10. Raise the battery cover. Install battery packs. NOTE: The unit will run with only one battery pack installed. Operating the unit with one battery pack - Ryobi P1111 | Operation Manual - Page 13
remove from mower. Empty grass clippings. Lift the rear discharge door and reinstall the grass catcher as described earlier in this manual. Reinstall into your eyes resulting in possible serious injury. WARNING: When servicing, use only authorized replacement parts. Use of any other parts - Ryobi P1111 | Operation Manual - Page 14
blade for damage, uneven, or excessive wear and replace blade if these conditions exist. Lower the handle assembly as described earlier in this manual. Store mower indoors in a clean, dry place out of the reach of children. Do not store near corrosive materials such as fertilizer or rock salt - Ryobi P1111 | Operation Manual - Page 15
TROUBLESHOOTING IF THESE SOLUTIONS DO NOT SOLVE THE PROBLEM CONTACT YOUR AUTHORIZED SERVICE DEALER. PROBLEM Handle not in position. POSSIBLE CAUSE Handle locks not locked. SOLUTION Lock upper and lower handle locks. Mower not starting. Mower cutting grass unevenly. Mower call the Ryobi Help Line - Ryobi P1111 | Operation Manual - Page 16
et des Ne pas charger l'outil sous la pluie ou dans un endroit pieds et projeter des objets. Le non respect de toutes les mouillé. instructions de sécurité pourrait résulter en des blessures graves ou la mort. Restez vigilant - Regardez ce que vous faites et utilisez votre meilleur jugement - Ryobi P1111 | Operation Manual - Page 17
démarrage et les blocs-piles doivent être retirés et rangés dans un autre endroit et hors de la portée des enfants. Suivre les instructions de lubrification et de changement d'accessoires. Maintenir les dispositifs de protection en place et en bon état de fonctionnement. Garder les lames aff - Ryobi P1111 | Operation Manual - Page 18
SYMBOLES Les termes de mise en garde suivants et leur signification ont pour but d'expliquer le degré de risques associé à l'utilisation de ce produit. SYMBOLE SIGNAL SIGNIFICATION DANGER : Indique une situation dangereuse qui, si elle n'est pas évitée, aura pour conséquences des blessures - Ryobi P1111 | Operation Manual - Page 19
SYMBOLES Certains des symboles ci-dessous peuvent être utilisés sur produit. Veiller à les étudier et à apprendre leur signification. Une interprétation correcte de ces symboles permettra d'utiliser produit plus efficacement et de réduire les risques. SYMBOLE NOM Symbole de recyclage DÉ - Ryobi P1111 | Operation Manual - Page 20
ASSEMBLAGE DÉBALLAGE Ce produit nécessite l'assemblage. n Retirez prudemment l'outil et les accessoires de la boîte. Assurez-vous que tous les articles énumérés dans la liste de colisage sont inclus. AVERTISSEMENT : Ne pas utiliser le produit si, en le déballant, vous constatez que des éléments - Ryobi P1111 | Operation Manual - Page 21
ASSEMBLAGE Pour abaisser l'assemblage de poignées : Ouvrir les verrous de la poignée supérieure. NOTE : Si le verrou de la poignée est difficile à ouvrir, dévisser les boutons de verrouillage de la poignée supérieure en les tournant dans le sens contraire aux aiguilles d'une montre. Abaisser la - Ryobi P1111 | Operation Manual - Page 22
UTILISATION AVERTISSEMENT : Ne laissez pas la familiarité tirée d'une utilisation fréquente de ce type de produit atténuer votre vigilance. Souvenez-vous qu'une fraction de seconde d'inattention suffit à infliger des blessures graves. AVERTISSEMENT : Toujours porter une protection oculaire munie - Ryobi P1111 | Operation Manual - Page 23
utiliser le produit tant que toutes les pièces manquantes ou endommagées n'ont pas été remplacées. Pour obtenir de l'aide, veuillez communiquer avec le Service à la clientèle ou un centre de réparations agréé. 9 - Français - Ryobi P1111 | Operation Manual - Page 24
ENTRETIEN ENTRETIEN GÉNÉRAL Évitez d'utiliser des solvants quand vous nettoyez des pièces en plastique. La plupart des plastiques résistent mal aux plusieurs types de solvants de commerce et peuvent être endommagés par leur utilisation. Utilisez des chiffons secs pour enlever la saleté, la poussiè - Ryobi P1111 | Operation Manual - Page 25
de l'utilisateur. 1-800A-PPE8LERL6E 0-4050 Pour toute question concernant l'utilisation ou l'entretien du produit, appeler le service d'assistance téléphonique Ryobi ! Ce produit est accompagné d'une garantie limitée de trois (3) ans pour utilisation personnel, familiales ou domestiques - Ryobi P1111 | Operation Manual - Page 26
INSTRUCCIONES DE SEGURIDAD IMPORTANTES ADVERTENCIA: LEA Y COMPRENDA TODAS LAS INSTRUCCIONES. El incumplimiento de las instrucciones señaladas abajo y en la máquina puede causar descargas eléctricas, incendios y/o lesiones serias. LEA TODAS LAS INSTRUCCIONES Esta máquina de corte es capaz de - Ryobi P1111 | Operation Manual - Page 27
INSTRUCCIONES DE SEGURIDAD IMPORTANTES Tenga cuidado cuando maneje baterías a fin de no realizar un cortocircuito en la batería con materiales conductores como anillos, brazaletes y llaves. La batería o el conductor pueden recalentarse y provocar quemaduras. Despeje el área de trabajo cada vez - Ryobi P1111 | Operation Manual - Page 28
le permitirá utilizar mejor y de manera más segura el producto. SÍMBOLO NOMBRE DENOMINACIÓN/EXPLICACIÓN Alerta de seguridad Indica un peligro posible de lesiones personales. Lea manual del operador Protección ocular Para reducir el riesgo de lesiones, el usuario debe leer y comprender el - Ryobi P1111 | Operation Manual - Page 29
Vea la figura 1. Para usar este producto con la debida seguridad se debe comprender la información indicada en el producto mismo y en este manual, y se debe comprender también el trabajo que intenta realizar. Antes de usar este producto, familiarícese con todas las características de funcionamiento - Ryobi P1111 | Operation Manual - Page 30
con piezas dañadas o faltantes puede ocasionar lesiones graves. LISTA DE EMPAQUETADO Podadora Llave de arranque Tapón para trituración Receptor de hierba Manual del operador DESPLEGAR Y AJUSTAR EL CONJUNTO DE MANGOS Vea las figuras 2 y 3. Para levantar el conjunto de los mangos: Abra las trabas - Ryobi P1111 | Operation Manual - Page 31
ARMADO Para bajar el conjunto de los mangos: Abra las trabas del mango superior. NOTA: Si le resulta difícil abrir la traba del mango, afloje las perillas de las trabas del mango superior haciéndolas girar en sentido contrario a las agujas del reloj. Baje el mango superior. Abra la traba del - Ryobi P1111 | Operation Manual - Page 32
lesiones personales graves, siempre extraiga la llave de arranque cuando mueva o transporte la podadora. Para obtener instrucciones específicas de carga, lea el manual del operador que se incluye con el cargador y la batería. ENCENDIDO Y APAGADO DE LA PODADORA Vea las figuras 9 y 10. Abra la tapa - Ryobi P1111 | Operation Manual - Page 33
de la podadora. Vacíe los recortes de hierba. Levante la puerta trasera y reinstale el receptor de césped como se indicó anteriormente en este manual. Vuelva a instalar la llave de arranque y el paquetes de baterías cuando esté listo para podar el pasto. MANTENIMIENTO ADVERTENCIA: Al dar - Ryobi P1111 | Operation Manual - Page 34
esté dañada o desgastada excesivamente en forma irregular y reemplácela si existen estas condiciones. Abaisser la ensemble de poignée como se indicó anteriormente en este manual. Guarde la podadora en el interior, en un lugar limpio y seco, lejos del alcance de los niños. No la guarde cerca de - Ryobi P1111 | Operation Manual - Page 35
ón del consumidor. ¡Si tiene preguntas sobre el funcionamiento o el mantenimiento del producto, llame al teléfono de atención al consumidor de Ryobi! Este producto tiene una garantía limitada de tres años para fines personales, familiares o domésticos (90 días para usos trabajo o comercial - Ryobi P1111 | Operation Manual - Page 36
OPERATOR'S MANUAL MANUEL D'UTILISATION / MANUAL DEL OPERADOR 18 VOLT LAWN MOWER 18 V TONDEUSE 18 V PODADORA P1100 • PARTS AND SERVICE: Prior to requesting service or purchasing replacement parts, please obtain your item, manufacturing, and serial numbers from the product data plate. ITEM NO
-
 1
1 -
 2
2 -
 3
3 -
 4
4 -
 5
5 -
 6
6 -
 7
7 -
8
-
9
-
10
-
11
-
12
-
13
-
14
-
15
-
16
-
17
-
18
-
19
-
20
-
21
-
22
-
23
-
24
-
25
-
26
-
27
-
28
-
29
-
30
-
31
-
32
-
33
-
34
-
35
-
36
 |
 |

OPERATOR’S MANUAL
MANUEL D’UTILISATION
MANUAL DEL OPERADOR
18 VOLT 16 in. LAWN MOWER
TONDEUSE DE 406,4 mm (16 po), 18 V
PODADORA DE 406,4 mm (16 pulg.), 18 V
P1100
ALL VERSIONS
TOUTES LES VERSIONS
TODAS LAS VERSIONES
WARNING:
To reduce the
risk of injury, the user must read and
understand the operator’s manual
before using this product.
TABLE OF CONTENTS
Important Safety Instructions
..........
2-3
Symbols
..........................................
4-5
Features
..............................................
5
Assembly
........................................
6-7
Operation
........................................
8-9
Maintenance
.................................
9-10
Troubleshooting
................................
11
Parts Ordering/Service
........
Back Page
AVERTISSEMENT :
Pour
réduire les risques de blessures,
l’utilisateur doit lire et veiller à bien
comprendre le manuel d’utilisation
avant d’employer ce produit.
TABLE DES MATIÈRES
Instructions importantes
concernant la sécurité
.....................
2-3
Symboles
........................................
4-5
Caractéristiques
..................................
5
Assemblage
....................................
6-7
Utilisation
........................................
8-9
Entretien
........................................
9-10
Dépannage
........................................
11
Commande de pièces/
réparation
..........................
Páge arrière
ADVERTENCIA:
Para reducir
el riesgo de lesiones, el usuario debe
leer y comprender el manual del
operador antes de usar este producto.
ÍNDICE DE CONTENIDO
Instrucciones de seguridad
importantes
.....................................
2-3
Símbolos
.........................................
4-5
Características
....................................
5
Armado
...........................................
6-7
Funcionamiento
..............................
8-9
Mantenimiento
..............................
9-10
Correción de problemas
...................
11
Pedidos de piezas/
servicio
...........................
Pág. posterior
SAVE THIS MANUAL FOR
FUTURE REFERENCE
CONSERVER CE MANUEL
POUR FUTURE RÉFÉRENCE
GUARDE ESTE MANUAL
PARA FUTURAS CONSULTAS