Ryobi P1816 Operation Manual - Page 7
Assembly, Operation
 |
View all Ryobi P1816 manuals
Add to My Manuals
Save this manual to your list of manuals |
Page 7 highlights
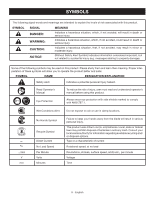
ASSEMBLY n Fit the saw blade inside the lower blade guard and onto the spindle. NOTE: The saw teeth point upward at the front of the saw. n Replace the outer blade washer. n Depress the spindle lock button, then replace the blade screw. Tighten the blade screw securely by turning it counterclockwise. n Return the blade wrench to the storage area. NOTE: Never use a blade that is too thick to allow the outer blade washer to engage with the flats on the spindle. REMOVING THE BLADE See Figure 2, page 13. Remove the battery pack from the saw. n Remove the blade wrench from the storage area. n Position the saw as shown, depress the spindle lock but- ton, and remove the blade screw by turning it clockwise. n Remove the outer blade washer. n Remove the blade. OPERATION WARNING: Do not allow familiarity with products to make you careless. Remember that a careless fraction of a second is sufficient to inflict serious injury. WARNING: Always wear eye protection with side shields marked to comply with ANSI Z87.1. Failure to do so could result in objects being thrown into your eyes resulting in possible serious injury. WARNING: Do not use any attachments or accessories not recommended by the manufacturer of this product. The use of attachments or accessories not recommended can result in serious personal injury. WARNING: Never use abrasive cut-off wheels of any kind with this saw. Use of non wood cutting blades can result in property damage or serious personal injury. APPLICATIONS You may use this product for the purposes listed below: Cutting all types of wood products (lumber, plywood, paneling, composition board, and hard wood) INSTALLING/REMOVING BATTERY PACK See Figure 3, page 13. Insert the battery pack into the product as shown. Make sure the latches on each side of the battery pack snap in place and that battery pack is secured in the product before beginning operation. Depress the latches to remove the battery pack. For complete charging instructions, see the operator's manuals for your battery pack and charger. WARNING: Battery tools are always in operating condition. Therefore, switch should always be locked when not in use or carrying at your side. KICKBACK See Figures 4 - 7, pages 13 and 14. Kickback occurs when the blade stalls rapidly and the saw is driven back towards you. Blade stalling is caused by any action which pinches the blade in the wood. DANGER: Release switch immediately if blade binds or saw stalls. Kickback could cause you to lose control of the saw. Loss of control can lead to serious injury. 7 - English
-
 1
1 -
 2
2 -
 3
3 -
 4
4 -
 5
5 -
 6
6 -
 7
7 -
 8
8 -
 9
9 -
 10
10 -
 11
11 -
 12
12 -
13
-
14
-
15
-
16
-
17
-
18
-
19
-
20
-
21
-
22
-
23
-
24
-
25
-
26
-
27
-
28
-
29
-
30
-
31
-
32
-
33
-
34
-
35
-
36
-
37
-
38
-
39
-
40
 |
 |
