Ryobi P1833 Operation Manual - Page 6
Operation
 |
View all Ryobi P1833 manuals
Add to My Manuals
Save this manual to your list of manuals |
Page 6 highlights
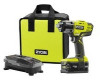
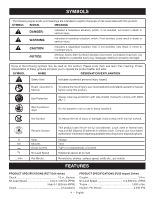
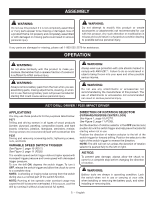
OOPPEERRAATTIIOONN INSTALLING/REMOVING BATTERY PACK See Figure 2, page 10 (P277). See Figure 2, page 11 (P235). Lock the switch trigger. Insert the battery pack into the product as shown. Make sure the latches on each side of the battery pack snap in place and that battery pack is secured in the product before beginning operation. Depress the latches to remove the battery pack. For complete charging instructions, see the operator's manuals for your battery pack and charger. P277 DRILL-DRIVER INSTALLING/REMOVING BITS See Figures 3 - 4, page 10. The arrows on the keyless chuck indicate which direction to rotate the chuck sleeve to tighten or release the drill bit. Do not use a wrench to tighten or loosen the chuck jaws. To install bits: Lock the switch trigger and remove the battery pack. Open or close the chuck jaws until the opening is slightly larger than the bit size you intend to use. Raise the front of the drill slightly and insert the drill bit. WARNING: Make sure to insert the drill bit straight into the chuck jaws. Do not insert the drill bit into the chuck jaws at an angle, then tighten. This could cause the drill bit to be thrown from the drill, resulting in possible serious personal injury or damage to the chuck. Rotate the chuck sleeve to close and tighten the chuck jaws. WARNING: Do not hold the chuck sleeve with one hand and use the power of the drill to tighten the chuck jaws on the drill bit. The chuck sleeve could slip in your hand, or your hand could slip and come in contact with the rotating drill bit. This could cause an accident resulting in serious personal injury. To remove bits: Lock the switch trigger and open the chuck jaws. The bit provided with the drill can be placed in the storage area, located on the base of the drill. TWO SPEED GEAR TRAIN (HIGH-LOW SPEED SWITCH) See Figure 5, page 10. Select low (1) speed for applications requiring higher power and torque, such as driving screws and drilling in metal. Select high (2) speed for fast drilling or driving applications, and for drilling in wood or masonry. NOTICE: Never change speeds while the tool is running. Failure to obey this caution could result in serious damage to the drill. NOTE: If you have difficulty changing from one speed range to the other, turn the chuck by hand until the gears engage. ADJUSTING TORQUE See Figure 6, page 10. Rotate the adjustment ring to the proper torque setting for the type of material and size of screw you are using. • 1-4 • 5-8 • 9 - 12 • 13 - 16 • 17 - 23 • For driving small screws For driving screws into soft material For driving screws into soft and hard materials For driving screws into hard wood For driving large screws For drilling or high-torque applications DRILLING/DRIVING SCREWS See Figure 7, page 10. Check the direction of rotation selector for the correct setting (forward or reverse). Use low (1) speed for high torque applications and high (2) speed for fast drilling or driving applications. Refer to Two-Speed Gear Train and Adjusting Torque. Secure the workpiece in a vise or with clamps to keep it from turning as the bit rotates. Hold the drill firmly and place the bit at the point to be drilled, or where the screw is to be driven. WARNING: Do not drive a screw where there is likely to be hidden wiring behind the surface. Contact with a "live" wire will make exposed metal parts of the tool "live" and possibly shock the operator. If you must drive a screw where hidden wire may be present, always hold tool by insulated gripping surfaces (handle) when performing the operation to prevent a shock to the operator. 6 - English
-
 1
1 -
 2
2 -
 3
3 -
 4
4 -
 5
5 -
 6
6 -
 7
7 -
 8
8 -
 9
9 -
 10
10 -
 11
11 -
 12
12 -
13
-
14
-
15
-
16
-
17
-
18
-
19
-
20
-
21
-
22
-
23
-
24
-
25
-
26
-
27
-
28
 |
 |
