Ryobi P2904BTL Operation Manual - Page 9
Assembly, Operation
 |
View all Ryobi P2904BTL manuals
Add to My Manuals
Save this manual to your list of manuals |
Page 9 highlights
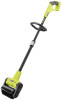
ASSEMBLY WARNING: Do not attempt to modify this product or create accessories not recommended for use with this product. Any such alteration or modification is misuse and could result in a hazardous condition leading to possible serious personal injury. WARNING: To prevent accidental starting that could cause serious personal injury, always remove the battery pack from the product when assembling parts. INSTALLING/REMOVING THE ROTATING BRUSH ASSEMBLY See Figures 2 - 4. Remove the battery pack. n Position the left end cap and deflector assembly on the side of the motor head. n Push the left end cap and deflector assembly onto the motor head until it clicks into place. n Slide the rotating brush beneath the deflector and onto the shaft on the left end cap. n Position the right end cap on the side of the motor head. n Rotate the deflector until it is aligned with the right end cap. n Push the right end cap onto the motor head until the shaft goes through the center of the brush and the end cap snaps into place. To remove the rotating brush: n Depress the latch on the right end cap and remove it from the motor head. n Slide the rotating brush away from the appliance. ATTACHING THE FRONT HANDLE See Figure 5. The front handle must be used to ensure the best control and maximize operator safety when using this product. Loosen and remove the wing nut and bolt from the handle. Install the handle on the power head shaft at the location indicated by the label on the shaft. Adjust handle up or down, if necessary, to desired operating position. Reinstall the bolt and wing nut. Tighten wing nut to secure. OPERATION WARNING: Do not allow familiarity with products to make you careless. Remember that a careless fraction of a second is sufficient to inflict serious injury. WARNING: Always wear eye protection with side shields marked to comply with ANSI Z87.1 along with hearing protection. Failure to do so could result in objects being thrown into your eyes and other possible serious injuries. WARNING: Do not use any attachments or accessories not recommended by the manufacturer of this product. The use of attachments or accessories not recommended can result in serious personal injury. WARNING: Do not allow hands, feet, or any other part of the body or clothing near the rotating brush or any other moving part. The brush will rotate once the lock-out button is depressed and switch trigger is pulled. The brush continues to rotate until the switch trigger is released. Failure to avoid contact could cause serious personal injury. WARNING: Always remove battery pack from your tool when you are assembling parts, making adjustments, cleaning, or when not in use. Removing battery pack will prevent accidental starting that could cause serious personal injury. NOTICE: Before each use, inspect the entire product for damaged, missing, or loose parts such as screws, nuts, bolts, caps, etc. Tighten securely all fasteners and caps and do not operate this product until all missing or damaged parts are replaced. Please contact customer service or a qualified service center for assistance. 7 - English
-
 1
1 -
2
-
3
-
 4
4 -
 5
5 -
 6
6 -
 7
7 -
 8
8 -
 9
9 -
 10
10 -
 11
11 -
 12
12 -
 13
13 -
 14
14 -
15
-
16
-
17
-
18
-
19
-
20
-
21
-
22
-
23
-
24
-
25
-
26
-
27
-
28
-
29
-
30
 |
 |
