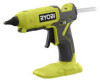
Ryobi P307 Operation Manual - Page 6
Operation
 |
View all Ryobi P307 manuals
Add to My Manuals
Save this manual to your list of manuals |
Page 6 highlights
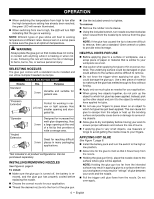
OPERATION When switching the temperature from high to low after the high temperature setting has already been reached, the green LED will remain illuminated. When switching from low to high, the LED will turn RED indicating that the gun is warming NOTE: Different types of glue sticks will heat to working temperature at different rates. Always test on a scrap piece to make sure the glue is at optimum temperature. WARNING: Always place the glue gun so that nozzle does not come in contact with anything while it is heating or when not in use. Following this rule will reduce the risk of damage to items, burns, fire, or serious personal injury. SELECTING NOZZLES The glue gun comes with a standard nozzle installed and can utilize multiple threaded nozzle tips. NOZZLE SELECTION GUIDE Nozzle Dia. Purpose Standard 3 mm Versatile and suitable for general use. *Precision Extended *Spreader *Angled Extension Perfect for working in nar- 2.5 mm row or tight spaces. Has smaller opening and elon- gated tip. 3 mm Designed for increased hot melt glue dispensing. Has a large opening at the end of a flat tip that provides a wide coverage area. Great for reaching difficult 3 mm places in many packaging applications. *Not included in all product configurations. Can be purchased separately. INSTALLING/REMOVING NOZZLES See Figure 6, page 9. To install: Make sure the glue gun is turned off, the battery is re- moved, and the glue gun has properly cooled before replacing the nozzle. Choose the correct nozzle for your application. Thread the desired nozzle into the front of the glue gun. Use the included wrench to tighten. To remove: Remove the rubber nozzle sleeve. Using the included wrench, turn nozzle counterclockwise when viewed from the nozzle tip to remove from the glue gun. NOTE: If the glue has caused the tip to become difficult to remove, then use a standard 12mm wrench or pliers to provide extra leverage. HELPFUL HINTS FOR USE Before applying glue to a surface or workpiece, use a scrap piece of paper or material that is similar to your workpiece as a test. Use caution when applying hot glue to thin or porous material. The underlying surface could be damaged or glue could adhere to the surface and be difficult to remove. Do not force the trigger when applying hot glue. This could damage the glue gun. Use a test piece of material to make sure the glue has melted enough to flow without forcing. Apply only as much glue as needed for your application. When gluing two objects together, do not pick up the object to which hot glue has been applied. Instead, pick up the other object and join it to the object to which you have applied hot glue. Do not use your fingers to press down on an object to which hot glue has just been applied. This can cause hot glue to escape from the edges or heat up the bonding surface and possibly cause burns or damage to surrounding objects. Allow glue to dry completely before moving your work to ensure proper adhesion and reduce the risk of burns. If applying glue to very small objects, use tweezers or tongs to avoid getting the nozzle close to your fingers. APPLYING HOT GLUE See Figure 7, page 9. Install the battery pack and turn the switch to the high or low position. Allow time for the glue to melt so that it flows freely from the nozzle. Holding the glue gun firmly, place the nozzle close to the surface where glue will be applied. NOTE: Holding the glue gun too far from the intended surface may result in applying glue to a surface other than your workpiece or may result in "strings" of glue between your work and the nozzle. Pull the trigger until glue flows from the nozzle. Do not over-apply. 6 - English
-
 1
1 -
 2
2 -
 3
3 -
 4
4 -
 5
5 -
 6
6 -
 7
7 -
 8
8 -
 9
9 -
 10
10 -
 11
11 -
 12
12 -
13
-
14
-
15
-
16
-
17
-
18
-
19
-
20
-
21
-
22
-
23
-
24
 |
 |
