Ryobi P307 Operation Manual 1 - Page 1
Ryobi P307 Manual
 |
View all Ryobi P307 manuals
Add to My Manuals
Save this manual to your list of manuals |
Page 1 highlights
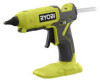
18 VOLT DUAL TEMPERATURE GLUE GUN P307 NOTE: These instructions supplement the INSTALLING/REMOVING NOZZLES instructions in your operator's manual. For complete operating instructions, refer to page 6 of the Operator's Manual. Fig. 1 WARNING: This insert sheet is not a substitute for reading the operator's manual. To reduce the risk of injury or death, user must read and understand operator's manual before using this product. INSTALLING/REMOVING NOZZLES See Figure 1. To install: Make sure the glue gun is turned off, the battery is removed, and the glue gun has properly cooled before replacing the nozzle. Choose the correct nozzle for your application. Thread the desired nozzle into the front of the glue gun. Use the included wrench to tighten. To remove: Remove the rubber nozzle sleeve. Using the included wrench, turn nozzle counterclockwise when viewed from the nozzle tip to remove from the glue gun. NOTE: If the glue has caused the tip to become difficult to remove, then use a standard 12mm wrench or pliers to provide extra leverage. A *C *B *D A - Standard nozzle (buse classique, boquilla estándar) B - Spreader nozzle (buse d'écarteur, boquilla de separador) C - Precision extended nozzle (buse à précision étendue, boquilla extendida de precisión) D - Angled extension nozzle (buse rallongée en angle, boquilla de extensión en ángulo) *Not included in all product configurations. Can be purchased separately. *Non comprise dans toutes les configurations de produit. Peut être achetée séparément. *No incluida en todas las configuraciones del producto. Se puede adquirir por separado. ONE WORLD TECHNOLOGIES, INC. P.O. Box 1288, Anderson, SC 29622 1-800-525-2579 • www.ryobitools.com 998000530 1-21-21 (REV:01)
-
 1
1 -
 2
2
 |
 |
