Ryobi P3100 Operation Manual - Page 7
Operation - tips
 |
View all Ryobi P3100 manuals
Add to My Manuals
Save this manual to your list of manuals |
Page 7 highlights
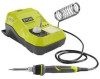
OPERATION INSTALLING/REMOVING BATTERY PACK See Figure 3, page 10. Make sure the on/off switch is in the off position. Insert the battery pack into the product as shown. Make sure the latches on each side of the battery pack snap into place and that the battery pack is secured in the product before beginning operation. Depress the latches to remove the battery pack. For complete charging instructions, see the operator's manuals for your battery pack and charger. INSTALLING/REMOVING POWER CORD See Figure 4, page 10. WARNING: Do not route cord under carpets, rugs, runners, furniture, or appliances and always route cord away from traffic areas to prevent a tripping hazard. Remove the battery pack. Insert the female end of the power cord into the product as shown. Connect the male end of the power cord to the power source. Make sure the power cord is secured before beginning operation. SPONGE TRAY AND SPONGE See Figure 5, page 9. n Insert sponge tray into the base as shown. n For use, wet the sponge, squeeze out excess water, and place into tray. NOTE: Remove the tray for easy cleaning. ON/OFF/TEMPERATURE CONTROL SWITCH See Figure 6, page 10. The LED indicator will light up when a charged battery pack is installed or an extension cord is connected and the switch is turned to the on position. If the indicator light is on, the tip is heating. Connect the product to an AC or DC power supply. Place soldering pen in holder. Press the on/off/temperature control switch to turn on the soldering iron. NOTE: The LED indicator will glow solid red until the tip has reached the selected operating temperature. Once the selected temperature is reached, the indicator will glow solid green. Select desired temperature by rotating the on/off/temperature control switch. NOTE: The temperature range can be adjusted from 400° F to 900° F. Press the on/off/temperature control switch again to turn the soldering iron off. NOTE: The LED indicator will flash slowly until the tip has cooled. Do not touch the tip while the LED indicator is solid or flashing. AUTOMATIC SHUT-OFF After 10 minutes of operation, the unit will automatically enter an energy saving mode and the LED will slowly fade green. To exit this mode, rotate the control slightly in either direction. After 20 minutes of being in the energy saving mode, the unit will turn off. This preserves the tip and prevents powering an unattended tool. OPERATING THE SOLDERING IRON See Figure 7, page 10. Always hold the soldering iron pen as shown. Apply solder with the tip of the pen. NOTE: The hybrid soldering station features a grounding loop for use when soldering circuitry or other static- sensitive materials. It is recommended an ESD safe strap (not included) be used when soldering sensitive electronics. Apply the tip of the soldering iron at the point where the soldering wire touches the workpiece. After soldering, return the pen to the pen holder. Press firmly to make sure it is secure. Press the on/off/temperature control switch to turn the soldering iron off. NOTE: The LED indicator will flash until the tip has cooled. Do not touch the tip while the LED indicator is flashing. Clean the soldering tip as described in the Maintenance section of this manual. WARNING: Always place the pen back into the holder so that the tip does not come in contact with anything while it is heating or when not in use. Following this rule will reduce the risk of damage to items, burns, fire, or serious personal injury. Always allow 30 minutes for the soldering iron to cool before storing the tool. 7 - English
-
 1
1 -
 2
2 -
 3
3 -
 4
4 -
 5
5 -
 6
6 -
 7
7 -
 8
8 -
 9
9 -
 10
10 -
 11
11 -
 12
12 -
13
-
14
-
15
-
16
-
17
-
18
-
19
-
20
-
21
-
22
-
23
-
24
-
25
-
26
-
27
-
28
 |
 |
