Ryobi P601 User Manual - Page 1
Ryobi P601 Manual
 |
View all Ryobi P601 manuals
Add to My Manuals
Save this manual to your list of manuals |
Page 1 highlights
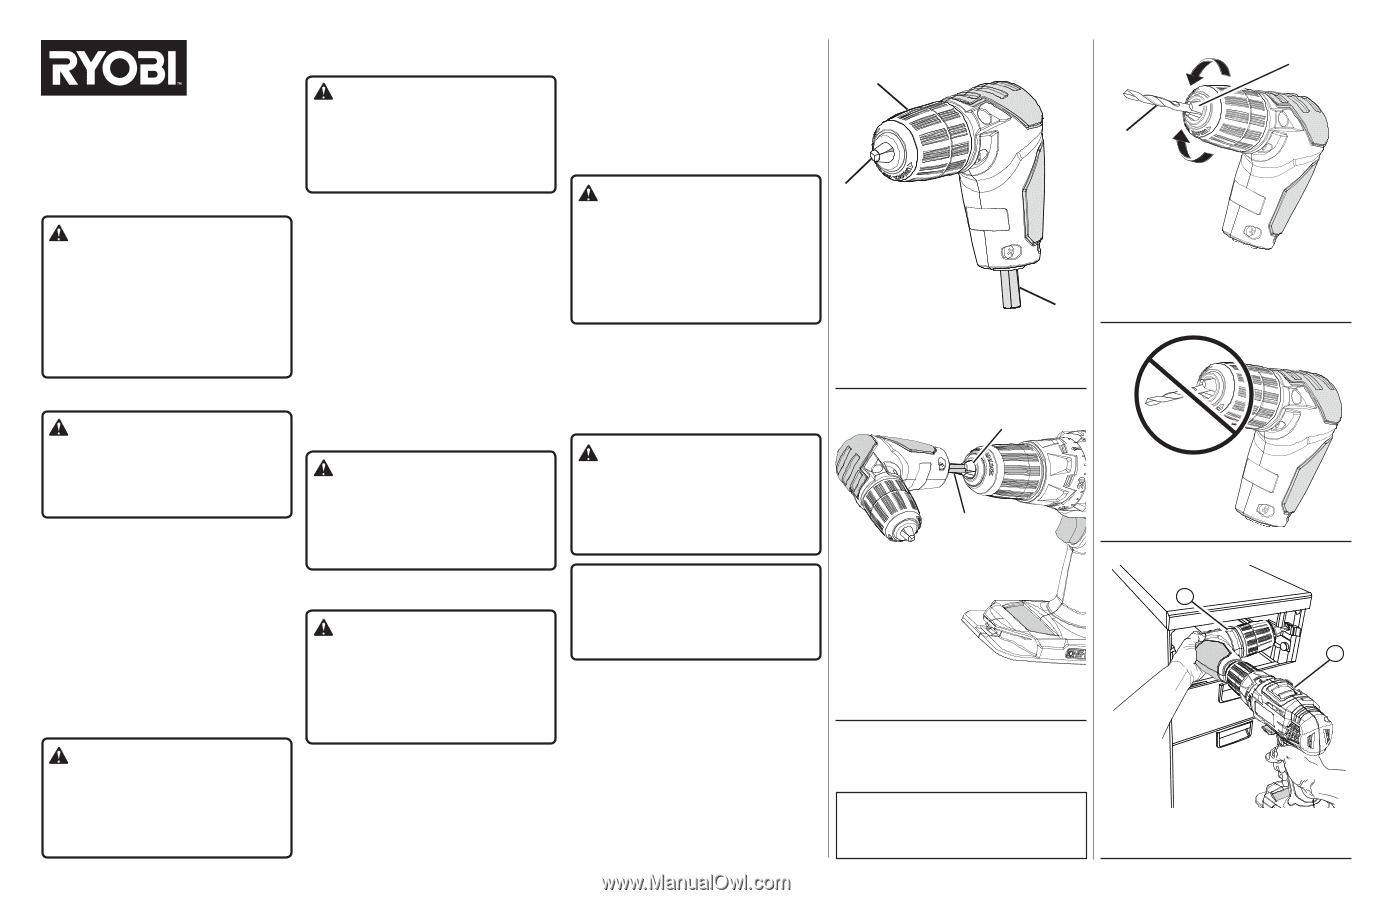
OPERATOR'S MANUAL 3/8 in. RIGHT ANGLE DRILL ATTACHMENT A10RAA1 WARNING: To reduce the risk of injury, do not attempt to use this product until you have read thoroughly and understand completely this operator's manual and the operator's manual for any power tools used. Always wear eye protection with side shields marked to comply with ANSI Z87.1. Ensure compatibility and fit before using this accessory. Do not use this accessory if a part is damaged or missing. CALIFORNIA PROPOSITION 65 WARNING: This product and substances that may become airborne from its use may contain chemicals, including lead, known to the State of California to cause cancer, birth defects, or other reproductive harm. Wash hands after handling. PACKING LIST Right Angle Drill Attachment and Operator's Manual. INSTALLING THE DRILL ATTACHMENT See Figures 1 and 2. The right angle drill attachment can be installed onto any drill with a 3/8 in. or larger chuck. Lock the switch trigger on your drill, and either remove the battery pack or unplug the power source. Open or close the chuck jaws until the opening is slightly larger than the drill attachment's shaft. Raise the front of the drill slightly, and insert the drill attachment's shaft. WARNING: Make sure to insert the shaft straight into the chuck jaws. Do not insert the shaft into the chuck jaws at an angle, then tighten. This could cause the drill attachment to be thrown from the drill, resulting in possible serious personal injury or damage to the chuck. Close and tighten the chuck jaws. Make sure that the jaws are contacting the flats of the shaft. WARNING: Do not hold the chuck sleeve with one hand and use the power of the drill to tighten the chuck jaws on the bit. The chuck sleeve could slip in your hand, or your hand could slip and come in contact with the rotating bit. This could cause an accident resulting in serious personal injury. To remove the drill attachment, lock the switch trigger and open the chuck jaws. INSTALLING / REMOVING BITS See Figures 3 and 4. The arrows on the keyless chuck indicate which direction to rotate the chuck sleeve to tighten or release the drill bit. Only use twist or spade bits that are 1-1/4 in. or smaller. Do not use a wrench to tighten or loosen the chuck jaws. To install bits, lock the switch trigger. Open or close the chuck jaws until the opening is slightly larger than the bit size you intend to use. Raise the front of the drill slightly and insert the drill bit. WARNING: Make sure to insert the drill bit straight into the chuck jaws. Do not insert the drill bit into the chuck jaws at an angle, then tighten. This could cause the drill bit to be thrown from the drill, resulting in possible serious personal injury or damage to the chuck. Rotate the chuck sleeve to close and tighten the chuck jaws. WARNING: Do not hold the chuck sleeve with one hand and use the power of the drill to tighten the chuck jaws on the drill bit. The chuck sleeve could slip in your hand, or your hand could slip and come in contact with the rotating drill bit. This could cause an accident resulting in serious personal injury. To remove bits, lock the switch trigger and open the chuck jaws. DRILLING / DRIVING SCREWS See Figure 5. Set the speed and direction of rotation (forward or reverse) for your drill. Secure the material to be drilled in a vise or with clamps to keep it from turning as the drill bit rotates. Hold the drill and drill attachment firmly and place the bit at the point to be drilled, or where the screw is to be driven. NOTE: When using the drill attachment, use both hands. Hold the drill attachment with one hand and the drill with the other. WARNING: Do not drive a screw where there is likely to be hidden wiring behind the surface. Contact with a "live" wire will make exposed metal parts of the tool "live" and possibly shock the operator. If you must drive a screw where hidden wire may be present, always hold tool by insulated gripping surfaces (handle) when performing the operation to prevent a shock to the operator. Depress the switch trigger on the drill to begin operation. Move the bit into the workpiece, applying only enough pressure to keep the bit cutting or driving the screw. Do not force the drill attachment or apply side pressure to elongate a hole. Let the tool do the work. WARNING: Be prepared for binding at bit breakthrough. When these situations occur, drill has a tendency to grab and kick opposite to the direction of rotation and could cause loss of control when breaking through material. If not prepared, this loss of control can result in possible serious injury. NOTICE: This product is not intended for prolonged use. Extended periods of operation can cause heat damage to the tool's housing. Allow the tool to cool periodically during periods of continuous use. With hard, smooth surfaces, use a center punch to mark the desired hole location. This will prevent the bit from slipping off-center as the hole is started. When drilling metals, use a light oil on the drill bit to keep it from overheating. The oil will prolong the life of the bit and increase the drilling action. If the bit jams in the workpiece or if the drill attachment stalls, stop the tool immediately. Remove the bit from the workpiece and determine the reason for jamming. FIG. 1 B A C A - Chuck jaws (mors du mandrin, mordazas del portabrocas) B - Keyless chuck (mandrin sans clé, portabrocas de apriete sin llave) C - Shaft (arbre, eje) FIG. 2 A B A - Chuck jaws (mors du mandrin, mordazas del portabrocas) B - Shaft (arbre, eje) ONE WORLD TECHNOLOGIES, INC. 1428 Pearman Dairy Road, Anderson, SC 29625 Phone / Téléphone / Teléfono 1-800-525-2579 www.ryobitools.com FIG. 3 B A C D A - Chuck jaws (mors du mandrin, mordazas del portabrocas) B - Unlock (release) [unlock (libération), unlock (aflojar)] C - Drill bit (foret, broca) D - Lock (tighten) [lock (blocage), lock (apretar)] FIG. 4 WRONG INCORRECT FORMA INCORRECTA FIG. 5 A B A - Drill attachment (accessoire de perceuse, accesorio del taladro) B - Drill (perceuse, taladro)
-
 1
1 -
 2
2
 |
 |