Ryobi P746 User Manual - Page 6
Operation
 |
View all Ryobi P746 manuals
Add to My Manuals
Save this manual to your list of manuals |
Page 6 highlights
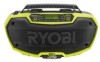
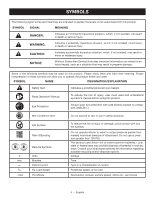
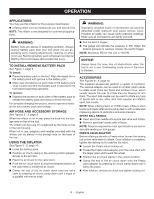
OPERATION APPLICATIONS You may use this inflator for the purpose listed below: Inflating items such as motorcycle, car, and bicycle tires NOTE: The inflator is not designed for commercial applications. WARNING: Battery tools are always in operating condition. Always remove battery pack from your tool when you are assembling parts, making adjustments, cleaning, or when not in use. Removing battery pack will prevent accidental starting that could cause serious personal injury. TO INSTALL/REMOVE BATTERY PACK See Figure 1, page 9. To install: Place the battery pack in the tool. Align the raised rib on the battery pack with groove in the battery port. Make sure the latches on each side of the battery pack snap in place and that the battery pack is secured in the tool before beginning operation. To remove: Depress the latches on both sides of the battery pack to release the battery pack and remove it from the tool. For complete charging instructions, see the operator's manuals for your battery pack and charger. AIR HOSE AND ACCESSORY STORAGE See Figures 2 - 3, page 9. When the inflator is not in use, press the hose into the storage area on top of the tool. The inflator can be hung on a pegboard by the holes on top of the tool housing. When not in use, adaptors and needles provided with the inflator can be placed in the storage area on the base of the tool. USING THE INFLATOR See Figure 4 - 5, page 10. Install the battery pack. Position air chuck clamp in the unlock position perpen- dicular to the air hose. Place the air chuck on the valve stem. Push the air chuck down so that the threaded section of the valve stem is inside the air chuck. Clamp the end of the air chuck down onto the valve stem by pressing air chuck clamp down until it stops or is parallel with the air hose. WARNING: Improperly attached hoses or accessories can become detached under pressure and cause serious injury. Possible air leaks can cause faulty pressure readings. Make sure all connections are tightly secured. Pull the switch trigger. The gauge will indicate the pressure in PSI. When the desired pressure is reached, release the switch trigger. NOTE: Maximum PSI for this unit is 150 PSI. NOTICE: Always leave the hose free of obstructions when the tool is not in use. Overheating could occur if the hose is blocked. ACCESSORIES See Figures 6 - 8, page 10. The supplied accessories perform a variety of functions. The tapered adaptor can be used on smaller pinch valves to inflate small items like floats and children's toys, which usually require the user to inflate them by blowing air into them. The sport ball needle can be used to inflate any type of sports ball or any other item that requires an inflation sport ball needle. NOTE: When inflating items of 10 PSI or less, inflate in short bursts and check after each burst by feel or with a calibrated measuring device to determine accurate pressure. SPORT BALL NEEDLE: Insert sport ball needle into sports ball valve and inflate. Remove sport ball needle after inflation. NOTE: Pressure required for most sports balls is too low for accurate reading on tool gauge. PRESTA VALVE ADAPTOR Before inflating a tire with a Presta valve, loosen the locking nut on the valve stem to inflate. Once inflation is complete, tighten the locking nut to seal the tire valve. Loosen the Presta valve locking nut. Thread the Presta valve adaptor onto the valve stem with the larger open end toward the wheel. Position the air chuck clamp in the unlock position. Clamp the end of the air chuck down onto the Presta valve adaptor by pressing air chuck clamp down until it locks into place. After inflation, remove air chuck and tighten locking nut. 6 - English
-
 1
1 -
 2
2 -
 3
3 -
 4
4 -
 5
5 -
 6
6 -
 7
7 -
 8
8 -
 9
9 -
 10
10 -
 11
11 -
 12
12 -
13
-
14
-
15
-
16
-
17
-
18
-
19
-
20
-
21
-
22
-
23
-
24
 |
 |
